• Steel Soldiers now has a few new forums, read more about it at: New Munitions Forums!

  • Microsoft MSN, Live, Hotmail, Outlook email users may not be receiving emails. We are working to resolve this issue. Please add support@steelsoldiers.com to your trusted contacts.


Restoration of FAV #0010

Mogman

Moderator
Staff member
Moderator
Steel Soldiers Supporter
5,808
8,063
113
Location
Papalote, TX
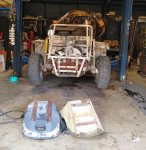
Now that the paperwork seems to be behind me it is time to start restoration of serial number 10.

The plan is to to strip it down to the bare chassis, strip and repaint everything, I plan to re-use every serviceable part not to save money but to keep it as original as possible.

The front end is in fair shape and is really easy to remove so the plan is to clean it up and use as is for now, of course looking it over very carefully and rebuilding the brakes/bearings etc.

Speaking of brakes all the components will be re-built/inspected and or replaced.

The trans will get a "refresh" with new seals, gaskets etc, very happy to have the original modified transmission.

The engine will get a complete re-build, it looks to be in fair condition, very clean inside and seems to have good compression, if it were any other project I would see if it would run but not on this one, I will re-use any serviceable part I can and anything that needs to be replaced will be the same spec as it has now, again very lucky to have at least the engine it had when sold by DRMO if not the original.

I will "blueprint" the engine during disassembly, checking cam timing/duration/lift, bore/stroke, CC the heads, check deck height and calculate compression ratio etc.

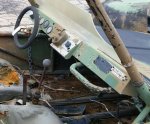
I plan on taking it back to when it was with the 9th infantry division circa 1982-3 after the first round of modifications, this includes removing ALL the bastardization that was done by the DOE in Nevada, restoring the chassis and dash they cut out and removing that hideous weapons mount they added.
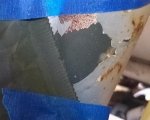
It will be painted in MERDC colors, many restorations I see are in CARC which is fine but at least #10 was originally painted in MERDC as I have found that the first layer over the original black was 34079, the picture is close but to the eye it is an exact match.

I actually need a few days to clean/clear the shop before all the butt holes and elbows get to thrashing around, I did remove the seats today which are trash.

I am extremely fortunate that this sat for the last 25-30 years or more in Nevada, many FAVs have serious corrosion issues with the chassis, chrome moly may sound like a metal that would not easily rust but it is actually very happy to rust even though the black coating the factory gave it originally I have only been able to remove with a propane torch, no paint stripper I have tried does anything to it.

I am going to deviate on the wiring, the Army in Ft Lewis modified and installed a M151 wiring harness and it is complete crap, they may have had some very good craftsmen in the Ft. Lewis "skunk works" (what the base personnel called the hanger where the FAVs were modified for Army use) but they were evidently all metal smiths and weapons experts, not a decent electrician among them. that harness is the ugliest bastardization I have ever seen, I will build a proper harness with all asphalt loom like I did on the DuraVee...

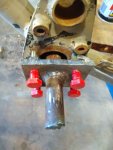
I also I think I have actually figured out why the former owner put so few miles on it, one of the half shaft boots was bad and the CV joint burned up, when he tried to replace it he busted off two of the flange bolts and that is evidently where all the fun stopped.

EDIT the chassis may actually be "tweaked" the right front lift pad lacks an inch or so from touching the bottom of the chassis and the right basket has over an inch more clearance to the lift arm than the left side, they beat these things up pretty good...
 

Attachments

Last edited:

Mogman

Moderator
Staff member
Moderator
Steel Soldiers Supporter
5,808
8,063
113
Location
Papalote, TX
I did get to spend a couple hours on the FAV today, removed the shocks,floor pans and the front bumper (which is a mess).
I found many rounded off nut/bolt heads, many bolts that were too long or too short for the application.
I re-positioned the FAV on the lift and can get it to a perfect height to eyeball the chassis from stem to stern and even though I think it is tweaked a little bit it does not look like much, of course once it is completely stripped it will be checked!
IMG_20220909_155903630.jpg
I would like to know what the thinking here was when they butchered the dash...
IMG_20220909_165439726.jpg
 

Mogman

Moderator
Staff member
Moderator
Steel Soldiers Supporter
5,808
8,063
113
Location
Papalote, TX
I did get to put in a few hours today, she is looking pretty sparse, lots of blaster and patience, no big surprises or disappointments.
There are some stuff that will need to be straightened and some drilling and tapping, for example the "dog-bones" on the sway bar have 1/2" holes but they were mounted with 7/16 bolts and the threads they mount to are wallowed out, Simple Simon says just drill them out and tap them for 1/2"!!
Sparse.jpg
 

Mogman

Moderator
Staff member
Moderator
Steel Soldiers Supporter
5,808
8,063
113
Location
Papalote, TX
Well I hoped that I would be able to report that I had the FAV's chassis completely stripped but the torsion bars are stuck and I am at the point that destructive measures may need to be taken, I am going to give it a few days more of soaking before I continue, worst case scenario I will have to replace the spring plates and torsion bars, nether should be a problem and I am about 100% convinced the torsion bars are much to heavy for such a light vehicle anyway.
Spring plate.jpg
There are a few things the chassis will need before going to be blasted, the beam connections on the front of the chassis are pretty beat up, and all of the beam clamps need to be replaced.
Then there is a couple items like this one, someone at the DOE installed a mount that needed three holes, the two rear ones are not too big of a deal as that particular tube has a drain hole, the front one however does not so any water that has seeped in over the years would have accumulated at the bottom of the A pillar and would be causing corrosion so I will have to drill a small inspection hole at the bottom of that piece of tubing and inspect before filling all those holes.
IMG_20220917_185140977.jpg
Actually the same thing must be done to the drivers side of the A pillar as when the military added the BUFF's (big ugly fat fenders) they needed to raise the rear view mirror and did a rather poor job of it, using a TEK screw driven into the A pillar, A ton of bent tabs and other small items to deal with also.
This mod was probably done buy the DOE and certainly was not done buy the same personnel that did the first round of mods at the "skunk works"
IMG_20220917_184938174.jpg
I did get the dash torn down so the roof and dash can go to my metal guy this week to be restored, I will put the original bastardized wiring harness in a box and whomever buys the FAV at the estate sale is welcome to it.
IMG_20220917_175402278.jpg
That is one ugly harness!
IMG_20220917_185341283.jpg
All of the Dzus springs and self ejecting buttons will have to be replaced.
 
Last edited:

Mogman

Moderator
Staff member
Moderator
Steel Soldiers Supporter
5,808
8,063
113
Location
Papalote, TX
Well I used some heat and got the spring plate off of the torsion bar, as I suspected at 27mm this bar is WAY to heavy for a vehicle that weighs 100lb less than a bug, I am thinking 22-23MM would be fine, so this leaves me the option to cut off the splined section and weld up a thick plate with a 27mm hole in the center and some 1/2" holes around the perimeter to push against the chassis!
IMG_20220919_093317695.jpg
There is a suspicious white "residue" on the inside of the splines, I wounder if someone used some type of epoxy etc. on these, they are not supposed to be a press fit on ether end...
 
Last edited:

Mogman

Moderator
Staff member
Moderator
Steel Soldiers Supporter
5,808
8,063
113
Location
Papalote, TX
WE WILL ENDEAVOR TO PERSEVERE!!!!!!

Man this was a fight to the finish! bent the pull plate to its limit.
IMG_20220920_092907081.jpg
Then I heated the adjuster plate where it was stuck for the second time, allot of heat, it started to go tink, tink, tink then a small bang!
So I straightened out the pull plate by heating it and using a crescent wrench to get it straight and did the best I could to harden it by chilling it with motor oil, then with allot more heat (and swapping out the spare acetylene bottle) it moved a little more, about 1/2-5/8" total.
I let the center cool down and then after lunch I went out to straighten the pull plate again I decided to heat it and just use a hammer to bend it back into shape, I was a little curious if the bar would go back in with such relatively little effort and it did.
So after that cooled I pulled it back out, it was not happy about moving at first, lots of bang, bang. bang, but it came out about as far this time without distorting the pull plate, drove it in and pulled it out 5-6 times the whole time soaking it in Blaster each time going easier, then put in a longer bolt and it popped right out!
IMG_20220920_161633243_HDR.jpg
Now I get to work the drivers side, lessons learned, use a 3/4" pull plate instead of a 3/8 plate, use a backing plate against the chassis, will reduce the bending and damage done with the pull bolts (gouging) I will also have the luxury of being able to use a bar through the passenger side to beat the crap out of and help drive out the drivers side torsion bar....
Tonight it was Duck Farts for ALL!!
 
Last edited:

Mogman

Moderator
Staff member
Moderator
Steel Soldiers Supporter
5,808
8,063
113
Location
Papalote, TX
OK, NOW I can say the chassis is fully stripped!
The second torsion bar did not come out any easier than the first, it only seemed that way because I was better equipped to do the job, no problem bending the 3/4" pull plate and the added luxury of being able to beat on the other end made it rather quick...
OUT.jpg
 

Mogman

Moderator
Staff member
Moderator
Steel Soldiers Supporter
5,808
8,063
113
Location
Papalote, TX
They are available, there are three basic bars for the VW series, this uses the longest which is 26 9/16"
27mm was just too dang heavy I am thinking a 23-24MM would be plenty, the force needed gets exponentially higher with width.
I am seeking advice from the off road guys, but this thing will never see serious off roading again.
 

Mogman

Moderator
Staff member
Moderator
Steel Soldiers Supporter
5,808
8,063
113
Location
Papalote, TX
I bought a set of used Porsche 944 torsion bars which are 24MM for 39.15 SHIPPED!
To show the difference the bug weighs 1700lb and used 22MM bars, the fastback weighs 2200lb and used 23mm bars, the 944 weighs in at 2800lbs and uses 24MM bars.
The FAV weighs in at 1640lb and had 27mm bars, 24MM may be stiff but nothing like the 27MM bars...
And changing them in the future should not be a big deal especially right away while the Never-seize is still fresh, I cleaned up one of the old bars and have been working it in and out of both sides
 

Mullaney

Well-known member
Steel Soldiers Supporter
Supporting Vendor
7,249
18,774
113
Location
Charlotte NC
I bought a set of used Porsche 944 torsion bars which are 24MM for 39.15 SHIPPED!
To show the difference the bug weighs 1700lb and used 22MM bars, the fastback weighs 2200lb and used 23mm bars, the 944 weighs in at 2800lbs and uses 24MM bars.
The FAV weighs in at 1640lb and had 27mm bars, 24MM may be stiff but nothing like the 27MM bars...
And changing them in the future should not be a big deal especially right away while the Never-seize is still fresh, I cleaned up one of the old bars and have been working it in and out of both sides
.
Nice! At least this way you will have a ready source for those two parts. I'm really looking forward to your build.
 

Mogman

Moderator
Staff member
Moderator
Steel Soldiers Supporter
5,808
8,063
113
Location
Papalote, TX
Went and picked up the roof and dash from my metal guys, as usual they did a good job, I actually expected them to cut the roof off square and put a piece in, seems that would have been easier but they installed a patch to match the mutilation done by the DOE.
The dash looks good, they also built a "new" dash, he said I was paying for the aluminum anyway, they even finished off the ends like the original.
The $39 Porsche rear torsion bars also came in and look like they will fit just fine, they even marked which side they were removed from, not sure that is important but I will install them as they were removed anyway.
BACK TO WORK!
Dash.jpg
IMG_20220929_145318596.jpg
 

Mogman

Moderator
Staff member
Moderator
Steel Soldiers Supporter
5,808
8,063
113
Location
Papalote, TX
OK so I like to think I am a smart guy but sometimes I am a total D.A., went out to start grinding the welds on the roof, put on safety goggles, hearing protection and a brand new course flappy wheel on my 4 1/2" grinder, this is certainly not my first rodeo with a grinder, the very first thing I did was remove all the skin for almost the entire length of my left index finger, NO gloves! Geez I am such a D. A.!! (actually I feel lucky for such a total D. A. it could have been much worse)
And this is not the first time even this week, yesterday I was cutting some metal with a torch and had the WRONG gloves on, I was wearing mechanics gloves, the molten stream went awry and went right through my glove, what made it worse was the melted synthetic material of the glove sticking to my finger, same finger, I have no idea what is wrong with me, I have been doing this stuff for 50 years, maybe that IS what is wrong with me....
Don't be a D. A. like me wear gloves AND the PROPER gloves!!
 

Mogman

Moderator
Staff member
Moderator
Steel Soldiers Supporter
5,808
8,063
113
Location
Papalote, TX
The dash come out nice, not perfect but is was hand made so it was not perfect to begin with.
Got the wind knocked out of my sails a little bit today when I discovered my favorite "will cut to any size" iron shop only carried pipe not DOM tubing.
I did find some online and went ahead and bought chrome moly, (what the chassis is made of) 1 1/2" to repair the chassis and 1" to reproduce the missing passenger hand hold, unfortunately my "metal guys" cannot bend the 1" in the dimensions I need, they normally do not deal with such small trivial stuff as what I bring in but try their best to fix me up when they can, they are repairing the broken welds on the side baskets, welding up some BS holes the DOE put in the rear basket to hang a crap gun rack and reproducing the mangled front skid plate (he did ask if I needed it mangled like the original, LOL)
Old dash.jpg
Dash (2).jpg
EDIT, I need to get the damage done buy the DOE to the dash and roof areas of the chassis and the roof and dash first as it looks like the same company that is going to blast all the parts that will not fit in my blast cabinet is also going to paint the chassis and all of those parts as it looks to just be more efficient, they have all the equipment on hand to do the job. they do allot of blasting/painting of trailers so this should be right up their alley!
 
Last edited:

Mullaney

Well-known member
Steel Soldiers Supporter
Supporting Vendor
7,249
18,774
113
Location
Charlotte NC
The dash come out nice, not perfect but is was hand made so it was not perfect to begin with.
Got the wind knocked out of my sails a little bit today when I discovered my favorite "will cut to any size" iron shop only carried pipe not DOM tubing.
I did find some online and went ahead and bought chrome moly, (what the chassis is made of) 1 1/2" to repair the chassis and 1" to reproduce the missing passenger hand hold, unfortunately my "metal guys" cannot bend the 1" in the dimensions I need, they normally do not deal with such small trivial stuff as what I bring in but try their best to fix me up when they can, they are repairing the broken welds on the side baskets, welding up some BS holes the DOE put in the rear basket to hang a crap gun rack and reproducing the mangled front skid plate (he did ask if I needed it mangled like the original, LOL)
View attachment 881042
View attachment 881043
EDIT, I need to get the damage done buy the DOE to the dash and roof areas of the chassis and the roof and dash first as it looks like the same company that is going to blast all the parts that will not fit in my blast cabinet is also going to paint the chassis and all of those parts as it looks to just be more efficient, they have all the equipment on hand to do the job. they do allot of blasting/painting of trailers so this should be right up their alley!
.
It could be worth a trip out to a local Northern Tool.
They sell a manual pipe bender. Roughly $150

Don't know if you have even bent electrical conduit or not, but there is a chart that helps you "get it right" when you try to make proper bends. I'm just guessing - and thicker wall tubing has to impact space between bends - but it could be a start. Sometimes just seeing it in person is better than a picture on a website.

NorthernTool Pipe Bender.jpg

Oh, and by the way that dash looks pretty neat too!
Cool to have friends with metal skills...
 
Last edited by a moderator:

Mullaney

Well-known member
Steel Soldiers Supporter
Supporting Vendor
7,249
18,774
113
Location
Charlotte NC
The problem is the radius is so small, I have a bender like that and it will not come close, this kind of radius needs a mega buck mandrill bender.
.
Ahhh... Yes sir. Without the right tools to do that bend, buying "pre-bent corners" that you will have to weld is about the only other choice. That would require good welding and lots of grinding and "making it purty". I have seen them before and I think @chucky very recently had a post about buying them.
 
Top
AdBlock Detected

We get it, advertisements are annoying!

Sure, ad-blocking software does a great job at blocking ads, but it also blocks useful features of our website like our supporting vendors. Their ads help keep Steel Soldiers going. Please consider disabling your ad blockers for the site. Thanks!

I've Disabled AdBlock
No Thanks