-
Steel Soldiers now has a few new forums, read more about it at: New Munitions Forums!
REV winch options
- Thread starter thoner7
- Start date

More options
Who Replied?- 376
- 579
- 93
- Location
- Cleveland,TN
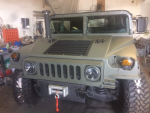
Doesn't look legit to me............The Hummer Supply sent me this pic as "proof" it will fit. But i noticed round airlift hooks in the hood. Did all the ECVs go to the beefier squared off hooks, or only the armoured ones?View attachment 905430
- 3,204
- 4,842
- 113
- Location
- Olympia/WA
Serial number break for the heavier airlift bracket is 246890. Below that is old style, after is new. That puts the truck pictured as either an early truck, or someone's modified an older truck.The Hummer Supply sent me this pic as "proof" it will fit. But i noticed round airlift hooks in the hood. Did all the ECVs go to the beefier squared off hooks, or only the armoured ones?
Just from the picture, all you can say for certain is someone has a milemarker pull strap on a hook and cable that sticks out of the rollers. No way to tell if it's really a milemarker SEC12 or if it's a Harbor Freight 5k winch from just the image.
- 4,624
- 4,642
- 113
- Location
- Brentwood, Calif
MM winch uses its own proprietary winch plate, that is an OEM front bumper plate
So I ended up going the Sherpasteed route with a black dog customs front plate. 17,000# rating and synthetic rope. The Black Dog plate is the same dimensions as oem and super hard steel- i couldn’t sand it when prepping for paint.
The Mile Marker tho, I am now confident will fit. This is not the military’s unit, and is fit by cutting and drillling the OEM plate for the winch.
PS Black Dog Customs is a great shop and very friendly and helpful.
The Mile Marker tho, I am now confident will fit. This is not the military’s unit, and is fit by cutting and drillling the OEM plate for the winch.
PS Black Dog Customs is a great shop and very friendly and helpful.
M1165A1
Well-known member
- 448
- 921
- 93
- Location
- The High Country, CO
Just to rehash some of the wiring issues. The supplied wiring on the winch is short as Sherpa assumes most batteries are in the front of the vehicle.
If you mount the control box on the back of the winch, as recommended, the supplied wires won't quite make it to the starter which is the nearest place I could figure out you can safely tap power.
So I purchased replacement supply and ground wiring in the form of Ancor marine grade cable (link).
The safest routing is up and over the front shafts etc, which took a long run of cable. You could run it without taking it up and over but I got very nervous about damage from moving parts of the vehicle and also road/off road debris. Once you pass the front shafts, you can run the wiring on top of the right frame rail and it seems pretty safe there. Then go to either the starter or battery. I took the hot to the battery and the ground to the starter ground.
That took about 15 feet of cable run, so I upsized from 4 AWG (25mm2) to 2 AWG to have a little bigger cable. My EE friend ran the numbers and swears that provides a good margin of safety in terms of cable heating and power loss. I emailed Sherpa and the tech there was sure that the 25mm2 would also work on 24 volt supply. Still better safe than sorry and the cost difference is minimal if you are replacing the wiring entirely.
The winch control box can be opened and the supply wire (red) be replaced directly at the power solenoid and routed out the existing wiring location. The ground runs from the winch body and no work is needed to swap that out. Make sure to re-seal the control box with RTV to ensure water resistance. You will also want to put RTV on the winch electrical connections to keep out moisture.
An alternative that would be cheaper is to splice Sherpa's supplied wiring with a much shorter length of cable. That marine cable is expen$ive! and this would save a lot, but you will have splices as an additional failure point. But a correctly sized underground splice that is heat shrink wrapped could work, I suppose - I don't have a lot of confidence in that.
Also make sure to protect the cable with loom. I used this stuff:

It's pretty abrasion resistant. The insulation on the marine wiring is quite tough and waterproof in its own right. Make sure to wrap the loom with electrical tape or harness tape every 6" or so. Don't use the junky split plastic stuff, it's not the place to stint.
You will also need some lugs for the cable ends, heat shrink to wrap the lugs.
I opted for a disconnect switch rather than a fuse. A fuse seems like an OK idea, but make sure to carry spares and a jumper in case you get a tough recovery.
If you mount the control box on the back of the winch, as recommended, the supplied wires won't quite make it to the starter which is the nearest place I could figure out you can safely tap power.
So I purchased replacement supply and ground wiring in the form of Ancor marine grade cable (link).
The safest routing is up and over the front shafts etc, which took a long run of cable. You could run it without taking it up and over but I got very nervous about damage from moving parts of the vehicle and also road/off road debris. Once you pass the front shafts, you can run the wiring on top of the right frame rail and it seems pretty safe there. Then go to either the starter or battery. I took the hot to the battery and the ground to the starter ground.
That took about 15 feet of cable run, so I upsized from 4 AWG (25mm2) to 2 AWG to have a little bigger cable. My EE friend ran the numbers and swears that provides a good margin of safety in terms of cable heating and power loss. I emailed Sherpa and the tech there was sure that the 25mm2 would also work on 24 volt supply. Still better safe than sorry and the cost difference is minimal if you are replacing the wiring entirely.
The winch control box can be opened and the supply wire (red) be replaced directly at the power solenoid and routed out the existing wiring location. The ground runs from the winch body and no work is needed to swap that out. Make sure to re-seal the control box with RTV to ensure water resistance. You will also want to put RTV on the winch electrical connections to keep out moisture.
An alternative that would be cheaper is to splice Sherpa's supplied wiring with a much shorter length of cable. That marine cable is expen$ive! and this would save a lot, but you will have splices as an additional failure point. But a correctly sized underground splice that is heat shrink wrapped could work, I suppose - I don't have a lot of confidence in that.
Also make sure to protect the cable with loom. I used this stuff:

It's pretty abrasion resistant. The insulation on the marine wiring is quite tough and waterproof in its own right. Make sure to wrap the loom with electrical tape or harness tape every 6" or so. Don't use the junky split plastic stuff, it's not the place to stint.
You will also need some lugs for the cable ends, heat shrink to wrap the lugs.
I opted for a disconnect switch rather than a fuse. A fuse seems like an OK idea, but make sure to carry spares and a jumper in case you get a tough recovery.
Last edited:
- 3,204
- 4,842
- 113
- Location
- Olympia/WA
So for milemarker mounting, I put the SEC12 winch onto the hydraulic winch mount plate from milemarker, and bolt holes all lined up perfectly, so if the A2 winch plate bolts to the hydraulic, the electric is the same footprint.So I ended up going the Sherpasteed route with a black dog customs front plate. 17,000# rating and synthetic rope. The Black Dog plate is the same dimensions as oem and super hard steel- i couldn’t sand it when prepping for paint.
The Mile Marker tho, I am now confident will fit. This is not the military’s unit, and is fit by cutting and drillling the OEM plate for the winch.
PS Black Dog Customs is a great shop and very friendly and helpful.
M1165A1
Well-known member
- 448
- 921
- 93
- Location
- The High Country, CO
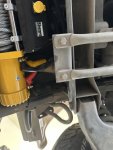
No wonder I’m so confused- yours is different than mine. My blue and yellow post are in opposite positions to yours.
Attachments
-
407.6 KB Views: 20
M1165A1
Well-known member
- 448
- 921
- 93
- Location
- The High Country, CO
That's weird - my winch is pretty new, only 6 months old. They must have altered. Or it might be because you got the synthetic. (That's definitely more practical, but doesn't look as good as steel cable!)
Can you rotate the motor like you can the gearbox? That might solve your fitment issues.
Can you rotate the motor like you can the gearbox? That might solve your fitment issues.
- 114,408members
- 167,298threads
- 2,355,054posts
- 1,284online users


