• Steel Soldiers now has a few new forums, read more about it at: New Munitions Forums!

  • Microsoft MSN, Live, Hotmail, Outlook email users may not be receiving emails. We are working to resolve this issue. Please add support@steelsoldiers.com to your trusted contacts.


Reviving a parked M1009

HeisenBob

Active member
103
31
28
Location
Norman, OK
Hey guys, I'm new here. I inherited an M1009 from my late father and it's been parked for about 2.5 years at my grandparents house. They live in the country so most likely there's going to be a few nests under the hood. I'm planning on making a trip in the next week or two to try and get this beast going again. My end goal is to drive it home to my house so I can work on it in my driveway. If i can't drive it home, I have a car hauler I can load it on but I'd have to rent a truck from someplace to get it home. I have a 2000 4runner with the v6 and it's max towing capacity is 5000lbs. So that won't handle it. I'm putting a list of things together that I need to check to get it running. I'm asking the group for advice on anything I should check out, tools to take, spare parts, etc. to get this thing on the road and drive it 60 miles home. Please add anything you think might be useful. I really appreciate the feedback.

Background on the truck: my brother put two new batteries in the truck about 2 years ago and was able to get it started. He drove it into town and put diesel in the tanks and then parked it in the driveway. Last year, I attempted to charge the batteries and jump start it off of a 2008 F350. I can't remember if any dash lights came on or not, but the truck wouldn't crank or make any noises that I remember. So that's what I'm starting with.

Diagnostics/Prep to Drive:
* check all fluid levels - top off as needed
* check all electrical connections for rust/loose or broken wires - repair as needed
* check resister under the dash - I've read this as a suggestion
* check batteries - either replace or charge them individually - I'll have to remove and take them to Napa to get checked out or invest in a battery tester
* check the starter relay - I think that's what it's called - I'll have to do some research on this and what to look for
* ?????

Once I can get it to turn over:
* prime fuel system as needed - probably need to replace the fuel filter as well
* maybe drain the tank and put fresh diesel in? or can I just put a fuel stabilizer/treatment in the tank?
* check the glow plugs to ensure they are getting power - if it won't start
* ?????

Tools Needed:
* socket wrench set
* open end wrenches
* volt meter
* test light
* wire clippers/connectors/electrical tape - etc.
* ??????


Thanks again for your help!!!!
 

Barrman

Well-known member
5,132
1,505
113
Location
Giddings, Texas
Welcome to the fun. An actual location in your profile will help people near you know they are close to you.

If the truck ran 2 years ago. Chances are it will fire right up like it was run yesterday if you have two good batteries. Two load tested to be at least 800 CCA batteries each. Not just volt meter tested for 12 volts. That distinction is very important to keep and mind. Only after you have that can you begin to diagnose any issues with starting.
 

M37M35

Well-known member
Steel Soldiers Supporter
572
648
93
Location
East Central Oklahoma
Looks likes you've got things pretty well covered.
If it was me, I'd clean the rodent nests out and fix whatever wires and hoses the 🤬🤬🤬🤬 rats destroyed, check all the fluids and put new batteries in, and I bet it will fire up without much else.
 

nyoffroad

Well-known member
895
601
93
Location
Rochester NY
Well there goes my advice, I was going to say pull the batteries and take them home and charge them overnight and then load test. Oh well new ones are even better. Cangrats!
 

cucvrus

Well-known member
11,263
9,552
113
Location
Jonestown Pennsylvania
My best luck on the V belts is to drive the truck to the parts store with the old squeaky/squealing belts and walk in and out with belts that fit as tight as possible when the alternators are in a fully collapsed position. I even go as far as turn the alternator with a wrench to get the belts on. Tighten them normally and life is happy. I hate when you get a new belt and it is out at the end or near the end of full adjustment the first time on. Worked for me for 25 + years on CUCV's. Back in the day the GM belts were available and seemed to give the best results. I still see a CUCV on occasion with the original belts still in place. Mostly the Power Steering belt. Good Luck. Gates makes some green fleet power belts that work if you can get the right size. I have used a few. Not to be confused with lawn mower belts. Be Safe. Take Care.
 

HeisenBob

Active member
103
31
28
Location
Norman, OK
My best luck on the V belts is to drive the truck to the parts store with the old squeaky/squealing belts and walk in and out with belts that fit as tight as possible when the alternators are in a fully collapsed position. I even go as far as turn the alternator with a wrench to get the belts on. Tighten them normally and life is happy. I hate when you get a new belt and it is out at the end or near the end of full adjustment the first time on. Worked for me for 25 + years on CUCV's. Back in the day the GM belts were available and seemed to give the best results. I still see a CUCV on occasion with the original belts still in place. Mostly the Power Steering belt. Good Luck. Gates makes some green fleet power belts that work if you can get the right size. I have used a few. Not to be confused with lawn mower belts. Be Safe. Take Care.
Glad you posted this because I saw a similar response in my search of the threads and I was going to search it out and reply. After loaded the truck on a trailer to head home, I stopped at a parts store and did exactly as you suggested. I got a belt that would only fit by using a flat head screw driver and me turning the alternator pulley at the same time to get it on. This sucker was tight. Well, when I got home, I unloaded the truck under its own power and now the power steering pump squeals. I believe the belt I put on routes to the power steering pump. The other belts seem fine, I’ll have to double check and make sure they aren’t loose but they didn’t squeak before I put the right belt on. Any suggestions?
 

cucvrus

Well-known member
11,263
9,552
113
Location
Jonestown Pennsylvania
May I suggest getting the power steering pump belt tight in the same way. Do it first and then size your Generator 1 belt after that one is good and tight. Do NOT pry on the pump reservoir. Use the shaft or the bottom adjusting slot bracket area as a pry point. Poor design. Could have added a square point that was usable not concealed behind the pulley on the failure plagued bracket that is long since discontinued. Good Luck. Be Safe.
 

HeisenBob

Active member
103
31
28
Location
Norman, OK
May I suggest getting the power steering pump belt tight in the same way. Do it first and then size your Generator 1 belt after that one is good and tight. Do NOT pry on the pump reservoir. Use the shaft or the bottom adjusting slot bracket area as a pry point. Poor design. Could have added a square point that was usable not concealed behind the pulley on the failure plagued bracket that is long since discontinued. Good Luck. Be Safe.
Thanks. I’ll have to get under there and see where to make that adjustment.
 

cucvrus

Well-known member
11,263
9,552
113
Location
Jonestown Pennsylvania
Do make sure you have the lower support bracket from the pump to the block. It will break the bracket eventually if all the brackets are not in place. Like I mentioned. Many of these parts are getting harder to find. The PS bracket was a $12. item back in the day. But like many other things on CUCV's used parts are still hard to find and the knock off parts like engine brackets don't even exist. Good Luck. http://www.hillbillywizard.com/cucv-and-k30-parts/cucv-power-steering-pump-bracket/ Pricey but try running without one. Be safe.
 

HeisenBob

Active member
103
31
28
Location
Norman, OK
Do make sure you have the lower support bracket from the pump to the block. It will break the bracket eventually if all the brackets are not in place. Like I mentioned. Many of these parts are getting harder to find. The PS bracket was a $12. item back in the day. But like many other things on CUCV's used parts are still hard to find and the knock off parts like engine brackets don't even exist. Good Luck. http://www.hillbillywizard.com/cucv-and-k30-parts/cucv-power-steering-pump-bracket/ Pricey but try running without one. Be safe.
It's covered in oil and grime but the L shaped bracket on the underside of the power steering pump is there! That's a relief. I think I figured out my problem. I was routing the belt from the power steering pump strait to the alternator. I found a picture of how the belt should route and I noticed that there were two open grooves not being used: one on the water pump pulley and the second was on the crank shaft pulley. After further research, I think I found the right Gates belt number 7575. I'm going to order that on Amazon and hopefully it will work.
 

kallisti5

Member
78
23
8
Location
Texas
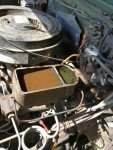
Check your brake fluid. Make sure it's either "all DOT3/4" or "all DOT5". These come with DOT5 which is uncommon enough now-a-days they can easily get "topped up" with DOT3/4 by unknowing mechanics.

I drove my "been serviced" M1009 home over a 120Mile butt-hole clenching night journey with lots of weird "random heavy pull to left or right when stopping" to find the following master cylinder the next morning.

brakes.jpg

Pretty sure that's what happens when someone "tops up DOT5 with incompatible DOT3/4"
While I was changing the master cylinder due to eaten away seals, I flushed it *WELL* with DOT3/4 and it has been fine ever since.
 

HeisenBob

Active member
103
31
28
Location
Norman, OK
Check your brake fluid. Make sure it's either "all DOT3/4" or "all DOT5". These come with DOT5 which is uncommon enough now-a-days they can easily get "topped up" with DOT3/4 by unknowing mechanics.

I drove my "been serviced" M1009 home over a 120Mile butt-hole clenching night journey to find the following master cylinder the next morning.

View attachment 799920

Pretty sure that's what happens when someone "tops up DOT5 with incompatible DOT3/4"
While I was changing the master cylinder due to eaten away seals, I flushed it *WELL* with DOT3/4 and it has been fine ever since.
I haven’t checked the brakes yet. Mine work fine for now. I can’t drive it on the road yet so I’m just working on it as I can in my driveway. How did you flush the brakes?

I’ve done this once on a 2000 F250 by jacking up the driver sideof the truck and cracking the passenger side rear bleeder and draining fluid into an old Gatorade bottle. then keep filling the reservoir and making sure it stayed full to keep air from entering the system. Once fluid was clear, I moved to driver side rear, repeat process....then pass front, then driver front.
 

kallisti5

Member
78
23
8
Location
Texas
I'd only bother with this is the fluid is *not* normal (aka not clear). If it's clear or mostly clear and is mostly full.. leave it alone and you'll be fine for your journey. If the truck stops fine on hard stops and doesn't swerve or do anything weird, you'll be ok for a single journey.

This process uses a lot of brake fluid and you'll likely have to replace all the rubber brake lines in the future if the truck has the original rubber brake lines on it. (before you do this, also look at the rubber brake lines for rips or leaks. There are two in the front (one at each wheel), and one in the rear under at the middle of the rear axle.

I haven’t checked the brakes yet. Mine work fine for now. I can’t drive it on the road yet so I’m just working on it as I can in my driveway. How did you flush the brakes?
Just pumping fluid through them. I purchased some speed-bleeders for the calipers which have a one way valve in them. Easier and cheaper than a vacuum pump if you don't have one.

The classic "two man" way is:

* Jack up a wheel.
* Remove the wheel (makes it a bit easier in a field)
* Replace all fluid in master cylinder with a turkey baster
* Attach a rubber line to each brake nipple

1 Open the nipple with a wrench.
2 Depress the brake pedal fully. *HOLD down*
3 Close the bleeder nipple with the wrench (aka... two person job)
4 Let go of brake pedal. Should return.
5 Check fluid in master cylinder. Ensure it stays topped up and does not suck air.
6 Repeat 1 - 6 a few times for each wheel

if you don't mind spending money, you could also take it to a brake place (this stuff is easier with a lift + a vacuum pump). Just bring your own DOT5 brake fluid... they'll try to use DOT3/4 because "who the hell uses DOT5?" :) There is a "correct order" of wheels to bleed based on line lengths. I think it's front left, front right, then rear tires.. but it doesn't matter *that much*.
 

cucvrus

Well-known member
11,263
9,552
113
Location
Jonestown Pennsylvania
Personally I would shop vac the fluid from that master cylinder and replace the entire master cylinder, calipers and wheel cylinders. While I was at it I would change the rear axle seals and repack the front wheel bearings and spindle bearings. Do it right. It will cost less than $200. for all the parts and you can do it all in 1 day. I have done it many times. You will not revisit the brake system in many miles. What you have there is a mess. Good Luck. Be Safe.
 
Top
AdBlock Detected

We get it, advertisements are annoying!

Sure, ad-blocking software does a great job at blocking ads, but it also blocks useful features of our website like our supporting vendors. Their ads help keep Steel Soldiers going. Please consider disabling your ad blockers for the site. Thanks!

I've Disabled AdBlock
No Thanks