• Steel Soldiers now has a few new forums, read more about it at: New Munitions Forums!

  • Microsoft MSN, Live, Hotmail, Outlook email users may not be receiving emails. We are working to resolve this issue. Please add support@steelsoldiers.com to your trusted contacts.

Shorted post on Alt 2 on bracket-melted two wires-need advice

M1008BOV

Member
125
0
16
Location
IN
In preparing for next weekends rally at Haspin, I was putting in a new temp gauge like camogriz did in his truck. I was placing the sensor in the water pump location since that's the only place this sending unit would fit and I could keep the light as well. Anyways, I took the belt off the passenger side alt and loosened up the lower bolt and rotated it out of the way. When I went to slide it back over to put the belt on the hot terminal burned through the boot and arc'd to the bracket for 15 seconds probably. I had smoke coming from there and then wires up on the firewall. The alt was stuck and hard for me to rotate quickly back by hand.

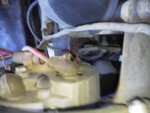
I have attached pics of where the two visible wires are burnt. The truck did still start, but I haven't checked anything else. I unhooked the batteries (yes I know I should have in the first place, believe me I've already beat myself up about it). So far I've traced to just the two wires circled in red that melted through. I did hear popping and saw quite a bit of smoke while this was going on. What is the best way for me to trace through this and find out what all could be damaged? I'm going through the TM's and FAQ links now. I just wanted to get this post out there to generate some thoughts so hopefully I can get through it today.

These two spots are melted wires (both blue)
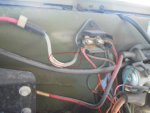
IMG_20140921_114759_zps2e713bdd.jpg

This is the wire that comes across the firewall and connects to the melted wire
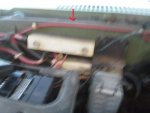
IMG_20140921_114716_zps40de097f.jpg

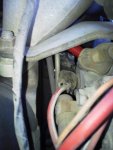
Boot where is burnt through :(

IMG_20140921_114705_zps21432049.jpg

What started out as an enjoyable project :(
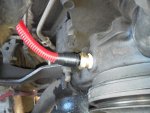
IMG_20140921_114450_zpscb9012f8.jpg

I appreciate any input and advice. Thanks-Jason
 

Recovry4x4

LLM/Member 785
Super Moderator
Steel Soldiers Supporter
34,012
1,810
113
Location
GA Mountains
Go to the CUCV faq and read up on fusible links. That's what got cooked. Fusible link wire is available at NAPA.
 

M1008BOV

Member
125
0
16
Location
IN
Thanks, I have that thread open. Is there a wiring diagram for the engine compartment? I've found the one for instrument panel, starting circuit in the -34 TM.
 

Recovry4x4

LLM/Member 785
Super Moderator
Steel Soldiers Supporter
34,012
1,810
113
Location
GA Mountains
Thanks, I have that thread open. Is there a wiring diagram for the engine compartment? I've found the one for instrument panel, starting circuit in the -34 TM.
Schematics are in one of the appendices in the back of the -20 manual.
 

M1008BOV

Member
125
0
16
Location
IN
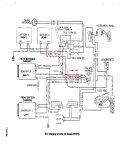
Based on Warthog's thread on fusible links and looking at the diagrams vs my truck it looks like these two (at a minimum are fried).

Diagram E-1 - 3 BLU-2B 12v - ENG WRG Harness Block - 12v feed from batteries- 12ga - supplies 12v to entire system

Diagram E-9 - 3 BLU-2H 12v - ENG WRG Harness Block - 12v feed to GEN2 negative terminal - 12ga - This is where the "Isolated Ground" comes into play

I'm going through your thread looking for part numbers (I'm not very familiar with this type of fusible link. That term to me always meant an 'inline' fuse. So under the black rubber where two wires come together is a special crimp connection that is considered a 'fusible' link?

Some numbers for folks to digest. I've been learning a little more about fusible link wire. I learned that it is supposed to be 4GA smaller than the load wire. So I ordered some 12GA fusible link wire on line for the 8GA wire along the firewall. My ventures took me to NAPA today to shop for crimp connectors. I wanted non insulated but couldn't find them so I settled for insulated ones. I can always strip off the insulation. NAPA 784275 steps down from 8GA to 12GA which is just perfect for that wire on the firewall. Not knowing if any of the other fusible links are bad, I bought a roll of 16GA fusible link wire PN 785832 and PN 784274 connectors that step down from 16GA to 12GA. They did have the 12GA fusible link wire but since I ordered it already, I didn't buy it. My plan is to replace links and heatshrink them to keep the connection weather tight.
 

southdave

Active member
1,986
6
38
Location
ripley, oh/TDY Lordstown,Oh
HOLY CRAP.. You guys are on it lol follow the other guy lead,, felt bad for the question with question answer..kind of thing

So.. I guessing you want to fix it? pull wire off back of alt check it with voltmeter. if works restore the wire go to napa or where ever buy new wire, I sugest installing a fuse or even circuit breaker in lieu of the fusible link.. ( they where cheaper install for the manufacture when truck was produced). do the rebuild thing if alt is fried. I don't think it is but.. everything worked as it should. just in reverse.. good luck
 
Last edited:

Recovry4x4

LLM/Member 785
Super Moderator
Steel Soldiers Supporter
34,012
1,810
113
Location
GA Mountains
The smaller wire is the fusible link. The section that melted on your truck is the actual fusible link wire. I used the step down crimp connectors to add a new piece of fusible wire to the existing red wire then used heat shrink tubing to insulate it. The black piece on the factory wire must be where the engineers designed the union.
 

M1008BOV

Member
125
0
16
Location
IN
Perfect thanks. I also spoke to my dad finally on the phone who was a GM mech for 25+ yrs and he cleared it up for me. Then rubbed in the "unhook the battery" thing again:deadhorse::eek:

Headed to the parts store now. Napa is closed on Sunday's so I'm going to try Advanced or O'Reillys.
 

Warthog

Moderator
Super Moderator
Steel Soldiers Supporter
13,774
232
63
Location
OKC, OK
The black plastic barrel shaped item is just a piece of plastic that covers the connection. It does nothing. The 6 or so inches of burnt wire is the actual fusible link.

The two burnt links are size 3mm according to the diagrams, That translates into 12 gauge link wire.

The circuits are the main 12v power feed for the entire truck and the 12v power feed for GEN2

E-9 GEN2 poer.jpg

The Fusible Link 101 thread shows you how to replace the wire.

http://www.steelsoldiers.com/showthread.php?122571-Fusible-Links-101

So what you need is a foot of 12ga fusible link. Some eye 12ga eye connectors, some shrink tubing, some butt connectors. Either use Kenny's step down (NAPA 784275) or some regular 8ga butt connectors and a crimp tool.

With the tools and parts in hand, it is a 30 minute job.

If you replace the fusible links with fuses, What size will you use? Have amp fuse will you need> Do you know how to calculate the amperage draw for the alternators and electrical devices?

The point is, stick with what works and is easy to fix. The automobile manufactures are still using fusible links in todays cars. Cheap and easy.
 
Last edited:

Warthog

Moderator
Super Moderator
Steel Soldiers Supporter
13,774
232
63
Location
OKC, OK
And a reminder to everyone else: Disconnect your batteries before working on or around your alternators. You can let the Smoke Genie out of the bottle. ;-)
 

M1008BOV

Member
125
0
16
Location
IN
Thanks Warthog, was planning to stay with the OE setup. Unfortunately the parts houses that are open today did not have what I need so I'll head to Napa tomorrow or Tuesday.

Oh and you're a funny guy! If I had unhooked my alternator look at the knowledge I would have never gained today :hammer:
 

M1008BOV

Member
125
0
16
Location
IN
Got very lucky at my Carquest in town, they had some 12g fusible link. Almost missed it, it's definitely been on the shelf a while! Long story short, got everything back together and no one had a new rubber elbow for the back side of the alternator. As I was reassembling (batteries unhooked :p ) I see what it shorted out on. I thought it was the bracket, but it's a fuel line! I can't believe this has been like this and all they were relying on was that rubber boot. Even if I slit a piece of fuel line and put it over the metal line I wouldn't feel very comfortable. Does everyone else's look like this?

IMG_20140922_153322_zps3629669b.jpg

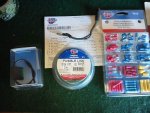
Score at Carquest....everything to finish my 12v accessory and temp gauge install.

IMG_20140922_140815(1).jpg

My help today!

IMG_20140922_142121_zpsab7756a8.jpg
 

Warthog

Moderator
Super Moderator
Steel Soldiers Supporter
13,774
232
63
Location
OKC, OK
A+ on the helper!!!

You can use some of the liquid electrical tape on the boot.
 

M1008BOV

Member
125
0
16
Location
IN
Good idea, I have some lying around somewhere if it's not dried up. I was able to bend the line over about an inch. I'm still going to put the fuel line over it for extra piece of mind.
 

212sparky

Well-known member
1,822
38
48
Location
Monroe/ Ohio
I can give you some 20kv silicone high heat resistance splicing tape if you want that as some insurance for your fuel line at haspin this weekend. Just look for me, you can miss my truck.
 
Top
AdBlock Detected

We get it, advertisements are annoying!

Sure, ad-blocking software does a great job at blocking ads, but it also blocks useful features of our website like our supporting vendors. Their ads help keep Steel Soldiers going. Please consider disabling your ad blockers for the site. Thanks!

I've Disabled AdBlock
No Thanks