• Steel Soldiers now has a few new forums, read more about it at: New Munitions Forums!

  • Microsoft MSN, Live, Hotmail, Outlook email users may not be receiving emails. We are working to resolve this issue. Please add support@steelsoldiers.com to your trusted contacts.


Single circuit to dual circuit brake conversion

banditt1979

Well-known member
273
738
93
Location
Cincinnati, OH
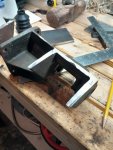
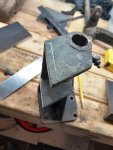
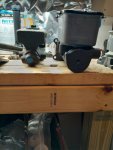
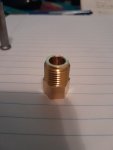
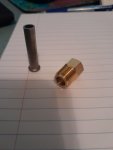
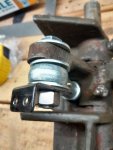
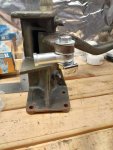
I am attempting to convert my single circuit brakes to dual circuit on my 71 M35A2. I have acquired a master cylinder MC39577, an extra long air pack, and a spare single circuit mc bracket to modify. Still need to find or purchase an additional air tank, and possibly a combination valve to isolate the brake lines should one fail. That part I'm not completely sold on but would like to have it as an additional safety factor.

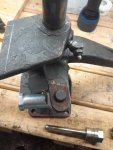
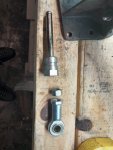
I've taken some measurements and determined that the new mc is 3" longer than the original single. So at a minimum I'll need to cut back 3" off of the bracket, maintaining the original height location, and weld in a plate to bolt it to. Then need to check geometry to the brake pedal. Looking at the A3 and air force setup, the connection to the brake pedal is offset from the brake pedal lever. Maybe I'll use a heim joint to make that connection? Not sure yet. Also the dual mc mounting flange is wider than the single, so there may be issues with drilling and tapping the bolt holes, at least at the top. I am still researching and taking pictures and measuring, so this won't happen very quickly. I've already rebuilt my single system and it is working fine as far as I can tell, but while I have the time I would like to do the upgrade.


20221002_192230.jpg20221002_192203.jpg20221002_193114.jpg

I saw in one of the other threads that someone had done something like this and bolted in the new mounting plate. Depending on what I can get done at home with my tools or at work with the saws and CNC, I may do a bolt in or weld in plate. More to come!

PS I have a workbench in the laundry room which is normally used for early planting for our garden in the fall, so never mind the background :LOL:
 

patracy

Administrator
Staff member
Administrator
14,587
4,610
113
Location
Buchanan, GA
Did you mean to post this in the other thread?

I personally would weld it together instead of bolting it. Also this entire endevour is worth it. My hardline failed between the tandems and the t-case today. Thankfully it was in my driveway and I was intentionally testing it.
 

banditt1979

Well-known member
273
738
93
Location
Cincinnati, OH
Did you mean to post this in the other thread?

I personally would weld it together instead of bolting it. Also this entire endevour is worth it. My hardline failed between the tandems and the t-case today. Thankfully it was in my driveway and I was intentionally testing it.
No I figured I would start a new thread detailing what I want to do. That way its clear to anyone who wants to go this direction. And hopefully have it step by step, if I can remember to take enough pictures :cool:
 

banditt1979

Well-known member
273
738
93
Location
Cincinnati, OH
Here is a post where the author milled down an A2 bracket and bolted on a plate for the dual mc:


banditt1979

Well-known member
273
738
93
Location
Cincinnati, OH
I've discovered that the fitting on the single circuit mc that adapts the 5/16" brake line fits the air packs, so with the mc on the truck and the one I received with the sacrificial bracket I have the fittings needed for the second air pack. Working on fittings for the dual mc, I have some part # 's but will need to order some fittings to make sure they actually work. Gave up on the combo valve for now.
 

banditt1979

Well-known member
273
738
93
Location
Cincinnati, OH
I found Edelmann part # 265500 to be the fitting that has 1/2-20 straight threads for the mc and 1/2-20 inverted flare on the female side. I can't seem to find one that has the same size on the inverted flare but 9/16-18 straight threads for the mc. If anyone knows of an adapter like this please let me know. I found Edelmann # 258307 but the male side is inverted flare, which makes me think it doesn't have the correct flat surface for the copper washer to seal against the mc.
 

banditt1979

Well-known member
273
738
93
Location
Cincinnati, OH
Edelmann #258307 does not work, the male side is beveled and won't allow the copper washer to seal. So I'm thinking a -6 AN to 1/2-20 inverted flare fitting might work (Russell #640600, steel instead of aluminum). Got one on order from amazonion but won't be here til the 18th. Summit has it but I'm not paying another $12 shipping for a $10 part lol
 

banditt1979

Well-known member
273
738
93
Location
Cincinnati, OH
Well hell
20221008_135902.jpg
Edelmann #265500 works for the 1/2-20 port but is about 3/32" too long for my mc, and bottoms out on the inside of the threaded hole. I know I need a washer here, but I'll still need to remove some material at the end of the adapter and clean up the threads after.
 

banditt1979

Well-known member
273
738
93
Location
Cincinnati, OH
Thinking the army navy fittings will be the way to go. Screws in tight, I'll have to do some testing to make sure it seals well.
20221010_183457.jpg

20221008_184750.jpg

To date I have not found any bubble flare fittings that would work. Peashooter's diagram shows the brake lines for the air force deuce to be 1/4" coming out of the master cylinder, but I want to use 5/16" to be able to use the air pack adapters that I have. Not sure why they downsized the master cylinder lines. If anyone knows, please enlighten!

PEASHOOTER BRAKE SCHEMATIC A2 DUAL CIRCUIT REV 1 PUBLIC.jpg
Also my master cylinder appears to be machined for bubble flares, which is why I will try an army navy adapter going into it, to inverted flare on the other end.
 

mitchsc0tt0

Member
76
28
18
Location
Unionville CT
Just curious if you happened to make any further progress? Starting to look into doing this upgrade on my truck and so far it looks like my only option is to fabricate the existing single circuit bracket since the double circuit bracket appears to be rare.

Thanks,

Mitch
Sorry guys, haven't been able to do more on this due to trying to find a decent truck to daily drive and family projects. Got the daily driver figured out so will hopefully get back on this project soon.
 

banditt1979

Well-known member
273
738
93
Location
Cincinnati, OH
Just curious if you happened to make any further progress? Starting to look into doing this upgrade on my truck and so far it looks like my only option is to fabricate the existing single circuit bracket since the double circuit bracket appears to be rare.

Thanks,

Mitch
Unfortunately, I haven't. That bracket is extremely rare and expensive if you can find it. There are some posts I linked in here where you can download a 3D file of the bracket that someone put together to help fabricate your bracket. Once I finish getting the last fluid changes done I'll get back into it.
 

mitchsc0tt0

Member
76
28
18
Location
Unionville CT
Thanks! I have seen the grab cad file. I think my plan right now is I am going to get the single circuit bracket off another truck hopefully and work on experimenting with modifying it for the dual circuit master cylinder. Will post pic's / info as I make any progress. The one other thing I've noticed / think will need modification is the push rod as that looks different between the 2 as well.

Thanks

Mitch

Unfortunately, I haven't. That bracket is extremely rare and expensive if you can find it. There are some posts I linked in here where you can download a 3D file of the bracket that someone put together to help fabricate your bracket. Once I finish getting the last fluid changes done I'll get back into it.
 

banditt1979

Well-known member
273
738
93
Location
Cincinnati, OH
Thanks! I have seen the grab cad file. I think my plan right now is I am going to get the single circuit bracket off another truck hopefully and work on experimenting with modifying it for the dual circuit master cylinder. Will post pic's / info as I make any progress. The one other thing I've noticed / think will need modification is the push rod as that looks different between the 2 as well.

Thanks

Mitch
That's exactly what I did, got another bracket and started marking it up for trimming. Let us know how yours goes! And yes the push rod needs to be shortened, I noticed that as well.
 

banditt1979

Well-known member
273
738
93
Location
Cincinnati, OH
Hard to believe its been over a year since I started this endeavor but, life has a way of grabbing you up and not letting go. Well today I found myself looking at this again and decided to start cutting.
Took lots of measurements and I believe I will notch the bracket to allow the new plate to run past the legs of the old bracket, and hopefully be able to cut some threads into it to attach the wider bolt pattern master cylinder after welding. To keep it centered with the brake pedal the bolts will fall directly on center with the legs of the old bracket. Using a 3/8" plate would be perfect, and I have a 5/16" steel angle to work with, I think it will be fine.
I have a feeling the huge reservoir on the new mc will be a problem based on some measurements I took. Trying to open it up with the plastic lid and the tabs on each side may be impossible. I considered moving the entire assembly down an inch which would give more throw to the pedal lever at the bottom. Once I get it welded, I'll mock it up and see what I need to do. The plan is to use remote reservoirs anyway but can't find that plate that bolts to the mc for it. I may try out my new welder that has a lift tig attachment to make my own plate from the aluminum reservoir that is on it. We'll see
 

Attachments

banditt1979

Well-known member
273
738
93
Location
Cincinnati, OH
So I was having a problem locating a 9/16-18 fitting for a 5/16" bubble flare tube. Then I remembered back when I bought Edelmann # 258307 and it fit the thread size but not correct flare end. So it dawned on me as I was looking for the fitting: why not just drill it out??

I think I solved this connection issue that had me hemmed up for most of this time.
 

Attachments

banditt1979

Well-known member
273
738
93
Location
Cincinnati, OH
Another piece of the puzzle solved. 1/2" heim joint to actuate the master cylinder and I'll cut the "pushrod" to the length I need, after the setup is mounted, then thread the end to go into the heim joint. How did I miss that the air force and A3 trucks had offset the mc towards the frame? Edit: I should have re-read this thread from the beginning. This may make it possible to use the reservoir on the mc, not so sure about being able to remove the cap. If anyone knows where I can find the remote reservoir set up/mc plate please let me know.
 

Attachments

Last edited:

banditt1979

Well-known member
273
738
93
Location
Cincinnati, OH
Purchased a shouldered 1/2-20 grade 5 bolt, locknut and washers, cut it down to clear the bracket and realized there is no way to connect it to the return spring. Utilizing my hot rod experience I found a chrome bracket for chevy kick down cable with spring holes. Fit right on and have 2 possible locations for spring tension. Good thing I never throw away extra parts!
 

Attachments

Top
AdBlock Detected

We get it, advertisements are annoying!

Sure, ad-blocking software does a great job at blocking ads, but it also blocks useful features of our website like our supporting vendors. Their ads help keep Steel Soldiers going. Please consider disabling your ad blockers for the site. Thanks!

I've Disabled AdBlock
No Thanks