• Steel Soldiers now has a few new forums, read more about it at: New Munitions Forums!

  • Microsoft MSN, Live, Hotmail, Outlook email users may not be receiving emails. We are working to resolve this issue. Please add support@steelsoldiers.com to your trusted contacts.


Starting My Bobber Project!!

misterbill64

Member
51
2
8
Location
Buckhannon WV
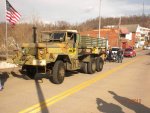
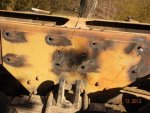
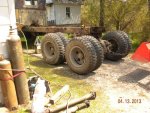
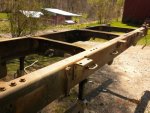
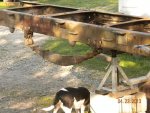
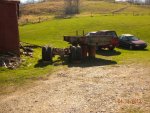
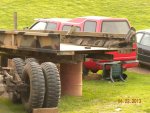
Well after almost 2 years I finally have enough parts to start. so far its pretty easy removed bed, torched of all the rivets and used the tractor to pull axles out. I removed everything from the rear frame so I can blast it then paint. Planning on an artic camo paint job,(thats what convinced me to buy it in the first place). Drilled all the spring bracket holes and temp installed springs. then cut the rear off the bed, I kind of jump all around with the project but it will get there. Here are some pictures, more to follow!
 

Attachments

JCKnife

Well-known member
1,367
46
48
Location
Kentucky
Tagging this to see your progress--I have been meaning to check and see how this was going. Looks like a good start!
 

misterbill64

Member
51
2
8
Location
Buckhannon WV
That is actually the one I saw that made me want to get one, I love that paint job, thought your idea of using the computer to project the camo pattern on the truck was good too. By the way what paint did you use,and how well has it stood up!
 
Last edited:

mikew

Member
454
8
18
Location
edmond, ok
Thanks!

Tractor Supply tractor / implement paint with hardener. It is not flat, it has a little gloss to it, but has held up well.
 
Looks like you're off to a great start! I wish I had access to an oxy-aceteline rig and a tractor to help with the heavy stuff when I bobbed my deuce! All I had was a pair of comealongs, a few lengths of different size pipe for prying, and the power of gravity! I had to borrow a hoist to get the bed on the truck. lol
 

misterbill64

Member
51
2
8
Location
Buckhannon WV
Well I got a little more done, bed cut and welded back together. Rear springs taken apart ,cleaned and primed. Now that the weather is better maybe I can get more done . Heres a few more pictures. DSCN2501.jpgDSCN2550.jpgDSCN2552.jpgDSCN2557.jpgDSCN2562.jpgDSCN2564.jpgDSCN2565.jpg
 

misterbill64

Member
51
2
8
Location
Buckhannon WV
So sick of rain!!! , Well I finally got some more done, frame painted, springs and all there brackets painted,rear frame air tanks and all there brackets painted now I can finally start putting some of it back together!!! I have the bumperetts , rear shackels,tail light brackets cleaned and ready to paint. about the only things left to clean or blast are the fuel tank and brackets, the bed and mud flaps.After I get that all put back together then I will turn it around and start on the front. Due to the rain I 've been painting in an old barn , at least it keeps me dry. Pictures are in no particular order I've probably shot over 60 these are just some random ones.DSCN2591.jpgDSCN2614.jpgDSCN2616.jpgframe end view.jpgmarked holes i drilled.jpgDSCN2601.jpgDSCN2609.jpgDSCN2612.jpgDSCN2613.jpg
 

Ridgerunner

New member
791
6
0
Location
Holland, Mi
I like that you not just throwing it together. Although your route is time consuming and takes much longer, the end result will be a very nice and clean looking truck. Good job....
 

JCKnife

Well-known member
1,367
46
48
Location
Kentucky
What did you use to paint the springs? I've always wondered if it would be worth it to take them apart or just paint them in place. Seems like no matter which, the paint would crack off from all the flexing.

It's looking great!
 

plym49

Well-known member
1,164
171
63
Location
TX USA
What do you use to take the pressure off the center bolt when disassembling and reassembling the springs? That seems a scary job.

Really nice so far, BTW, very impressive shiny black parts!
 

misterbill64

Member
51
2
8
Location
Buckhannon WV
I am using majic gloss black from tractor supply, I don’t believe it matters what you paint springs with it all will eventually ware off. By taking them apart it will take longer for the rust between the leafs to show up.
 

misterbill64

Member
51
2
8
Location
Buckhannon WV
What do you use to take the pressure off the center bolt when disassembling and reassembling the springs? That seems a scary job.

Really nice so far, BTW, very impressive shiny black parts!
I did mine on the back of the truck, I didnt want the center bolt to break so I heated it with a torch ( Wrong Answer ) the nut shot off striping the bolts so Im replacing them. I have a small harbor freight press I will be using to press them back together, but I suppose you could use c clamps
 

bigginstactical

New member
246
1
0
Location
port angeles washington
A customer of ours took apart his springs on his 75 jeep and painted them with graphite paint so they don't squeak. Its been about 4 years and probably 12k miles and seems to be holding up really well. Seemed like a good idea to me haha!
 

misterbill64

Member
51
2
8
Location
Buckhannon WV
Well I put my springs back together today, press was a no go too small for the springs to fit so after a little head scratching here's what I did. assembled the springs with the center bolt aligning them, I took two wood pipe clamps and placed them on each side of the center bolt and cranked them down alternately then put the nut on the center bolt, release the pipe clamps and install the four bolts and spacers it took me about 15 minuets each pack. Its really easy this way!
 

misterbill64

Member
51
2
8
Location
Buckhannon WV
I got a little more done in the last couple of days , Installed the spare tire mount , Reinstalled the air tank brackets and air tanks ,The air lines, Fuel tank brackets, Rear wiring harness, I decided not to cut it and shorten it I just folded it up and zippy tied it. Spring brackets and springs, The rear cross member and support, Pintle hitch and shackles . I left the last bed mount bracket on the frame so I had to modify my bumperetts a little bit to fit , Need to paint them. I did make one mistake I forgot to put the airtank hold down straps on so I had to take the tanks back out. I decided instead of spending two days trying to clean bolts I'd just get new ones. I hope to start on one of the rear axles later this week but it's coming along . Here' s a few more pictures air tanks.jpgsprings 1.jpgsprings 2.jpgwiring harness doubled up.jpgfuel tank brackets.jpglast bed frame bracket.jpgrear crossmember with pintle.jpgspare tire holder.jpg
 
Last edited:
Top
AdBlock Detected

We get it, advertisements are annoying!

Sure, ad-blocking software does a great job at blocking ads, but it also blocks useful features of our website like our supporting vendors. Their ads help keep Steel Soldiers going. Please consider disabling your ad blockers for the site. Thanks!

I've Disabled AdBlock
No Thanks