• Steel Soldiers now has a few new forums, read more about it at: New Munitions Forums!

  • Microsoft MSN, Live, Hotmail, Outlook email users may not be receiving emails. We are working to resolve this issue. Please add support@steelsoldiers.com to your trusted contacts.

T50 Turret resurrection

wgtactical

Well-known member
684
343
63
Location
Carrollton, Georgia
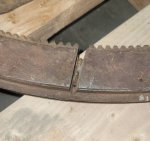
I was finally able to find a T50 turret that had some demil work done on the hatch hinge and main bearing. This came with no glass and missing odds and ends parts. I'm kicking off the project by drilling out the broken bolts that attach the bearing to the turret and then re-tapping the 30 @ 3/8-16 holes. Once everything has been checked out and repaired I will have it abrasive blasted to bare metal and start the metal prep. The main bearing for this turret had been torch cut in two places and the outer races had already been welded back together but the inner race had not. The effort required to properly repair this bearing was simply not cost effective and even if it were I wouldn't want it on my own stuff, much less a customer's vehicle.
 

Attachments

wgtactical

Well-known member
684
343
63
Location
Carrollton, Georgia
Spring stock for the torsion springs in the hatch hinge. These work the same as the spring pack in a VW beetle front end (seems everyone is familiar with that) and the material is .094" x 1 x 14-1/8 and .062" x 1 x 14-1/8, four each. I got ours from McMaster Carr (9074K184 and 9075K367)

The two round dots on the ends seen on the originals (on right side of pic) are from the 10-32 set screws that anchor each end of the spring pack.


20250119_100805.jpg
 

wgtactical

Well-known member
684
343
63
Location
Carrollton, Georgia
Here are all the newly manufactured parts along side the samples used to make them. Sometimes when an old, obsolete piece is brought back to life, there are going to be broken or missing parts that simply wont be available over the counter. Since a measure of corrosion protection would be necessary, the work to apply this protection was more than the cost of the material upgrade, when considering the limited number of parts.

Relating to the previous post, we ended up having to cut both hinge arms off to be able to shift the hatch about 1/4" to the side...curious now if the hatch was actually the one that went to this particular turret.
t50parts.jpg
 

Buck Wampum

Active member
65
132
33
Location
SE PA
Hi G, I’d be interested to see how you handle getting the hatch to shut flush/concentric with the top of the turret. Both my vehicles have uneven gaps around the circumference where the hatch meets the turret. Kind of a pain to get it to shut and seal and be waterproof. I don’t think there’s much adjustability of the hatch once the brackets are welded to the back of the turret, correct?
 

wgtactical

Well-known member
684
343
63
Location
Carrollton, Georgia
Hi G, I’d be interested to see how you handle getting the hatch to shut flush/concentric with the top of the turret. Both my vehicles have uneven gaps around the circumference where the hatch meets the turret. Kind of a pain to get it to shut and seal and be waterproof. I don’t think there’s much adjustability of the hatch once the brackets are welded to the back of the turret, correct?
You are correct S. Very small adjustments (probably less than 1/16”) can be made by either reducing or shimming the thickness of the two large thrust washers along with adjusting the length of the outer tube spacer between the hinge arms. Anything more than that you’ll probably have to adjust the length of the torsion spring plates. Also be mindful of the location of the lock plunger for the hatch as it too may need modification if you get too far from it's centerline (you have probably seen the little notch in it to miss one of the two thrust washers) That being said, evidently there wasn’t a lot of attention to detail when the hatches were fitted. For me, cutting the arms from the hatch gave me the opportunity to center it with the opening in the turret as well as allowing me to adjust the height to accommodate a .15” thick, push on rubber edge trim. I also cut another small drainage gap in the lip around the opening where the hatch sits, at the rear of the hatch just between the hinge arms, much like the one in the front just behind the sight.
 
Top
AdBlock Detected

We get it, advertisements are annoying!

Sure, ad-blocking software does a great job at blocking ads, but it also blocks useful features of our website like our supporting vendors. Their ads help keep Steel Soldiers going. Please consider disabling your ad blockers for the site. Thanks!

I've Disabled AdBlock
No Thanks