• Steel Soldiers now has a few new forums, read more about it at: New Munitions Forums!

  • Microsoft MSN, Live, Hotmail, Outlook email users may not be receiving emails. We are working to resolve this issue. Please add support@steelsoldiers.com to your trusted contacts.


The One Stop 700R4 Swap M1009

2INSANE

Well-known member
722
819
93
Location
Belgrade, Montana
Overview

Please give many thanks to the 10+ SS members for giving me the motivation to create this thread. Chuckg, 4sdair, forest522, computer54, dezertdemond, Dsilverline, Chevymike, ssdvc, TheMod, Mullaney, royalflush55, 1love, Sharecropper…


By popular demand! This is a REAL M1009 1984 Chevy K5 Blazer 700r4 swap. This swap has been done many times, talked about 1 million times and beat to a dead horse a trillion times! However, in this thread, unlike other threads, I will be giving step by step detailed instructions with pictures and condense hundreds of threads worth of knowledge into one. This thread will be the one stop M1009 700r4 swap info thread any m1009 owner or others would ever need regarding this topic.


This 27 spline 700r4 and 27 spline np208 came out of a 1985 Chevy Suburban that had a 6.2L Diesel. Pre 1986 700r4’s have a mechanical controlled valve body that does not require electronics for the lockup.


Why am I swapping from the strongest 3 speed th400 to a weaker 700r4?


Read this!


https://www.thedieselpage.com/article/lee700r4-1.htm


Pros:


  1. The 700r4 has a lower 1st gear of 3.06 vs the Th400 1st gear of 2.48. The lower 1st gear will drastically help crawl up or down hills and obstacles. Even reverse gear on the 700r4 is lower with a 2.29 ratio vs the Th400’s 2.0 ratio.
  2. The 700r4 has a high 4th gear of .75 vs the Th400’s 3rd gear of 1:1, which is the same ratio of the Sm465. This added 4th gear will drastically improve motor life by lowering rpm’s, give better mpg and faster hwy speeds.
  3. 700r4’s have many upgrade options that can make it stronger, if not better then the Th400 pending on ones budget. In fact, the 700r4 is commonly used in drag racing cars that push 600 hp and 600 torque. My current budget is based off of a 27 spline build vs an optional upgrade to the 30 spline in a 700r4. My goal is to run it until it blows and upgrade the spline and other items later as my budget and warranty allows.
  4. The pre 1986 700r4 is controlled by a TV cable, not vacuum or electronics. My plan is to delete the M1009 vacuum system which includes the vacuum lines, vacuum pump and vacuum throttle position valve on the injection pump. In place of the old vacuum pump, I am going to put a 6.5 diesel oil pump gear drive with the tachometer sensor on top for the rpm gauge.
  5. Ever since I changed the axles with 4.56 gears back in 2009, I have always wanted an extra gear. With 4.56 gears and the old 6.2 my top speed was 55mph and about 16-18mpg. With the 6.5 turbo my top speed is the same 55mph but my mpg dropped to about 15-17 mpg. I do not want the electronics of a 4L80E and do not want a clutch Nv4500 to burn when crawling up hills or obstacles. Since 2009, I have only driven my M1009 37,000 miles. Most of those miles are interstate and hwy from the house to the trail head. I do not plan on towing more then 2,000 pounds. I think this swap will suit me well for the time being. My chances of blowing up this 700r4 before the 3 year/30,000 mile warranty this 700r4 is high. If it does blow while still in warranty, the additional cost to add the 30 spline will be minimal. I plan on keeping the 30 spline np208 as a spare, as it is a direct bolt on when it is 700r4 32 spline time ;-)


Cons:


  1. In a nutshell, I have basically talked myself into doing something stupid. There are better and cheaper drivetrain options then the 700r4. If I could financially start my build over, I would have kept the 3.08 gears with the th400 and mated a np205/np203 doubler. In my opinion, if anyone wanted to do the 700r4 swap, I think 3.73 gears or lower with the M1009 is the absolute minimum one must have in their axles to best utilize the extra 4th gear. If not, one would find their 700r4 constantly jumping from 4th-3rd which causes excessive abnormal wear and tare on the clutches.
  2. Cost of this swap is a lot… You could have 3 TH400’s built with the cost of a 700r4 swap.
  3. Early model 700r4’s are prone to over heating. Remedy is to run an external transmission cooler.
  4. 27 spline input shaft breaks easily. Remedy is to upgrade to a 30 spline.
  5. The governor tends to stick as the fluid gets dirty. Remedy is to change fluid and filter every 30,000 miles or less.
  6. As time goes by, the Tv cable stretches and causes premature 700r4 failure. This can be avoided by checking adjustment every other oil change.
  7. The 700r4 weighs more at about 155 pounds empty vs the Th400’s 135 pounds.
  8. Over time, the accelerator pedal tends to bend which makes the TV cable out of adjustment causing excessive ware on the clutches. Remedy is to check adjustment every other oil change and bend the pedal back.


Am I missing anything?


So now you know all the pros and cons…


Let’s giterdun!


Parts List:

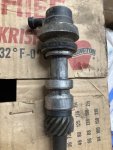
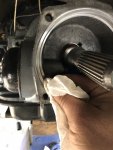
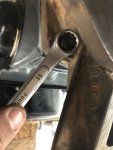
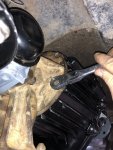
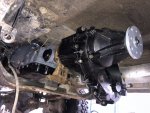
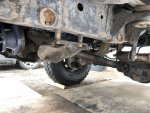
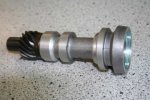
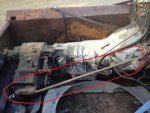
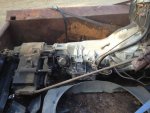
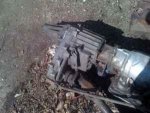
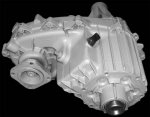
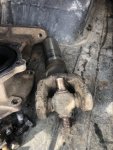
  1. Freshly rebuilt 27 spline 700r4 (Pic1)
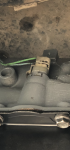
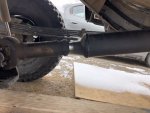
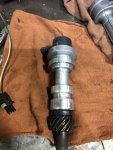
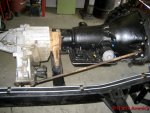
  2. Freshly rebuilt 27 spline Np208 (Pic2)
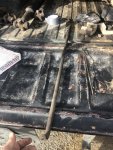
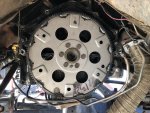
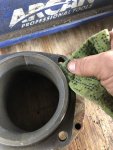
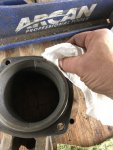
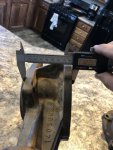
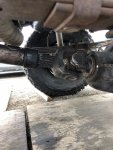
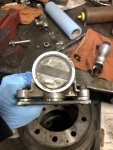
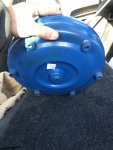
  3. New or rebuilt 1400 stall Torque Converter with 6x10.75” bolt pattern. (Pic3) The 700r4 3 bolt torque converter will work too.
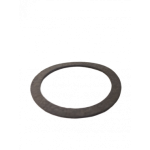
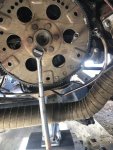
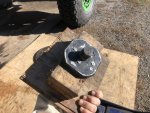
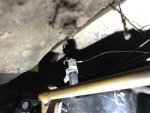
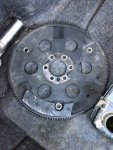
  4. Flex plate with 6x10.75 bolt pattern (Gm 1407715) (Pic4)
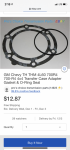
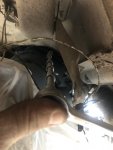
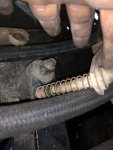
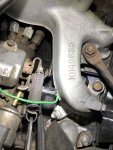
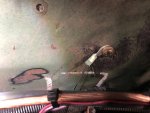
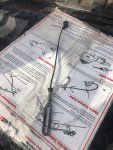
  5. Green head TV cable (Aka Kick down cable (Gm 25515599) (Pic5) The green head tv cable is vehicle specific for the 6.2-6.5/700r4. Gm does not make the Green head TV cables anymore and good luck finding one! But almost any Tv cable for the 700r4 will work with the proper adjustments.
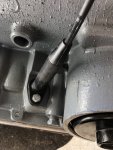
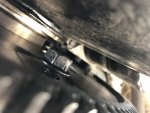
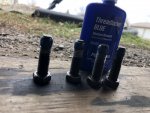
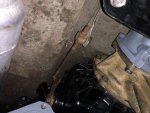
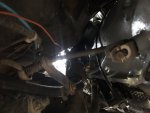
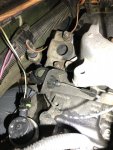
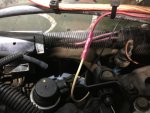
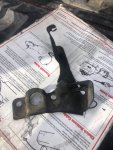
  6. TV cable bracket (Pic6)
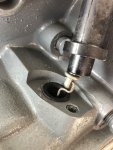
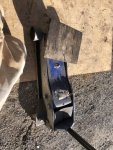
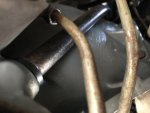
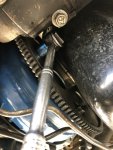
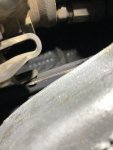
  7. TV cable rod (Pic7)
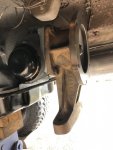
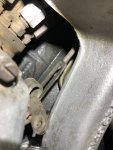
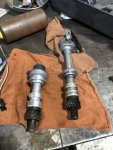
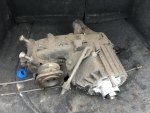
  8. 27 spline rear driveshaft/transfer case yolk (Pic)
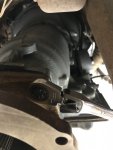
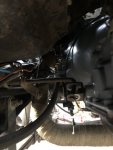
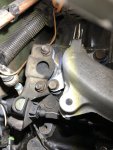
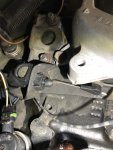
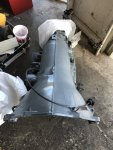
  9. Th400 crossover transmission crossover brace (Pic9)
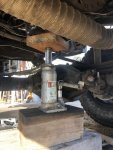
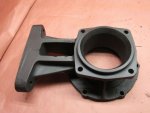
  10. Long 700r4 trans to t-case adapter. (Gm 14038663)(Pic10)

Parts list continued…
 

Attachments

Last edited:

2INSANE

Well-known member
722
819
93
Location
Belgrade, Montana
Parts list continued…

11. 6.5 diesel oil pump gear drive with tachometer sensor on top (Gm 7849305) Pic 11
12. Transfer case to Transmission support brace. Pic 12
13. Oil pump gear drive gasket (Gm 14022649) Pic 13
14. 700r4 Transfercase adapter gasket and O-Ring Pic 14
15. About 15 quarts of Dextron VI ATF. 10 quarts for the 700r4, 1/2 quart for the torque converter pre start and 4.5 quarts for the Np208=15qt


Disclaimer:


I will not be there in person to babysit others that choose to do this swap. Please use this advice, direction and knowledge at your own risk!
 

Attachments

Last edited:

2INSANE

Well-known member
722
819
93
Location
Belgrade, Montana
With the th400 and np208 out…

Step #1

Remove the Th400 flexplate using a 11/16 socket and wrench. Use a long extension bar to keep flex plate in place.

Install the 700r4 6x10.75 bolt pattern (Gm 1407715) flex plate. Make sure the notched side of the teeth and weight on the flex plate faces toward motor. Use lock tight and torque to 65 foot pounds.
 

Attachments

2INSANE

Well-known member
722
819
93
Location
Belgrade, Montana
Step #2

Install the TV cable into the 700r4. Carefully insert the rod threw the Tv cable bracket, gently give tension on the motor side of the Tv cable and suck in the rod into the Tv cable housing and carefully install the housing into the 700r4 and bolt it up. The Tv cable bolt size is M6x20 and a 10MM head.
 

Attachments

Last edited:

2INSANE

Well-known member
722
819
93
Location
Belgrade, Montana
Step #3

Install the 700r4 using a transmission Jack or a modified Jack like mine. Pic 1-2.
It helps to have a buddy lift the trans on the Jack.

Having a bottle Jack under the motor to make height adjustments helps as well. Pic 3.

Use 14mm socket wrench and a plethora of extensions to bolt up the 6 transmission bolts. Use lock tight on the bolts with washers and torque to 30-35 foot pounds. Pic 4-5

Install the 700r4 dipstick. The dipstick mounting bracket goes to the very top passenger side transmission bolt. Pic 6-7

If you can find a 4 prong connector to keep dirt and scum out of the plug, install it but leave wires loose. Pic 8
 

Attachments

Last edited:

2INSANE

Well-known member
722
819
93
Location
Belgrade, Montana
Step #4

Bolt up the torque converter to the flexplate. Torque is 50 foot pounds.

Install the 6 bolts with lock tight. Install bolts loose. Do not fully tighten until all 6 bolts are on to keep bolt holes aligned. Pic 1.

Use 15mm short socket wrench to fully tighten the 1 bolt in between the weight as shown in pic 2.

Use 15mm wrench or 15mm ratchet wrench to fully tighten the other 5 bolts. Pic 3.

Make sure the center of torque converter is in the center of the flex plate.
 

Attachments

Last edited:

2INSANE

Well-known member
722
819
93
Location
Belgrade, Montana
Step #5

Install the 700r4 transfer case adapter (Gm 14038663).

First clean up the adapter and transmission rear housing area with a Scott’s pad and paper towel. Pics 1-4

Put some ATF on the adapter O-Ring by simply pouring a small amount on a paper towel and rotate the O-Ring on the fluid. This helps give a better seal and slows down the dry rot of the O-ring. Pic 5

Install the O-Ring to the adapter. Pic 6

Clean the 4x15mm bolts thread and apply blue threadlock. Pic 7

Install the adapter and bolts. Tighten down the first top bolt and switch to the lower bottom bolt to keep the O-ring pressure the same. Use a 15mm ratchet wrench on the top bolts and a normal 15mm wrench on the bottom. Pics 8-9

Installed. Pic 10
 

Attachments

2INSANE

Well-known member
722
819
93
Location
Belgrade, Montana
Step #6

Install the Th400 Crossmember.

The Th400 Crossmember with the Long 700r4 Adapter is a direct bolt on! No drilling into the frame is required! Because it is a direct bolt on, you will also NOT NEED to shorten or lengthen the driveshafts! Why?

The Th400’s length from bell housing to adapter point is 24 5/16” long. See figure B Pic 1.

The 700R4 length from bell housing to adapter point is 23 3/8” long. See figure B Pic 2.

When compairing the old Th400 adapter to the Long 700r4 adapter, you will see that the Th400 adapter is about 2 1/2” wide Pic 3 and the 700r4 long adapter is about 3 1/4” wide Pic 4.

This gives about only .1875” of difference. See math on Pic 5. This difference is not going to affect driving performance on road and off road.

Anyhow…

Install your old Th400 Adapter bushings on the crossmember if they are still good

Clean the 2x18mm bolt threads and add Threadlock. Pic 6

Install the crossmember to adapter with the 2 18mm bolts but keep loose. Pic 7

Install the 18mm crossmember end bolts and tighten fully. Use 1” transfercase drop spacers if you have 4” or higher of lift. This gives better driveline angles and prevents front driveshaft from rubbing on the crossmember. Pic 8

Fully tighten the Adapter bushing bolts. Pic 9

Fully installed Pic 10
 

Attachments

Last edited:

2INSANE

Well-known member
722
819
93
Location
Belgrade, Montana
Step 7

Put a generous bead of Optimum Black on the adapter. If you prefer to use the gasket, that is an option as well. Pic 1

Lift up the freshly rebuilt Transfer case and put it part way on the shaft. Let it hang. Clean the 6x9/16” bolt threads and put on thread lock. Clock the Transfer case back to its original position and install the 6 bolts as you will use them as dowels to slide the Transfer case up against the Adapter and RTV.

Tighten down bolts using a 9/16” wrench. Pic 2. The bottom bolt can be tightened with a 9/16th socket, adapter and socket wrench.

Installed. Pic 3

While I had both Np208 Transfer cases at the shop, they installed a bolt on style slip yolk to the output shaft instead of the OEM slip yolk. The bolt on style is stronger.
 

Attachments

Last edited:

2INSANE

Well-known member
722
819
93
Location
Belgrade, Montana
Step 8

Reconnect the transfer case linkage. Pic 1

Step 9

Reconnect the Transmission Linkage.
Do not forget to install the spring and plastic washer. Pic 2-4
Connected Pic 5-6

Both step 8 and 9 does not require any adjustments of the shifting linkage.

Steering column does not need to be replaced.
 

Attachments

Last edited:

2INSANE

Well-known member
722
819
93
Location
Belgrade, Montana
Step 10

Install front and rear driveshafts. Pic 1-2

As you can see in pics 3-4 you will not need to shorten or lengthen the driveshafts. The driveshaft angles are exactly the same as it was with the Th400/np208
 

Attachments

  • Like
Reactions: rtk

2INSANE

Well-known member
722
819
93
Location
Belgrade, Montana
Step 11

Plug in the transfer case 4x4 indicator plug on the top of the np208. This is the only electrical connection needed for a pre 1986 700r4 swap. Pic 1


Step 12

If you have a warranty on your 700r4, I recommend having the transmission shop install the tv cable bracket, tv cable rod, tv cable to bracket and have them do the adjustment so you do not void any warranty. Pics 2-6
 

Attachments

2INSANE

Well-known member
722
819
93
Location
Belgrade, Montana
Step 13 (Optional)

Delete all vacuum lines and remove vacuum pump.

If you are on a budget, you can modify your old vacuum pump gear drive by removing the top vacuum pump, installing a pressed cap on top and a plate on the side as seen in pics 1-3

Or you can buy a 6.5 oil pump gear drive without sensor as seen in pic 4.

Or you can do what I did and get a 6.5 oil pump drive (Used $200+) with tach sensor, clean it up, dunk it in fresh oil and install. It has an 8 pulse per revolution signal. Autometer tachometers can be modified in-house to an 8 pulse. Black wire to ground and white wire to tach. Yeah it is that simple. Pics 5-10
 

Attachments

Last edited:

2INSANE

Well-known member
722
819
93
Location
Belgrade, Montana
Step 14

Fill up transmission and transfer case with full synthetic ATF and enjoy that extra 4th gear, better mpg and low crawling 1st gear!

All done! Thanks for looking and I hope everyone has a Merry Christmas!
 

adf5565

Well-known member
Steel Soldiers Supporter
335
608
93
Location
Tioga, PA
Great post! The transfer case to transmission support brace (part 12), is that just something the 700r4 was designed to have? The stock setup with the TH400 doesn’t have that and like you said the transmissions are essentially the same length so I’m curious why that’s needed now. Could you post a pic of that installed?
 

2INSANE

Well-known member
722
819
93
Location
Belgrade, Montana
Great post! The transfer case to transmission support brace (part 12), is that just something the 700r4 was designed to have? The stock setup with the TH400 doesn’t have that and like you said the transmissions are essentially the same length so I’m curious why that’s needed now. Could you post a pic of that installed?
The older np208 transfer case’s are designed to have part #12, which is the trans/t-case support rod. It prevents the transmission case and bell housing from cracking. They are not made anymore and are quite rare to find. If your np208 has those 2 bolt holes for the support rod, then I recommend using it for more strength. I would say it is a must have for this swap with budget permitting and parts availability. Without it, one would be playing the violin against the devil.

The newer np208’s are not designed to have that support rod..

In my case, It was cheaper and easier for the Transmission Shop to rebuild the original M1009 np208 since it only had 58,000 original miles on it and already had the upgraded bolt on yolk I upgraded years ago. Unfortunately, it does not have the 2 bolts to add the support rod or else I would have installed it.

Pics 1-5 are some images I found on google with it installed.

Pic 6 is the np208 that came with my 700r4. You can see the two bolts for the rod on the left side of the np208. I am saving it as a spare and right now it is being used in my trunk for added weight in the rear of my Dodge neon for the winter. Lol
 

Attachments

Last edited:

adf5565

Well-known member
Steel Soldiers Supporter
335
608
93
Location
Tioga, PA
The older np208 transfer case’s are designed to have part #12, which is the trans/t-case support rod. It prevents the transmission case and bell housing from cracking. They are not made anymore and are quite rare to find. If your np208 has those 2 bolt holes for the support rod, then I recommend using it for more strength. I would say it is a must have for this swap with budget permitting and parts availability. Without it, one would be playing the violin against the devil.

The newer np208’s are not designed to have that support rod..

In my case, It was cheaper and easier for the Transmission Shop to rebuild the original M1009 np208 since it only had 58,000 original miles on it and already had the upgraded bolt on yolk I upgraded years ago. Unfortunately, it does not have the 2 bolts to add the support rod or else I would have installed it.

Pics 1-5 are some images I found on google with it installed.

Pic 6 is the np208 that came with my 700r4. You can see the two bolts for the rod on the left side of the np208. I am saving it as a spare and right now it is being used in my trunk for added weight in the rear of my Dodge neon for the winter. Lol
That makes sense. It looks like my 208 has the bolt holes on the side. I don’t think it be too hard to fab up a support rod if I end up going this route, better to be safe than sorry.
 
Top
AdBlock Detected

We get it, advertisements are annoying!

Sure, ad-blocking software does a great job at blocking ads, but it also blocks useful features of our website like our supporting vendors. Their ads help keep Steel Soldiers going. Please consider disabling your ad blockers for the site. Thanks!

I've Disabled AdBlock
No Thanks