• Steel Soldiers now has a few new forums, read more about it at: New Munitions Forums!

  • Microsoft MSN, Live, Hotmail, Outlook email users may not be receiving emails. We are working to resolve this issue. Please add support@steelsoldiers.com to your trusted contacts.


Turbocharging a HMMWV with BMI's kit

patracy

Administrator
Staff member
Administrator
14,575
4,588
113
Location
Buchanan, GA
In typical fashion, things never go as planned for me. But I did manage to get in a quick test drive today. I only got up to 50 tops just cruising around the block near the shop. Never really went WOT or anything. But the power is certainly there. No longer a lame dog at getting moving. My shop is on top of a hill (Hilltop Drive actually) so it's a great place to test. Just taking it easy I saw 5-7psi of boot and EGT was around 800 tops if memory serves. All very reasonable. The bad news today was that I had to replace the batteries in the HMMWV. But I guess I shouldn't complain since they were 6 years old. I have to work tomorrow at a transmitter site and I'm working all day Sunday through Friday of next week. Hopefully I'll get to sneak out tomorrow afternoon if weather allows for a more lengthy test drive. But I can already tell a difference. Even the transmission shifts better since there's more power after a shift to keep the vehicle moving.

Also thought I'd take an opportunity for a photo with a train since there's a few train fans around here:
165677849_4027041733984649_8860431616873433439_o.jpg
 

patracy

Administrator
Staff member
Administrator
14,575
4,588
113
Location
Buchanan, GA
Went for a little longer drive today. The power is definitely impressive. I haven't really "smacked it" yet. Just wanting to get everything bedded in when it comes to the wrap/exhaust/turbo. But hopefully tomorrow I'll have time to do a video of 0-60 comparison. The truck no longer just short shifts into 3rd gear and bogs along. It now roars through the gears and has no problem accelerating in 3rd.
 

nikojo

Active member
Steel Soldiers Supporter
175
102
43
Location
Wisconsin and Illinois
Went for a little longer drive today. The power is definitely impressive. I haven't really "smacked it" yet. Just wanting to get everything bedded in when it comes to the wrap/exhaust/turbo. But hopefully tomorrow I'll have time to do a video of 0-60 comparison. The truck no longer just short shifts into 3rd gear and bogs along. It now roars through the gears and has no problem accelerating in 3rd.
Any updates??

Loved the initial you tube video

Any others?

JJ
 

juanprado

Well-known member
Steel Soldiers Supporter
5,482
2,656
113
Location
Metairie/La (N'awlins)
In typical fashion, things never go as planned for me. But I did manage to get in a quick test drive today. I only got up to 50 tops just cruising around the block near the shop. Never really went WOT or anything. But the power is certainly there. No longer a lame dog at getting moving. My shop is on top of a hill (Hilltop Drive actually) so it's a great place to test. Just taking it easy I saw 5-7psi of boot and EGT was around 800 tops if memory serves. All very reasonable. The bad news today was that I had to replace the batteries in the HMMWV. But I guess I shouldn't complain since they were 6 years old. I have to work tomorrow at a transmitter site and I'm working all day Sunday through Friday of next week. Hopefully I'll get to sneak out tomorrow afternoon if weather allows for a more lengthy test drive. But I can already tell a difference. Even the transmission shifts better since there's more power after a shift to keep the vehicle moving.

Also thought I'd take an opportunity for a photo with a train since there's a few train fans around here:
View attachment 829766
Actually the locomotive you pictured was a special edition and I believe only one carries this paint and markings so it is a rare bird. Nice work on both :cool:
You are now an official rail fan.

http://www.nscorp.com/content/nscor...ewlocomotiveincelebrationofgorailstentha.html
 

patracy

Administrator
Staff member
Administrator
14,575
4,588
113
Location
Buchanan, GA
So here's the results everyone has been waiting for:


Over a 4 second reduction in 0-60mph times. 4 seconds!!!

So let me go over the entire install/kit/performance and give it a review.

INSTALL

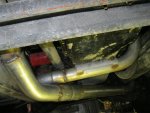
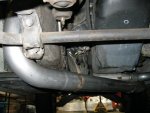
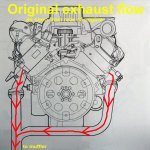
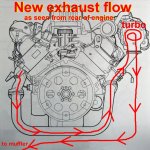
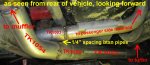
The install is straightforward and anyone can do this. (I'll expand on that in a bit) with nothing more than hand tools and a reciprocating saw. The instructions are completely clear and easy to follow. There a plenty of pictures to help you along as well. The worst part of the install would be increasing the fueling of the injection pump. Only because of the extra care needed to ensure you don't contaminate the pump or break it. While the instructions say that you need to weld all this up. You could get by with clamping a number of the connections with band or c clamps. There are some sections that would need to be welded. But one could get everything installed and take the truck to a muffler shop to have them burn those pipes in. I actually used band clamps on my build to facilitate easier assembly for the crossover pipe install. I did TIG weld up the custom downpipe I made though. Which brings me to the only negative I can say about the exhaust. As a kit, the system is designed to simply drop the exhaust straight down from the turbo. You'd run the exhaust pipe under the frame rail and over to the stock exhaust. I personally didn't want anything hanging below the frame rail, so I passed the downpipe along the passenger manifold. I completely understand why as a kit they wanted you to route it under the frame rail. I had HOURS in making the downpipe. It's actually a 2 piece design as there's no other way to do it. Then I had to reroute fuel, transmission, and electrical connections all through the path I took. For the home install, this would probably be over the top. I ended up using the bandsaw, mill, lathe, hydraulic press, and many other things to make this happen. But for me, it was worth it. So you might also notice how long it took me to get through this install. There were a few issues along the way. There was a defect in one part, but BMI promptly took care of it. Also I've had a few other issues with my install. But more vehicle related than the kit. (Water pump replacement, fan clutch issues, blown transmission cooler liner, dead batteries, snapped injection pump cover bolts, FUN TIMES!) And my main job has taken a lot of my free time lately. If I had followed the kit and not gone rouge on the exhaust, the kit can easily be installed in a weekend.

KIT

The items included in the kit complement themselves well. The manifold BMI has made is of great quality. I'd even go as far to say the casting is more substantial than a factory 6.5 casting for a pickup truck. The oil supply lines and return are all of stainless steel with AN fittings and appears to be a powdercoating. Hoses were Gates as I recall. The airbox is made by BMI as well and is well constructed. The only negative I can find with it is I don't particularly care for the rubber/cork seal used for the airbox lid. I think I'll replace it next time I have it off with a neoprene seal of some sort. Not so much that it doesn't seal. But rather that the rubber tends to want to pick up any trash on it. (I dropped it while working on it and had to pull leaves off the rubber) It's also great they provided boost and EGT gauges. This isn't a knock, but I might end up replacing mine. Not that they don't work. But only to replace with a analog "dial" gauge to fit in more with the stock HMMWV gauges.

PERFORMANCE

Have I mentioned this thing isn't a slouch anymore? The 0-60 alone speaks volumes. My truck is only a 3 speed, so of course top speed isn't really something that can be increased with this kit. But it certainly gets there a LOT faster now. And just cruising around is pleasurable now instead of having it mashed to the floor and not really increasing any speed. If/when I slip in a 4l80e, I will have to probably be able to easily do interstate speeds. I no longer have to worry about holding up traffic up a hill or in general. As I certainly have plenty of power on tap now for all situations. Also some might be interested in the gauge numbers. From the hilly area I live in, I've only seen 11psi and 980F on the gauges. I did only turn up the pump 1 and 1/8 turn. I might turn it up another 1/8 given the EGTs being low. But I'd like to hook up the DRASH HVAC/GEN trailer and pull it around to see how EGTs work under a heavier load to see if I really have all that much more headroom. Heck, I probably could dial it up a little more as I'm not really going to be pulling trailers with the HMMWV.


Overall
I've had this HMMWV for a number of years. Honestly I kinda had grown tired of it because it was so slow. It just wasn't fun to drive if I have to "think" about every move I make. This kit has changed all that. Power is always on tap and it's FUN again. Now many people simply buy a 6.5TD takeout. But you're going to be at that with the cost of this kit. And the engine swap is going to be way more labor involved than this install. If you have a healthy (Starts easily, runs well, good oil pressure, low blowby) 6.2 or 6.5. I'd recommend just going this path instead of a total swap.
 

MattNC

Well-known member
222
270
63
Location
Raleigh, NC
This was really awesome! Can I ask for some pictures of it installed and/or a walk around video of the truck? I'd really appreciate a zoom in on what you did with the exhaust and where it would have gone. I really dig the idea of doing this + a 4L80. An I agree with your assessment. For shadetree+ mechanics like myself the idea of doing this kit if we have a strong engine sounds better than a full swap. I feel comfortable with most mechanical projects but once I start thinking through body lifts, wiring harnesses and hoisting engines I get nervous not so much that I couldn't someday get it done, but that I couldn't get it done within the timeframe allotted by my spouse's patience for chaos in the shop!
 

patracy

Administrator
Staff member
Administrator
14,575
4,588
113
Location
Buchanan, GA
This was really awesome! Can I ask for some pictures of it installed and/or a walk around video of the truck? I'd really appreciate a zoom in on what you did with the exhaust and where it would have gone. I really dig the idea of doing this + a 4L80. An I agree with your assessment. For shadetree+ mechanics like myself the idea of doing this kit if we have a strong engine sounds better than a full swap. I feel comfortable with most mechanical projects but once I start thinking through body lifts, wiring harnesses and hoisting engines I get nervous not so much that I couldn't someday get it done, but that I couldn't get it done within the timeframe allotted by my spouse's patience for chaos in the shop!
If time allows I'll try to get a few pics and a video of the engine bay. If not today I'll make it happen this weekend weather allowing.
 

patracy

Administrator
Staff member
Administrator
14,575
4,588
113
Location
Buchanan, GA
So I had made a video of the hmmwv on my phone. But apparently it only recorded a few seconds. Just realized it now. But here's a pic underneath where I passed the exhaust under/around the transmission. There's a gap all around the pan. And it's wrapped as well to cut down on heat soak. Please excuse the mess. The transmission cooler line made sure the underbody is protected from rust!20210424_162211~2.jpg

Sent from my SM-G965U using Tapatalk
 

nikojo

Active member
Steel Soldiers Supporter
175
102
43
Location
Wisconsin and Illinois
This is great work! Thanks for doing this. I am now convinced this is the route I want to go.

I'm still trying to understand the routing of the exhaust. Does anyone have pictures of how the exhaust is routed 'normally".......I don't have access to these skills LOL.
 

BMI

Member
Supporting Vendor
23
37
13
Location
Bostic, NC
This is great work! Thanks for doing this. I am now convinced this is the route I want to go.

I'm still trying to understand the routing of the exhaust. Does anyone have pictures of how the exhaust is routed 'normally".......I don't have access to these skills LOL.
Attached are 2 pictures showing the exhaust routing as suggested in the manual. The exhaust components for the pictured setup are included with the kit, but the exhaust routing is easily modified and is completely up to the installer as to what they want to do.
Some people have run down along the passenger side frame rail and come out the side (in front of the passenger rear wheel) "Nascar style"
One shop went the same route (along the passenger side frame rail) and then went up the side of the truck with a tall fording stack.
One custom routing came right out of the turbo with a straight pipe, right through the hood with a "smoke stack" style chrome pipe.
Another setup went the same route as the manual shows, but he tucked the pipe up closer to the transmission and made a skid plate to protect the exhaust.

There are many ways that the exhaust can be done. It is really just according to the preference of the truck owner. The setup in the manual is just a suggestion that uses the factory muffler and tail pipe location - basically the least intrusive install option possible is what is given with the kit.
 

Attachments

Last edited:

MattNC

Well-known member
222
270
63
Location
Raleigh, NC
I'm sorry guys, I am dense or something. I went under the humvee looking at the image from the TM and the bottom of my stock 6.2 and also looking at your pictures and I am lost as how these merge back together to go to the muffler. No rush but when you have a chance could you share how you did it? This kit is on my to-do list as soon as I get an overdrive transmission done shortly. Thanks
1620240512571.png
 

BMI

Member
Supporting Vendor
23
37
13
Location
Bostic, NC
I'm sorry guys, I am dense or something. I went under the humvee looking at the image from the TM and the bottom of my stock 6.2 and also looking at your pictures and I am lost as how these merge back together to go to the muffler. No rush but when you have a chance could you share how you did it? This kit is on my to-do list as soon as I get an overdrive transmission done shortly. Thanks
View attachment 833681
No problem Matt,
The pictures can be hard to understand from the different angles.
In addition, the routing and direction of the exhaust gasses (within the cross-over pipe) is changed from OEM, so that may be confusing you if you are just looking at the pipes without the theory behind what is going on with the new routing.
Attached are a couple pictures with notes (as included within the install manual).
I hope these will clarify.
 

Attachments

MattNC

Well-known member
222
270
63
Location
Raleigh, NC
No problem Matt,
The pictures can be hard to understand from the different angles.
In addition, the routing and direction of the exhaust gasses (within the cross-over pipe) is changed from OEM, so that may be confusing you if you are just looking at the pipes without the theory behind what is going on with the new routing.
Attached are a couple pictures with notes (as included within the install manual).
I hope these will clarify.

Thanks this makes sense now!
 

BMI

Member
Supporting Vendor
23
37
13
Location
Bostic, NC
Attached is an additional picture showing the exhaust downpipe as it crosses under the frame-rail. This is just one way the exhaust can be configured, but as you can see from the picture the pipe is no lower than the upper portion of the lower A-arm on the wheel that it is only about 11.5" behind as it passes under the rail.Turbo kit exhaust downpipe.jpg
 

Action

Well-known member
3,582
1,550
113
Location
East Tennessee
Attached is an additional picture showing the exhaust downpipe as it crosses under the frame-rail. This is just one way the exhaust can be configured, but as you can see from the picture the pipe is no lower than the upper portion of the lower A-arm on the wheel that it is only about 11.5" behind as it passes under the rail.View attachment 836654
Is the exhaust pipe resting on the frame rail?
 

BMI

Member
Supporting Vendor
23
37
13
Location
Bostic, NC
Is the exhaust pipe resting on the frame rail?
No, the pipe is about 1/4" from the bottom of the frame rail. It must be the camera angle that makes it look closer. than it actually is.
That is just one of the possible routes for the exhaust pipes to go.
 

Nitrocannon300

New member
I have a question. Since most of these kits were made for NA 6.2 and 6.5 would there be any way to easily modify it to work on CUCVs ie: M1009 and M1008. I have not seen any information on if someone has tried this.


Sent from my iPhone using Tapatalk
 
Top
AdBlock Detected

We get it, advertisements are annoying!

Sure, ad-blocking software does a great job at blocking ads, but it also blocks useful features of our website like our supporting vendors. Their ads help keep Steel Soldiers going. Please consider disabling your ad blockers for the site. Thanks!

I've Disabled AdBlock
No Thanks