• Steel Soldiers now has a few new forums, read more about it at: New Munitions Forums!

  • Microsoft MSN, Live, Hotmail, Outlook email users may not be receiving emails. We are working to resolve this issue. Please add support@steelsoldiers.com to your trusted contacts.


Well, Not my deuce exactly. But...

tinygpw11

Active member
49
172
33
Location
London U.K.
Metalmiki is trying to 'outdo' (Re my previous accident) me, by incapacitating himself!.
He has done too much. Now has a really bad rotator cup injury.
He can't even lift his Huge plastic tea/coffee cup.
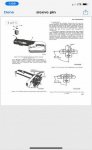
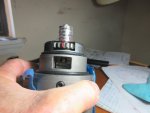
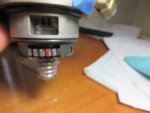
Getting under the deuce to time the hydraulic Head, Impossible and made him really cringe with the pain.
Screwdrivers, No, Spanners, No, Anything with the right arm/ Hand, No.
computer work, Ouch.
So I have to study this before I fcomplete this write up of the work I carried out under his watchful and pain filled 'eye'..,
,

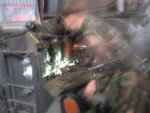
Sorry about the quality of the pictures of me working, But You can imagine the pain as he struggled with the camera.
 

Attachments

Last edited:

marchplumber

Well-known member
Steel Soldiers Supporter
3,651
2,416
113
Location
Peoria, Illinois
Glad you're doing the work, sorry for the reason why! Our brains say, "23" our bodies scream "much older"......................Keep us informed from across the "pond" and stay safe yourself young man, that knee can't be completely healed yet.....................

THANKS again!!
 

tinygpw11

Active member
49
172
33
Location
London U.K.
My apologies for the slow reply. I haven't had a lot of free time lately.
As I said, the other day we re-timed the hydraulic head on a deuce and put new seals on to stop the leak. We started by taking off the pipes at the top of the Hydraulic head (the pipes which lead to the injectors) and pulled them out. Next we loosened each bolt and then took them off keeping the head level, then we took the fuel control arm (which controls how much fuel is supplied to the engine) out of the socket and took the bracket off. Now we took the head off trying to keep it level so the timing mark can stay in the same position. This is where we changed the seals. We had the help of someone (Steve) from the barn next door to go under the truck to twist the propshaft so we could find the timing mark on the harmonic balancer. Finally we put the head back in and screwed it down tight, then we did the fuel contol arm and the bracket. I started to try and put it on with the sleeve pin at the end horizontal and attaching the arm and bracket which was really fiddly then Dmetalmiki tried and had about 147 attempts. By that point my legs were aching and Dmetalmikis arm was really hurting so we called it a day and we would finish it off next time I went. Later that night Dmetalmiki searched up how to do it to see what we got wrong. Turns out I got it right first time.

This is my edited version that dmetalmiki mentions further down.
 
Last edited:

Floridianson

Well-known member
Steel Soldiers Supporter
7,390
2,434
113
Location
Interlachen Fl.
Per TM before we install the Head we check that the plunger sleeve is moving free on the plunger shaft. We do this buy turning the Head up side down and the plunger sleeve should on it's own slide down the plunger shaft. Then when we turn the Head right side up the plunger sleeve will slide on it's own to the bottom. . As for when we install the fuel control unit assembly the arm will be close to the 4 / 5 o' clock position and the little pin should be horizontal because the plunger sleeve is down and the spill port is open. You might have to move the fuel control unit assembly arm just a bit but it still will be around the 4/5 position. As per the TM we are supposed to check the end gap with a feeler gage. As for why the fuel control unit assembly tightens up and we have to leave the two screws just a tad loose or find the right spot where the fuel control unit moves free. I believe that the pin is being pressed to tight into the plunger sleeve and bottoming out and that is what causes the binding. So here we have to find just the right amount of torque on the two screws that hold the fuel control unit into the Head. As for the correct timing of the Head. Yes we only remove and install the Head when the red scribe mark is on the Head pointer. Problem is if someone installed the Head incorrectly then the Head would not come out when the red / scribe is on the Head pointer. The red/ scribe and pointer is a timing mark and we check it buy putting the harmonic balancer on it's correct mark and the advance window on it mark. Now the Head red / scribe will be just about one tooth off to the rear. If the harmonic balancer and advance window are on the correct marks but the Head red scribe is more than one tooth off to rear or forward of the pointer the Head timing is not correct. Bottom line you screwed up on install of the Head.
 

Attachments

Last edited:

Floridianson

Well-known member
Steel Soldiers Supporter
7,390
2,434
113
Location
Interlachen Fl.
Just to be clear the red scribe is a timing mark as per the TM. We just have to make sure if / when we remove the Head and the red scribe is on the Head pointer we must reinstall the Head with the red scribe right on the Head pointer. Not almost one tooth off to the rear or anywhere else but on the on the pointer. The picture did not come out that well but if you installed the Head correctly with red scribe on Head pointer then if you rotate the HB and advance window to there correct marks the red scribe will have move off the Head pointer just about one tooth. This means we are timed correct. If look at the bad picture the the red scribe is to the rear and the pointer is just at the base of the tooth behind the red scribe This is why the TM says just about one tooth off.
 

Attachments

dmetalmiki

Well-known member
5,523
2,026
113
Location
London England
OOO, K Tiny..well done..I will ' Mark' your write up when We do the M145 fuel tank tomorrow. ( I will edit your post with you tomorrow ( That's your 'detention'! Homework! )).

Thank you for dialing in Floridianson,
The boy (tiny gpw11) was trying to explain (That), The guy from the other barn was asked to come and turn the PROPSHAFT while you (Tiny). kept calling the moves of the Hydraulic Head gear with the red mark (remember?).
The INJECTOR PIPES (You removed) Supply diesel oil under pressure to the INJECTORS. (No spark plugs on a diesel engine).
The throttle rod Tiny gpw fitted right first time, (I had in my head to set it a 7 o'clock per past steel soldiers posts.
I just could not due to my shoulder rotator cuff injury.
The boy was correct. 6 o'clock engine harmonic balancer (The big wheel on the front of the the engine at the LDS 4651 lined to the POINTER. (tiny Remember you spotted it for us and Steve under the truck turning the propshaft. TRANSFER IN NEUTRAL. and FOURTH GEAR SELECTED ON THE MAIN GEARBOX.
BUT, The two screws on the throttle rod retainer are NOT TIGHTENED (as) you fitted a NEW O RING SEAL to the shaft. And tightening the screws would 'sqish the new fatter seal' and lock up the shaft. FINGER TIGHT and a 'nudge' is good then (You are going to WIRE IT UP( tomorrow)).
Tomorrow he will complete the task, and we will fire up the truck.
Thank you all for following and supplying guidance and support.
 
Top
AdBlock Detected

We get it, advertisements are annoying!

Sure, ad-blocking software does a great job at blocking ads, but it also blocks useful features of our website like our supporting vendors. Their ads help keep Steel Soldiers going. Please consider disabling your ad blockers for the site. Thanks!

I've Disabled AdBlock
No Thanks