• Steel Soldiers now has a few new forums, read more about it at: New Munitions Forums!

  • Microsoft MSN, Live, Hotmail, Outlook email users may not be receiving emails. We are working to resolve this issue. Please add support@steelsoldiers.com to your trusted contacts.

What have you done to your 5 ton this week?

M35A2-AZ

Well-known member
Steel Soldiers Supporter
3,220
390
83
Location
Tonopah, AZ
Got a set of front axle flange drive caps, my friend Welder1 is de-splining them. Looking forward to reducing some drag in the near future. I've heard as good as a 1 mpg difference so I'll see if I get that lucky. Simp said they're good for 5 horsepower!!!
I used a set on the 3000 miles I drove on the MVPA RT66 convey and I think I got better MPG.
 

tobyS

Well-known member
4,832
833
113
Location
IN
Got a set of front axle flange drive caps, my friend Welder1 is de-splining them. Looking forward to reducing some drag in the near future. I've heard as good as a 1 mpg difference so I'll see if I get that lucky. Simp said they're good for 5 horsepower!!!
I was ready to have the sheet metal flange cut and use a small dished air tank head as a cover, welded, to keep from having to lose my splines....but didn't follow through. I think the dished heads were available at $12 or so and the plasma cut flange a couple bucks.
 

sandcobra164

Well-known member
2,999
289
83
Location
Leesburg, GA
I'll still have my splined caps for adverse conditions on board along with a socket wrench to swap around. My de-splines will be painted black to indicate normal use and my splined caps will be painted yellow to indicate emergency use. Might even add a ball valve for the air supply to the dash switch to eliminate the possibility of an un-informed operator trying to engage the transfer case front output "on the fly" as designed on an unmodified truck.
 
Last edited:

Amer-team

Well-known member
1,707
32
48
Location
Centralia/WA
Got the inner axle seal changed in the Gamewardens M931 today and changed the gear lube in the Front axle. the CTIS still worked once we got it back together. Wish it did in my M923A2.
 

8madjack

Active member
416
78
28
Location
Gold country Ca.
Got a set of front axle flange drive caps, my friend Welder1 is de-splining them. Looking forward to reducing some drag in the near future. I've heard as good as a 1 mpg difference so I'll see if I get that lucky. Simp said they're good for 5 horsepower!!!
Too bad they don't make selectable hubs like on regular 4x4 trucks. Might be a cool project to make some upsized versions!
 

simp5782

Feo, Fuerte y Formal
Supporting Vendor
12,118
9,355
113
Location
Mason, TN
Too bad they don't make selectable hubs like on regular 4x4 trucks. Might be a cool project to make some upsized versions!
Folks have in the past. A person here has the blueprints there is just not any money in it

Sent from my SM-G935P using Tapatalk
 

Mos68x

Active member
826
33
28
Location
Seligman,AZ
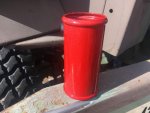
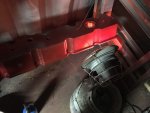
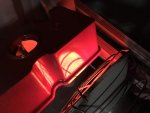
Finally got the valve cover ready to powder coat the new color.

9841E3F2-528F-434D-8809-16694029D862.jpg7185AD90-F4A7-4DAB-BE9E-CA40C7F811BF.jpg
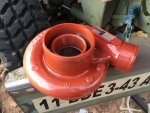
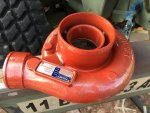
The turbo is with Dormant Red and clear, I wasn’t happy with the color so I cut it with 50% gloss red.

32EDEE64-7EA1-4231-A9EA-ED232CE6FA07.jpgB749E813-F29E-4707-A568-678B890001AC.jpg
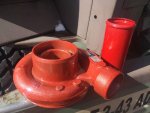
First test piece with the 50% cut and compared to the turbo. This color makes me much happier. The turbo turned very “orangey”, but cut with the red makes all the difference. Definitely pretty close to the ISX red that I was after.

6E07080C-A208-4EDD-8A8A-43E379166541.jpgC315FE37-C0EB-4D63-98AC-219665F365C8.jpg
Since I’m finally happy with the color I started on the valve cover. Took me a full day just trying to get the valve cover ready to coat. That old paint is a real PITA to get off! I even used my orbital with 40g to cut through what I could before taking it to the sandblaster cabinet(which it barely fit into lol). I will try to remember to get some pictures tomorrow in the daylight since the dark pics don’t show the color that well.
 

TwistedOaks

Member
Steel Soldiers Supporter
204
8
18
Location
Odessa, Florida
To quickly hijack... do you get decent results with a powder mix? I have a heck of a time getting a consistent color out of a blended powder color.
Finally got the valve cover ready to powder coat the new color.

View attachment 719380View attachment 719381
The turbo is with Dormant Red and clear, I wasn’t happy with the color so I cut it with 50% gloss red.

View attachment 719382View attachment 719383
First test piece with the 50% cut and compared to the turbo. This color makes me much happier. The turbo turned very “orangey”, but cut with the red makes all the difference. Definitely pretty close to the ISX red that I was after.

View attachment 719384View attachment 719385
Since I’m finally happy with the color I started on the valve cover. Took me a full day just trying to get the valve cover ready to coat. That old paint is a real PITA to get off! I even used my orbital with 40g to cut through what I could before taking it to the sandblaster cabinet(which it barely fit into lol). I will try to remember to get some pictures tomorrow in the daylight since the dark pics don’t show the color that well.
 

Mos68x

Active member
826
33
28
Location
Seligman,AZ
A8A8B9EA-A5A4-4EF9-B77D-9C7B4942A491.jpgB8E248D7-CF70-4CE0-8B10-CA46F5DC3F94.jpg974B798E-7DE1-4488-A61F-15C06E85E83D.jpgBFE4BB3F-5079-44C1-A12B-EDEA1802569B.jpg3620C393-EB83-4F77-B4F5-B42717300C37.jpg

Got two corner assemblies for the ISO frame that will be mounted to the truck finished today with the help of 98G who brought his arc welder. Welded up and now ready to be welded to the I-beam. For that part though I’ll be welding them together on top of the shipping container so I know for a fact that it will fit when I’m finished. Last thing I need is to be certain it’ll fit, cause that’s what a drawing said it should be. Welded most places with one pass of 6010 and then 1-2 passes of 7018.
 

Mos68x

Active member
826
33
28
Location
Seligman,AZ
To quickly hijack... do you get decent results with a powder mix? I have a heck of a time getting a consistent color out of a blended powder color.
If you’re talking about consistent between different mixes (like different days) I’m not sure, I’ll have to let you know later. If you’re talking about consistent throughout the whole batch, then that went great. Only thing that pissed me off was that some junk fell into the powder as it was cooling. That should be an easy fix though, I’ll just hit it with 2k and higher grit sand paper and then buff it all out. I did get some cracking in the base color when I looked at it in the daylight today, but I think that’s because I had to use the propane radiant heater instead of an oven, so uneven heating could’ve been the culprit there. Still looks good just need to dress it up a little bit...sometime lol.
 

74M35A2

Well-known member
4,145
326
83
Location
Livonia, MI
Oh geez, here comes the welding police in 3..2..1.. “You should not use flux cored post-flow wrong gas mix chrome-moly reverse polarity work hardened spool gun in your weak penetration of underwater basket weaving project!”. Watch... These welding threads always turn into a pen!s contest, especially if you post your row of dimes and start rattling stick #’s, you’re doomed. No matter what, you didn’t do it right. Everybody else can weld better from their armchair, with a beer in one hand, and the remote in the other.

While you’ve got the buzz box warmed up, lay a bead or 3 on the rocker arms so they don’t fall off again. :)
 
Last edited:

Mos68x

Active member
826
33
28
Location
Seligman,AZ
Oh geez, here comes the welding police in 3..2..1.. “You should not use flux cored post-flow wrong gas mix chrome-moly reverse polarity work hardened spool gun in your weak penetration of underwater basket weaving project!”. Watch... These welding threads always turn into a pen!s contest, especially if you post your row of dimes and start rattling stick #’s, you’re doomed. No matter what, you didn’t do it right. Everybody else can weld better from their armchair, with a beer in one hand, and the remote in the other.

While you’ve got the buzz box warmed up, lay a bead or 3 on the rocker arms so they don’t fall off again. :)
Lol blah blah blah lol they can stick that crack up their arse. But you’re right someone will start whining about welding done by someone else when they themselves can’t weld for sh1t lol

lol yer an ass
 

Jericho

Well-known member
1,180
69
48
Location
Landaff NH
You guys got arc welders with switches. In the great wilds of Jericho I still use oxy acetylene and good quality coat hangars
 

98G

Former SSG
Steel Soldiers Supporter
6,066
4,418
113
Location
AZ/KS/MO/OK/NM/NE, varies by the day...
Welds look great, I'm still trying to achieve that kind of flow. John can sure stick metal together.
Thank you all for the kind words.

Welds are like handwriting - mos68x did some and I did some. Looking at the posted pics, it's immediately obvious to me which ones are mine. Miniscule differences in rod angle transitions and similar subtleties sum to a personal style.

A similar effect comes through for sending Morse or similar code. Subtle differences in rhythm give each sender their own voice. Back when I used to eavesdrop for a living we'd know which particular operator was sending after just a few characters.

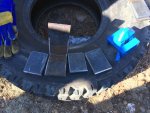
Yesterday was a good day. We accomplished a bit on mos68x's project, and while he prepped metal for welding I entertained myself by desecration of a 5ton rim by using it for fabricating yet another firepit.
 

tobyS

Well-known member
4,832
833
113
Location
IN
I'll venture a guess yours (98G) is on the right in photo 5 and mos68x is on the left. Porosity vs. none + enough metal. Certainly not everything needs full strength welds, but apparently this part does.

My problem is consistent overhead...actually I'm not going to claim to be an expert in doing the welding, I was involved in boiler engineering and design to know what to look for...not that I have the skill to consistently put it there. Been welding 49 years.
 
Last edited:
Top