• Steel Soldiers now has a few new forums, read more about it at: New Munitions Forums!

  • Microsoft MSN, Live, Hotmail, Outlook email users may not be receiving emails. We are working to resolve this issue. Please add support@steelsoldiers.com to your trusted contacts.


What have you done to your 5 ton this week?

Valley Rock

Big wheeler cat peeler
Steel Soldiers Supporter
329
523
93
Location
Rogue Valley OR
Remove the electronic fuel shut off solenoid from your inj. pump and throw it in the trash, that will fix 90% of your no start issues, and just use the manual fuel stop T-
-handle on the dash .

I might be working today, but eventually and intermittently it won't .
 

Valley Rock

Big wheeler cat peeler
Steel Soldiers Supporter
329
523
93
Location
Rogue Valley OR
Okay, so I did more stuff (M931A2)

I put that angle iron cross piece back on behind the cab that holds the metal covers over the fuel tanks and spare tire junk .

I had taken it off when I made this truck into a water truck, and I also removed the drivers side fuel tank and had a pump down there in it's place .

So having removed all of the water truck stuff and not needing two fuel tanks, I put a tool box in place of where the fuel tank used to reside .

I also switched the fuel tank covers to the opposite sides so the little flip up door would once again be over the fuel cap and feel needed .

I took the glad hand holders off of the spare tire holder that is no longer on the truck and just bolted them to the back of the cab .

I hope everyone approves and is thoroughly stoked for my amazing changes .

Enclosed are pics of green metal

Mike .

20230408_110222.jpg20230408_110426.jpg20230408_134029.jpg20230408_110202.jpg20230408_110154.jpg
 

Wreckclues

Well-known member
Steel Soldiers Supporter
157
434
63
Location
Jefferson, Massachusetts
Been experiencing electrical issues with the turn signals. At first contact cleaner cleared it up, but the problem persisted. Found that pin "C" was either cut or broken. This is for the Left Rear Directional.

LS1.jpg

There was no sign of the broken stub, but fortunately there was enough extra pin through the plug, to push back in.

LS2.jpg

But the signal switch still wasn't getting any power.

LS5.jpg

Ran the malfunction test in the tech manual by bridging sockets "A" & "B" at the Flasher Directional Signal Unit wiring harness, then with the light switch on service drive, positioned the blinker lever to the Right and Left positions.

LS6.jpg

The directional light came on but did not blink indicating a bad flasher unit.

LS7.jpg

Time for a new Flasher Directional Signal Relay...preferably without a hornets nest...

LS8.jpg
 

Attachments

Wreckclues

Well-known member
Steel Soldiers Supporter
157
434
63
Location
Jefferson, Massachusetts
Replaced the fuel sender this week with mixed results.
I was able to save the old gasket and all but one bolt came out without having to drill, although I did replce the bolts.

1Fuel1.jpg

There was definitely a lot missing on the old unit.

1Fuel2&3.jpg

At first the gauge worked but as soon as I climbed aboard it went to infinity.

1Fuel6&7.jpg

Tested the sender both at the tank without the wire and at the gauge through the wire. Not sure what the ohms rating is for the sender but I have continuity with only a .2 ohms difference.

1Fuel4.jpg
1Fuel5.jpg

I guess the sender float could be catching on something in the tank. I believe I have it installed correctly. To far to the left and I'm hitting the forward tank baffle and to the right the pickup tube.
Is the problem the gauge or should I fiddle more with positioning the sender float?

1Fuel3a.jpg
 

Valley Rock

Big wheeler cat peeler
Steel Soldiers Supporter
329
523
93
Location
Rogue Valley OR
What else did you do when you "climbed aboard" ?
I doubt that just getting in the truck would cause a problem, but, if the gauge is pegging over it's because is receiving a full ground signal, so somewhere that signal wire is getting to ground like it's maybe rubbed through somewhere, or your new sender is defective which is unlikely .

I'd be taking a look at that wire at the back of the gauge and follow it on down to the fuel tank for a thorough investigation .

A quick way to tell would be to unhook the signal wire completely and replace it with long jumper for test purposes eliminating the factory wire altogether .
 

US6x4

Well-known member
Steel Soldiers Supporter
1,181
2,064
113
Location
Wenatchee, WA
Today my brother and I got the level wind installed and functional. It turned out to be a 45,000 lb unit from the rear winch of a M816 or M936 so 3 of the 4 mounting holes had to be altered and all of the movements were froze up. All the lower fittings of the trolley were caked up solid so after getting those cleared out and greased we were able to exercise the trolley wheels, the pulley and the pulley swivel until everything loosened up. We accidentally reinstalled the trolley the correct way and now the locking pin works as it should! That was a good surprise.

I still need to find a tensioner to complete the setup and I think I'll paint the left side of it black to match the truck.

20230422_194718.jpg

20230422_194657.jpg
 

TechnoWeenie

Well-known member
Steel Soldiers Supporter
1,644
1,651
113
Location
Nova Laboratories, WA
Today my brother and I got the level wind installed and functional. It turned out to be a 45,000 lb unit from the rear winch of a M816 or M936 so 3 of the 4 mounting holes had to be altered and all of the movements were froze up. All the lower fittings of the trolley were caked up solid so after getting those cleared out and greased we were able to exercise the trolley wheels, the pulley and the pulley swivel until everything loosened up. We accidentally reinstalled the trolley the correct way and now the locking pin works as it should! That was a good surprise.

I still need to find a tensioner to complete the setup and I think I'll paint the left side of it black to match the truck.

View attachment 895724

View attachment 895725
45K? Holy crap.

You could quite literally lift yourself up a cliff face....
 

5TID

Well-known member
74
278
53
Location
Boise, ID
I made an external air line to my air system so I can pull air while truck is running (yes, I have a glad hand too), or pump the system up while the truck is off. I pumped it up and tracked down a couple leaks that I could finally hear without the motor running. Also cycled the CTIS system down and up to verify every is good. Found two wheel valves needed some tightening.

Also, this week during my pre trip inspection, found a torn front axle boot. So I am no longer part of the "those who will change a 5 ton axle boot" crowd and now part of the "those who have changed a 5 ton axle boot" crowd. Took me just under an hour to do for the first time; a chunk of that time was finding wire I could use for the bolts. I now have everything ready for when the other side goes. Ordered some spare CTIS fittings too.

Also Also, fixed my losing prime issue (looks good so far anyway). The 90 degree fitting that the fuel hose connected to at the pump was actually loose on the block side and letting air in, so pulled out, re-taped, and tightened back down and it's good to go. Put in a braided stainless fuel line while I was in there too.
 

Superthermal

Well-known member
267
769
93
Location
Utah, Murray, United States
I finally got my functional jake brake grenade shift knob installed! Just squeeze the spoon and the jakes come on (once I get the jakes installed). I will do a write-up on it in the hot rod section later but I couldn't resist not putting up a sneak peek.

View attachment 772840 View attachment 772839 View attachment 772841

https://www.steelsoldiers.com/showthread.php?189934-Trick-functional-jake-brake-grenade-shifter
Fun knob. Question on the shifter boot that you have there. Where did you find it?
 

Wreckclues

Well-known member
Steel Soldiers Supporter
157
434
63
Location
Jefferson, Massachusetts
Installed a new fuel gauge after testing the sender wire from the tank for a short. Although I don't know the ohms rating for the sender, found a setting on my meter that showed a signal from the sender and demonstrated a difference in readings with my weight on and off the truck. Replaced the gauge and the tank is indeed about 3/4 full
 

Attachments

TechnoWeenie

Well-known member
Steel Soldiers Supporter
1,644
1,651
113
Location
Nova Laboratories, WA
80* here... which is pretty warm for these parts considering it was 35* just a couple nights ago.

Got a bunch of parts laid out...

Replacing air drain valves with 1/4 turn ball valves.

Replacing fuel pickup tube.

Adding a Schrader valve to the fuel cap so I can pressurize/self bleed... it'll be through a regulator set at like 1 or 2 psi... so... just enough to get fuel flowing after changing filters.... I might also research bypassing the lift pump using air but sounds like not a good use of time since the pumps rarely fail and they're like $50 if they do so I'd be better off just keeping a spare on the truck since it takes 10 mins to replace.

Bypassing the transfer case lockup solenoid and modifying the front axle engagement switch not engage in low.

Nice laundry list... but... technically hasn't been done yet... heh
 

TechnoWeenie

Well-known member
Steel Soldiers Supporter
1,644
1,651
113
Location
Nova Laboratories, WA
So.. .Re: above... Apparently not all 3/8 compression unions are the same... The threads weren't matching up at all, and the nut supplied with the union was loose as #(%& on the factory fitting... So, who needs tolerances? So, didn't get the air line mod done. I was able to bend the front axle actuator lever out of the way, though, so putting it in low won't engage it.

Even with no air, it does NOT want to budge out of high range now....So, I'm thinking the plunger is stuck... and removing the valve would fix that issue.


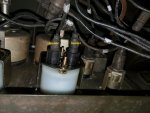
It's super easy to access, and I can actually SIT in the hole where the transfer case is, minding my head not to hit the shaft..

Figured out my stall in Reverse issue.. It was indeed a sticking transfer case shift button... I dumped half a can of electrical contact cleaner in there and kept hitting it like a mad man, and it's 99% there, but It's super sensitive and I think I'm just gonna buy a new switch and be done with it... I don't wanna know what happens if I'm going down the road @ 35 MPH and hit a bump and the switch activates...

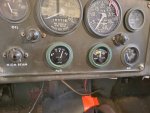
ABS light was on when I got it.. no clickety clackety... Pulled the 3A fuse... it was good...put it back in.... couldn't find the 15A fuse.. but it's clickety clackety now, so that's progress....

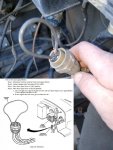
Protection valve is sticking.... Supposed to kick over @ 65PSI but it's closer to 100 PSI before it goes.... So I'll either need to try and clean it, or more likely, just replace it.


I'm not sure I mentioned this, but in my previous life I was an emergency vehicle upfitter. There are 2 things that really, REALLY piss me off.. Agencies who let their mechanics install stuff.... who don't know what they're doing... and agencies who just cut every wire they see when they're taking it out of commission because they don't care.

I got both. It's VERY clear that the person who installed the lights and radio and whatnot for the fire department, wasn't a trained EVT.... it's also VERY apparent that they went around cutting whatever wire was in the way to get lights/controls/etc out. They pulled the dash panel out to run wires behind it, which they didn't need to do, then mounted stuff to the dash panel, bending the panel back to fish wires behind the bezel.. which they just flush cut and left sticking out of the dash panel.

I also put together my glad hand air line, with an I/M adapter since I run V fittings. So, I can either use onboard air for tools, or air up the tires (they removed the CTIS), or use that same line, with the adapter, to supply air to the emergency line to check for leaks and whatnot.


So, basically, none of the stuff I planned to get done, got done... and a couple things I didn't plan on doing, I made some progress with.
 

Jbulach

Well-known member
Steel Soldiers Supporter
2,589
2,042
113
Location
Sunman Indiana
80* here... which is pretty warm for these parts considering it was 35* just a couple nights ago.

Got a bunch of parts laid out...

Replacing air drain valves with 1/4 turn ball valves.

Replacing fuel pickup tube.

Adding a Schrader valve to the fuel cap so I can pressurize/self bleed... it'll be through a regulator set at like 1 or 2 psi... so... just enough to get fuel flowing after changing filters.... I might also research bypassing the lift pump using air but sounds like not a good use of time since the pumps rarely fail and they're like $50 if they do so I'd be better off just keeping a spare on the truck since it takes 10 mins to replace.

Bypassing the transfer case lockup solenoid and modifying the front axle engagement switch not engage in low.

Nice laundry list... but... technically hasn't been done yet... heh
UploadFile1682880239.723836.jpg
Here is how I add air to my tank through the vent lines. I also keep my little paint gun regulator in the truck and use it to help keep from over pressuring the tank.UploadFile1682880468.611905.jpg

Disregard the 90 degree piece of coper tube laying on the tank, that is not part of the air setup, just the old pickup line that cracked the flair and was sucking air.
 
Last edited:

Russ Knight

Well-known member
Steel Soldiers Supporter
1,117
1,051
113
Location
Perry, FL
I made an external air line to my air system so I can pull air while truck is running (yes, I have a glad hand too), or pump the system up while the truck is off. I pumped it up and tracked down a couple leaks that I could finally hear without the motor running. Also cycled the CTIS system down and up to verify every is good. Found two wheel valves needed some tightening.

Also, this week during my pre trip inspection, found a torn front axle boot. So I am no longer part of the "those who will change a 5 ton axle boot" crowd and now part of the "those who have changed a 5 ton axle boot" crowd. Took me just under an hour to do for the first time; a chunk of that time was finding wire I could use for the bolts. I now have everything ready for when the other side goes. Ordered some spare CTIS fittings too.

Also Also, fixed my losing prime issue (looks good so far anyway). The 90 degree fitting that the fuel hose connected to at the pump was actually loose on the block side and letting air in, so pulled out, re-taped, and tightened back down and it's good to go. Put in a braided stainless fuel line while I was in there too.
Could you use thread lock instead of wire? I need to change mine too.
 

Russ Knight

Well-known member
Steel Soldiers Supporter
1,117
1,051
113
Location
Perry, FL
Changed a leaking brake diaphragm. Now I know why caution is to be used when doing so. If that big spring didn't send you to the grave, it would at least send you to the moon!
 
Top
AdBlock Detected

We get it, advertisements are annoying!

Sure, ad-blocking software does a great job at blocking ads, but it also blocks useful features of our website like our supporting vendors. Their ads help keep Steel Soldiers going. Please consider disabling your ad blockers for the site. Thanks!

I've Disabled AdBlock
No Thanks