- 2,206
- 3,422
- 113
- Location
- Florence, SC
Added some "patriotic" stickers to the truck today, changing the transmission fluid/oil & outside filter tomorrow...
Attachments
-
 78.3 KB Views: 45
Steel Soldiers now has a few new forums, read more about it at: New Munitions Forums!

.Added some "patriotic" stickers to the truck today, changing the transmission fluid/oil & outside filter tomorrow...
I second that motion..
I particularly like the flag sticker...
Volunteering to help them pack as well!
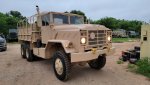
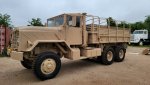
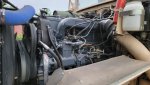

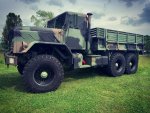
.Picked up this clean Kansas rebuild and gave her a face lift (paint), PMCS, and a few minor repairs. I've not seen a rebuilt engine that is navy gray/blue like this, maybe it was done at Cummins and shipped to the depot? Either way I feel it looks like it just rolled out the depot door.
I took my 813 to a car show 40 miles away and a heater fitting sprung a leak when I was 10 miles out. I showed up at the show with antifreeze spewing all over the place. The truck definitely made an entrance but not the kind I would have preferred. Fortunately and hardware store was 30 feet away so a pipe plug fixed the issue.
View attachment 775562
View attachment 775564
View attachment 775565


What paint did you use?Picked up this clean Kansas rebuild and gave her a face lift (paint), PMCS, and a few minor repairs. I've not seen a rebuilt engine that is navy gray/blue like this, maybe it was done at Cummins and shipped to the depot? Either way I feel it looks like it just rolled out the depot door.
Behr Marque Flat ExteriorWhat paint did you use?


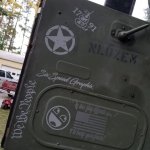
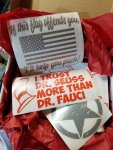
Here is a better pic of that sticker & another one I got as well too....
I particularly like the flag sticker...
Volunteering to help them pack as well!

I tore into my left rear hub suspecting a leaky wheel cylinder and all I found was two stripped lug studs and a rolled lip on the inner hub seal. Whoever last torqued those nuts & thimbles (army most likely) must have laid on it with a 1" impact because they were on tight! Using impacts with 1200 ft-lb break away torque did almost nothing. Breaker bars with torque multipliers did nothing. I laid on my impact until the tank was drained and repeated 3-5 times before they started to move. 1 week delay waiting on new studs to arrive and then I lost the battle with the new hub seal (even after shrinking in the freezer).
View attachment 834218
View attachment 834219
View attachment 834220
I turned my HubHelper sideways and then laid the hub face down taking the floor jack with it to drive the seal in from straight above. I ended up deforming the new seal and reinstalling the old seal - very frustrating.
After this episode I think I'm gonna source some Scotseal hub seals with the fine rubber ribs on the outside circumference. That's all we used at the Freightliner shop and for good reason. They're not cheap but they just work.
View attachment 834221
View attachment 834222


Nice looking ride!Picked up this clean Kansas rebuild and gave her a face lift (paint), PMCS, and a few minor repairs. I've not seen a rebuilt engine that is navy gray/blue like this, maybe it was done at Cummins and shipped to the depot? Either way I feel it looks like it just rolled out the depot door.
.Here is a better pic of that sticker & another one I got as well too...
.Got my wheels painted a couple days ago. Very happy with how they turned out.
Thank you! I just wanted to do something a little different.
Very nice looking paint!
I like the green axle caps...


.With my brother's help I finally decided to tackle the front inner axle seal that I knew was letting gear oil into the hub, wheel bearings, and knuckle boot. I'd been putting this repair off knowing how involved it could be and I made a contraption for removing the seal holder without the use of a slide hammer or a long bar from the other side.
This time I mounted the spout and can holder to my HubHelper to keep the gear oil mess to a minimum.
View attachment 835629
View attachment 835630
View attachment 835631
After reading about others using a gear puller with the jaws removed to pull the seal holder out, i made this gizmo to do the same thing using a tapped bar, a 12" long 3/4" leg screw, 1/4" c-channel, and a TIG filler rod to hold thigs in place. The amount of force required almost collapsed the c-channel...
View attachment 835632
View attachment 835633
View attachment 835634
View attachment 835635
View attachment 835636
We found that half the seal had been crushed inward deforming the rubber lip into more of an oval shape. It's always nice when the source of a problem readily shows itself
View attachment 835637
I found a scary situation while disassembling the spindle; the tightest of the 10 spindle retaining nuts i had was at 40 ft-lbs when the spec calls for 130-167 ft-lbs...no bueno!
This makes me want to inspect the driver side as well
View attachment 835638
There was so much gear oil in the knuckle (about 1/2 a quart) that I grabbed my brake bleeding hose and suck-started a siphon to drain it out. The clear hose gave me enough warning to move my mouth before taking on any oil...phew.
The worst part of the job was when I flexed the Birfield CV joint too much and all 4 of the outer balls fell out. We had just repacked all the fresh, messy grease in and it took some time to figure out what position I needed to be in so that my brother could fondle my greasy balls back into place...
You're right - there's really nothing to show for it externally. I'll have one less drip on the ground and I'll feel much more confident on longer trips. The whole RH side of the chassis was getting misted and splattered by the oil that escaped from the cracked knuckle boot on my longer trips (40+ miles)..
Wow! Nice job of documenting the process.
Fixing that sort of thing makes you feel good when it's done - but there isn't a lot of "show" when you finish.
The drip lip for gear oil was a major plus!
")

