• Steel Soldiers now has a few new forums, read more about it at: New Munitions Forums!

  • Microsoft MSN, Live, Hotmail, Outlook email users may not be receiving emails. We are working to resolve this issue. Please add support@steelsoldiers.com to your trusted contacts.

What have you done to your HMMWV today/lately

85
2
8
Location
Aurora, CO
Thunder Squirrel, can you walk us through how you applied the db Skin? I keep looking at it or going with Lizard Skin.
T.S.-- I'm liking the looks of this stuff. Sound deadener and heat resistant covering, that's a win-win situation. Did you buy 1 or 5 gallons? Is the color of it grey. That really looks nice--thanks for sharing that. Looks like I wont use the herculiner in mine after all.
I went with dbskin because I was able to get 5 Gallons of it for the best price possible. As well as some dbshield sheets. It took ~3gal to do 4 coats on the entire interior of the truck, up to about the middle of the b-pillar.
DB skin is a one part coating, which is nice. No mixing hardeners or curing agents in, just mix it real slow for 10 minutes and apply.

My paint was in really, really rough shape. It appears to have been painted solid green, then camo, then tan, the again as tan. It had lots of flaking, bare metal, thick spots with runs, and super thin spots. I used a scraper to get all the lose flake off, then used a 180 flap disk to sort of bevel the edges of the remaining paint to the bare metal and scuff up everything else. And of course, buying a good mask is highly recommended.

Once all the scraping and grinding was done, it got pressure washed,, vacuumed, and rubbed down real well with alcohol a couple times.
Then I used an aluminum etching primer on the bare metal, and a self etching primer over everything else.
Then spent a whole lot of time taping and masking.

Application can be done with a brush/roller, but I opted to spray it in. I used a bedliner gun that I bought from a local auto parts store and my compressor was just big enough, but I should have used a better one. It requires between 70-90psi constant to spray through the siphon gun. My 20gal garage compressor just couldn't keep up, it was 5 or so minutes of spray, then let the tank catch up, then continue. Per Heatshields instructions, the first coat should go on thick, and be about 50-60% of your total coat thickness. It sprays on purple, so it is easy to see your coverage while you work. I did 4 coats total, the first one super heavy, and the last 3 we thinner but uniform to cover everything.

It dries black, or what I call "Light Black" since it may or may not look a little grey depending on the light.
The recommend sealing it for longer life and better wear. So I used 1 Gal of Bed Armor, and sprayed it in with the same gun I used to spray the dbskin. I coated the entire interior once. The places that are not covered by the BedRug (Bed sides, tunnel sides, foot wells, rear compartments under the seats, etc) I coated twice since they will see the most wear.

I let everything cure for a couple days and then put the truck back together and then I used the dbshield on the firewall. It is a peel and stick type of mat that reminds me a lot of kydex. You can cut it and trim to fit around most anything. Then with a heat gun, you begin warming it up and forming it to where it needs to go. It can form around corner, into gaps and around rivets so well that you can actually still see the detail in the rivets.

There is a huge improvement in the amount of in-cab noise now. You can have a conversation without yelling, and at 55, you don't feel like you need ear-pro. I am certain it would be even quieter if it wasn't a soft side.

The things on the to-do list for this step of the project are to pull the rubber from the back of the doghouse, and hushmat the back then put the rubber back on. As well as hushmat some of the hood directly under the windshield.

Edit, After re-reading this it sounds like an advertisement. I am in no way affiliated with any of the products.
 

Carrera911

Active member
138
31
28
Location
Cumming, Georgia
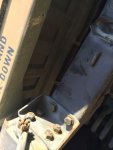
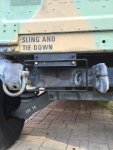
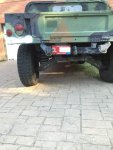
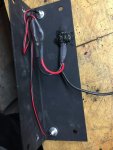
Installed the tag bracket from http://www.thosemilitaryguys.com/new-lighted-license-plate-holder/ . I would've just fabbed something up but for 31 bucks I'd probably break even not counting my time after ordering the LEDs and factory connectors. The few I've seen put the tag under the tail light but I don't like the idea of using my tag as a mud flap so I put it under the tail gate.
I drilled two holes and two corresponding ones in the bracket.
IMG_2888.jpg
IMG_2887.jpg
Here are the holes I drilled plus a little silicone I added to the LEDs to help keep the water out.
IMG_2889.jpg
tag.jpg
I chose this spot instead of under the tail light because 1. it won't catch mud, rocks and wind behind the tire and 2. it can't possibly scrape while off road. The wiring is pretty simple, just unplug wire 21 under the tail light and plug the tag lights in line for a positive tap. The negative comes from the chassis to the tag bracket. I recessed it about 1/2 and inch for clearance to the D ring bolt and put it as far left as possible in case I ever use the pintle hitch.
 

Jon0249

Member
111
4
18
Location
Lipan, TX
Finished fab/install of an overhead console. Hangs down about even with the roofline, so hardly noticeable. Should be fun to add switches, lights, etc. 20160919_170612.jpg 20160919_170547.jpg
 

Davetheplumber

"Moose"
44
6
8
Location
Corbett, OR
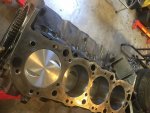
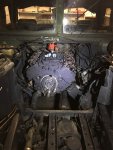
Started fresh. Pulled the 454 and had it board out to a 468. Rebuilt with new higher comp pistons and cam. New everything. Got it all installed and working on exhaust now. The truck is running but I want you to see the pic of the engine and how it fits in. You can't see anything with it all put together.
001.jpg

002.jpg

003.jpg
 

jdmcm

New member
125
2
0
Location
Canada
I know right? Going to be pretty cool with my new ECV hood, by the way I will have the old turret for sale soon, silver bearing, old style weapons tray with folding hatch and arrowhead weapons mount with genuine gunners shield...will be selling as a package
 

ari

New member
233
3
0
Location
dacula Ga
I got bored today and on a whim I painted my rig with colors i had on hand at the time. It might not be mil spec but I think it looks ok. IMAG0051.jpg
 

Weller

Member
220
8
18
Location
Kern County, CA
Picked up an "unkown" vehicle part from GL to fabricate a front barrier, so I can push stuff around on the ranch. With a couple of mods I should be able to use the brush guard brackets and switch out as needed.

20160925_073037.jpg 20160925_073054.jpg
 

Another Ahab

Well-known member
18,004
4,565
113
Location
Alexandria, VA
Picked up an "unkown" vehicle part from GL to fabricate a front barrier, so I can push stuff around on the ranch. With a couple of mods I should be able to use the brush guard brackets and switch out as needed.

View attachment 645634 View attachment 645635
That's a great item!

You might consider something like these fender bumpers on there to help take out the shock of any steel-on-steel contact.


Top
AdBlock Detected

We get it, advertisements are annoying!

Sure, ad-blocking software does a great job at blocking ads, but it also blocks useful features of our website like our supporting vendors. Their ads help keep Steel Soldiers going. Please consider disabling your ad blockers for the site. Thanks!

I've Disabled AdBlock
No Thanks