• Steel Soldiers now has a few new forums, read more about it at: New Munitions Forums!

  • Microsoft MSN, Live, Hotmail, Outlook email users may not be receiving emails. We are working to resolve this issue. Please add support@steelsoldiers.com to your trusted contacts.


What have you done to your HMMWV today/lately

BLK HMMWV

Well-known member
1,515
403
83
Location
Pasadena California
I sketched out a design for a locking glovebox I'm going to put in the middle of my radio deck. I put together a few mockup pieces last night made from cardboard. Basically it's about 5.5" x 10 deep (top, slightly shorter on bottom) and 10" wide, centered L-R between top/bottom decks. It'll take one piece of 1/8" Al sheet 12"x24" and that includes the front door. Back side will rivet to the two upright connections - tilted a little - but should go together like an erector set (or legos, for those of you NOT among us baby-boomers - and, at 60, I'm just at the tail end of that boom).

I'll post pictures when I get started/finished. Not sledge-proof, but suitable for keeping prying eyes/other from opening it without a lot of noise and hassle.

I need a place to keep m/titley registration.
Just an FYI
If you have the riser under the drivers seat there is a built in storage spare for your registration and insurance built in. It's behind the 2" wide Velcro strip.
I keep mine in there .
 

tobyS

Well-known member
4,820
815
113
Location
IN
I sketched out a design for a locking glovebox I'm going to put in the middle of my radio deck. I put together a few mockup pieces last night made from cardboard. Basically it's about 5.5" x 10 deep (top, slightly shorter on bottom) and 10" wide, centered L-R between top/bottom decks. It'll take one piece of 1/8" Al sheet 12"x24" and that includes the front door. Back side will rivet to the two upright connections - tilted a little - but should go together like an erector set (or legos, for those of you NOT among us baby-boomers - and, at 60, I'm just at the tail end of that boom).

I'll post pictures when I get started/finished. Not sledge-proof, but suitable for keeping prying eyes/other from opening it without a lot of noise and hassle.

I need a place to keep my registration/title.
I was thinking of the box behind the passenger side of the 5 ton seat and how it is the reason that the seat back will not go farther back on mine, just yesterday. I'm about to remove the box to get a more comfy passenger backrest, moved back about 4" (redrilled for the hinge point). Mine is not surplus, but you might want to check out that box for putting in... OEM look.
 

heavyzee

Member
49
1
6
Location
Houston, TX
got HMMWV #1 running (HMMWV #2 already runs just fine - needs a tranny service which is on the schedule for tonight)

HMMWV#1 has no oil pressure - pulling dented oil-pan tonight and inspecting for damage/ no pressure, etc...

Hopefully didn't fry the bearings yesterday - only ran for <30 sec

Need to research oil pans and seals, these both have 6.5 GEP motors
 

NormB

Well-known member
1,221
77
48
Location
Cloverly,MD
Just an FYI
If you have the riser under the drivers seat there is a built in storage spare for your registration and insurance built in. It's behind the 2" wide Velcro strip.
I keep mine in there .
Riser? As in the upgraded driver/commander high-back seats? I haven't gotten around to installing mine yet, I'll take a look at it. Could be a good stash, but not practical I think if I ever get pulled over and reach behind/under me to something in this day and age of people shooting police up close and personal.

Besides, I already have the parts on order. I'll keep y'all posted.

edit: oh, BEHIND the flap, not the seat. D'oh. I'll look when I get home. Never mind. Jeez.
 

Wire Fox

Well-known member
1,254
158
63
Location
Indianapolis, Indiana
Busy day today...
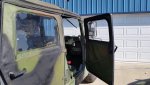
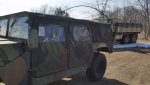
Straightened out all of the hinges, replaced all missing carriage bolts for the seat boards and tightened the rest, then installed six brand new clevis pins for my troop seats (all were gone when delivered...but later found as swollen, rusty pulps behind the rear seats). It's nice being able to actually sit back there now, or just at least be able to fold them up out of the way when not needed. All of the ring pins were still in good shape and the ARNG unit that had it last were trying to using them to replace the clevis pins...

Replaced the mysteriously missing side marker light. Truck hasn't moved once since delivered, yet my marker light went missing...can't honestly tell if it was an odd thief or if I had a terrible memory lapse, as it WAS the marker light I was working on last...

Set new rivnuts into the windshield frame to support the handrails. ARNG again took a shortcut and used wellnuts here instead of rivnuts. Unfortunately, this means the oversized the holes, so the rivnuts just barely grabbed on. While I can't even get them to budge when trying to force them free, time will tell if they're actually going to hold. If anyone has a lead on 10-32 steel rivnuts that have an oversized expanding shell, please let me know...

On the new-to-me 200A Alt., UPS managed to drop the package and damage the fan shroud and the impeller fan, plus the woodruff key that was still on the shaft was in a bit ugly shape as-is. I replaced the impeller fan (without some kind of soft-jawed vice, this is very annoying...). I used a steel rod through the impeller fan and old fan guard to hold it steady, and also got out an impact wrench to get the nut off. Since the shaft will spin on you once it's loose enough, inertia is your friend. Just hit it in short bursts from the impact and it spins it off for a few seconds while all the mass on the shaft resists spinning up. Woodruff key just took more PB blaster, hammering with punches, and striking outward with cold chisels than I care to talk much about. We'll see if the anti-seize I applied to the new one makes that job easier in another 5+ years when it might need replaced again.

Last task was trying to recondition the scissor jack that I found in the back. It looks like it's never had a touch of PMCS, so the jackscrew was pretty close to seized and in generally poor condition. I lubricated the jack with a molyb grease that was at-hand and was able to manually turn it with the opposite side of the wheel lugwrench. The worst part of this one was holding the jack down somewhere to free-spin it until it was extended enough to use the weight of the HMMWV to hold the jack in place while I cranked on it with the folding handle (which also need much TLC). It's still not perfect, but it's definitely serviceable now and the moving parts all have a fresh coat of grease to help inhibit further corrosion. I'm thinking I'll need to degrease it, scuff it down with steel wool and maybe some emery cloth, then grease it all back up again to see if that gets rid of the rest of the resistance in the screw... I do know that once I get it operating smooth, it's not getting buried into the mudpit that is the rear seat bases again. It's going in the nice tie-down behind the driver seat so that I can clean it and regrease it any time it gets wet without it having to sit and soak for days...
 

1 Patriot-of-many

Well-known member
Steel Soldiers Supporter
2,155
63
48
Location
Zimmerman MN
Put two new front doors on, they even included the strap and plate. Put a better door with clearer window on the right rear. The doors came with the handles at a different angle for shipping no doubt, but I find this to be a better angle ergonomically opening and shutting them, any thoughts on should I return them to the normal 90 degree angle?
 

Attachments

tokarev

Member
Steel Soldiers Supporter
243
4
18
Location
Safety Harbor Florida
Replaced to (2) 10-24 rivnuts for the instrument cluster mounting - bought the tool at Harbor Freight. Then installed a NOS instrument cluster and some new gauges.
 

Another Ahab

Well-known member
17,825
4,157
113
Location
Alexandria, VA
Busy day today...
Last task was trying to recondition the scissor jack that I found in the back. It looks like it's never had a touch of PMCS, so the jackscrew was pretty close to seized and in generally poor condition. I lubricated the jack with a molyb grease that was at-hand and was able to manually turn it with the opposite side of the wheel lugwrench. The worst part of this one was holding the jack down somewhere to free-spin it until it was extended enough to use the weight of the HMMWV to hold the jack in place while I cranked on it with the folding handle (which also need much TLC). It's still not perfect, but it's definitely serviceable now and the moving parts all have a fresh coat of grease to help inhibit further corrosion. I'm thinking I'll need to degrease it, scuff it down with steel wool and maybe some emery cloth, then grease it all back up again to see if that gets rid of the rest of the resistance in the screw... I do know that once I get it operating smooth, it's not getting buried into the mudpit that is the rear seat bases again. It's going in the nice tie-down behind the driver seat so that I can clean it and regrease it any time it gets wet without it having to sit and soak for days...
A little elbow grease and some TLC is a lot cheaper than replacement (if you can get away with it).

Sounds like you had a real good day. [thumbzup]
 

TOBASH

Father, Surgeon, Cantankerous Grouch
Steel Soldiers Supporter
3,263
2,995
113
Location
Brooklyn, NY
I found my power steering pump is leaking like a sieve. Hooray!

Too cold to look for exact area to see if this is the pump or the hoses.

I received my compartment divider to create a rear storage bay. Also received alternator swap kit to add a 200Amp unit. Then a 12V battery will be added to allow a radio and amp and such on a separate fusebox. Will also be adding a simple battery cut-off so repairs may proceed with quick battery cuts so I don't forget to cut power before repairs. Received filters for fuel/oil/air so I can swap in new for this new-to-me vehicle.

Lots of ordering and receiving but not so much elbow grease as yet.

Ciao,

T
 
Last edited:

Wire Fox

Well-known member
1,254
158
63
Location
Indianapolis, Indiana
Beat myself to death yesterday getting things together. 99% finished the new 200A alternator install-I'm just short the bolt I need to connect the main 24V cable to the alternator. Thanks to a Niehoff doc I found, I see it's a 3/8-16 bolt, so that should be a quick part to source on my way home. By the way, I'd highly recommend using some sort of crane for this install. It really sucks heaving that alternator into place. I did it, but I feel it took 30 minutes longer than it needed to and I had to do it twice because I left a part out of the bolt sequence...

Grab rails are both now properly installed with some fresh stainless screws. Definitely a much tighter fit with the fresh screws and rivnuts, versus the rotting wellnuts that had been used when I received it. Also pulled out one of the cargo bows to be straightened, painted, and have nearly every last one of its turn-lock fasteners replaced (only one is good and firmly mounted). Its brackets are also trashed, so replacements will be on the way.

I also impatiently attempted to start the HMWMV. Life reinforced that I shouldn't be impatient by having my batteries be low, and then said "you're welcome" when I also noticed I had left one of the coolant hoses disconnected that would have been a huge mess if the engine did start. Still, it was great seeing all the lights come on, the glow plugs properly cycle, and the solenoid kick on and the motor attempt to turn. Really, it was a great reward for three months of working on this. Batteries have been charging separately overnight. I hope everything's good-to-go when I return home and I get the real start.

EDIT: 17 minutes later, Niehoff responds to my email and confirm that bolt is 3/8-16x0.875" and also clarifies that in single voltage application, you must leave the +14V terminal floating without a jumper, which contradicts the install instructions given in the usual kit. The speed and quality of their response was amazing.
 
Last edited:

Another Ahab

Well-known member
17,825
4,157
113
Location
Alexandria, VA
I also impatiently attempted to start the HMWMV. Life reinforced that I shouldn't be impatient by having my batteries be low, and then said "you're welcome" when I also noticed I had left one of the coolant hoses disconnected that would have been a huge mess if the engine did start. Still, it was great seeing all the lights come on, the glow plugs properly cycle, and the solenoid kick on and the motor attempt to turn. Really, it was a great reward for three months of working on this. Batteries have been charging separately overnight. I hope everything's good-to-go when I return home and I get the real start.
I hope it all goes right. [thumbzup]
 
Last edited:
Top
AdBlock Detected

We get it, advertisements are annoying!

Sure, ad-blocking software does a great job at blocking ads, but it also blocks useful features of our website like our supporting vendors. Their ads help keep Steel Soldiers going. Please consider disabling your ad blockers for the site. Thanks!

I've Disabled AdBlock
No Thanks