General Hood
Member
- 712
- 2
- 18
- Location
- Fort Towson, OK
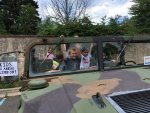
NiceView attachment 682971View attachment 682972View attachment 682973View attachment 682974 Just have to weld 1 pull pin bracket on each side and trim down inner seats.
Steel Soldiers now has a few new forums, read more about it at: New Munitions Forums!


NiceView attachment 682971View attachment 682972View attachment 682973View attachment 682974 Just have to weld 1 pull pin bracket on each side and trim down inner seats.
where did i get the impact? or Where do i get the 24volt power source? The Impact was bought on eBay and the The "HUMVEE" is my power source. The impact plugs into the slave port located under the passengers seat.Ok I'll try again.
Where did you get it from
 Guys after thinking this through, I think I will leave this set-up the way it is. My reason for this is if I install the troop seats I will create a big blind spot . You can sit on the wheel wells as is. I'm waiting on my netting to finish it off. I think it came out good and like the look. I did make another bar for the front, but the 4 pm monsoon ran me off. Will post last pic when netting shows...
I have poor memory retention, is this your keeper HMMWV or one you are putting on the market? It looks good sirView attachment 683177 Guys after thinking this through, I think I will leave this set-up the way it is. My reason for this is if I install the troop seats I will create a big blind spot . You can sit on the wheel wells as is. I'm waiting on my netting to finish it off. I think it came out good and like the look. I did make another bar for the front, but the 4 pm monsoon ran me off. Will post last pic when netting shows...

Keeping this one, but then again everything is for sale,,,,lolI have poor memory retention, is this your keeper HMMWV or one you are putting on the market? It looks good sir
")

The truck looks great, Alex.Took her to a car show! Entered her in the Greasy Grumpy Green category
Bulldogger
View attachment 683294
Took her to a car show! Entered her in the Greasy Grumpy Green category
Bulldogger
View attachment 683294
 [No shots of it all the ports taped up, but they certainly are right now.]


wired up my antennas and they are working! one antenna runs to the CB and the other runs to the radio. I'm getting more radio stations than my Jeep with a stock antenna. Moreover, my wrangler has a 4' fiberglass antenna and it woks good but the humvee gets out farther the that. so that tells me they are working to some degree.
View attachment 683442View attachment 683443View attachment 683444
.jpg")
.jpg")
.jpg")
.jpg")
.jpg")
.jpg")
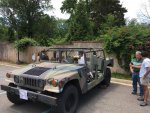
Yes it is! I love german Dogs, well a least the top 3 (GERMAN Shepherds, Dobermans and Rottweilers).Looks great. Is that a German Shepherd Dog in front of your vehicle? I'm partial to GSDs


Yes it is! I love german Dogs, well a least the top 3 (GERMAN Shepherds, Dobermans and Rottweilers).
you might like this pictures...
The black female (GSD) just had a liter of puppies.
View attachment 683461View attachment 683460View attachment 683462View attachment 683463View attachment 683461

We get it, advertisements are annoying!
Sure, ad-blocking software does a great job at blocking ads, but it also blocks useful features of our website like our supporting vendors. Their ads help keep Steel Soldiers going. Please consider disabling your ad blockers for the site. Thanks!