• Steel Soldiers now has a few new forums, read more about it at: New Munitions Forums!

  • Microsoft MSN, Live, Hotmail, Outlook email users may not be receiving emails. We are working to resolve this issue. Please add support@steelsoldiers.com to your trusted contacts.


Working on the FV1801A or Truck, 1/4 Ton, 4×4, CT, Austin Mk.1 AKA Austin Champ

mkcoen

Well-known member
Steel Soldiers Supporter
5,637
380
83
Location
Spring Branch, TX
Good job Mark, glad to see you are making progress.
Thanks! The goal, if the parts make it in, is to have it driveable by the end of next week. The Lone Star MVPA participants in an Open House at the TX National Guard Hdqts every April and I’d like to take it for that as it’d be a little bit unusual. Also I could put it on my trailer to take up. Otherwise I have a 2 hour drive, each way, in the LMTV. While typically 2 days to recover would be sufficient I still have to be “on” all weekend talking to people about the truck so I won’t really get much rest. While I still have the drive and the weekend of talking at least in my POV I have cruise control and a more comfortable seat.
 

m38inmaine

Well-known member
2,090
44
48
Location
Maine USA
A standard jeep cylinder mounts in the same place, MB-GPW-cj-2A etc may be able to retro fit one. It's a single circuit cylinder but you can put a Y in there to get by.
 

mkcoen

Well-known member
Steel Soldiers Supporter
5,637
380
83
Location
Spring Branch, TX
Keith_J brazed the pieces back together. As this is going to be a trailer queen for the time being I think it should be fine until I can either find a direct replacement or something similar enough to work.
 

Keith_J

Well-known member
3,657
1,313
113
Location
Schertz TX
The part that broke is the pushrod end mounting boss. Thin gray cast iron, its gray because the excess carbon in the iron precipitates out as graphite, making it quite brittle. The break was into the piston bore but this is the low pressure side of the piston so the repair had to be mechanically strong but only very low hydraulic pressure tight.

It was clean so just a good acetone soak to degrease and then coat with Harris brazing flux. Clamped the parts together, then went down the fracture line with a carbide burr to slightly vee and give the braze material a flow path. More flux, then heat. After finishing, it slowly cooled in a covered bucket. Took a bit of honing to get the piston to fit..didn't think it distorted that much but it was a few ten thousandths interference.
I've been brazing cast iron since the mid 1980s.
 

mkcoen

Well-known member
Steel Soldiers Supporter
5,637
380
83
Location
Spring Branch, TX
Well it's been a while but finally got most of summer stuff out of the way (awesome trip on the Idaho Backcountry Discovery Route in July) so back at it on the Champ. Keith_J was out yesterday and we got wheel cylinders rebuilt on all 4 wheels and bled. Still a little emulsion in the lines so going to let it sit a couple of day and go back and bleed again but there is brake pedal currently. Also a couple of days will give it a chance to spring any leaks that might have been hidden while we were working on it. I didn't get any pics as we were buttoned back up before I even thought about it but an interesting set up with 2 wheel cylinders on each side of the front and 1 each side on the rear. The debut event for it appears to be the Burnet Air Show Sept 8 unless something goes wrong between now and then.
 

Keith_J

Well-known member
3,657
1,313
113
Location
Schertz TX
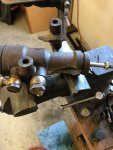
Its ALIVE!! After two days of carb fiddling, I can say I know how this Solex carb works. All circuits clean and passed vacuum tests but it was still running rich and improper so I hooked a vacuum gauge to the manifold, 14.5 inches of mercury is sick. I bumped timing to max with only a minor improvement so I tried to jump a tooth on the distributor thinking it was incorrect from acquisition, no luck as the gear is buried.

In doing so, #1 plug was loose so I pulled it, normal gray color?? So I pulled #2 and it was black and wet. It wouldn't throw a spark with all that carbon so it and the rest got a torch cleaning plus carb cleaner..and that was the secret sauce! The engine runs smooth, strong and clean. Just needed an Italian tune up to burn the rest of the carbon out as it intake backfired on me once.

Now we need to get the brakes running. And fix the M37 as its ignition decided to go on strike today.

Please keep ethanol at the bar in bottles and not in your fuel tank. Alcohol and vehicles do not mix. And it kills fuel systems.
 

mkcoen

Well-known member
Steel Soldiers Supporter
5,637
380
83
Location
Spring Branch, TX
Getting a little frustrated with these brakes. We rebuilt the master cylinder, all the wheel cylinders, bled the lines and it still won't stop unless you're standing on top of the pedal and already just rolling. We did discover one set of wc cups that were not the listed 1 1/8". They were at least about 1/32" smaller so were allowing the left front wc to leak. Luckily I had a couple of spares that were the correct size.

Did fix the M37 issue with new points, condenser, and plugs. I can certainly see why it's easier to set the points with the distributor out.
 

Keith_J

Well-known member
3,657
1,313
113
Location
Schertz TX
I think the leaking left front wheel cylinders caused air to get into the right rear wheel cylinder. I need to look at an RV in your neighborhood so noon tomorrow?
 

Keith_J

Well-known member
3,657
1,313
113
Location
Schertz TX
Got good brake pedal now. The front adjusters are like a M35 but coarser. The rears are very fine. All 4 needed adjusting.

Now the only issue is glycol soaked linings. A trip through a toaster oven at 300 °F overnight will fix that.
 

mkcoen

Well-known member
Steel Soldiers Supporter
5,637
380
83
Location
Spring Branch, TX
Brakes "kinda" work. You pretty much have to stand up on the pedal and be going slow to start with but it will stop.

Now the major issue is charging. Only getting 23.9v at both the alternator and the batteries so it doesn't take much running to run down the batts. A couple of thoughts I had was either loose belt or bad ground. Unfortunately this is not "factory" and there is little to no adjustment on the belt. I have it as tight as it will go and that didn't change anything. Next I pulled the unit and cleaned every connection point and added star washers to every bolt. Whoever painted the engine left the alt in when they did it so everything was pretty much painted over. Again, no joy. Still holding steady at 23.9v.

Keith is going to be out tomorrow to work on his RV Tug so maybe he can suggest something else. If there's no other option I can get a new 24v alt for $76 with free 3 day shipping.
 

Keith_J

Well-known member
3,657
1,313
113
Location
Schertz TX
I can wrangle something with the alternator. There are about a Brazilian parts from that company named after a South American river ;)
 

mkcoen

Well-known member
Steel Soldiers Supporter
5,637
380
83
Location
Spring Branch, TX
In order to make sure the Champ was ready for the Austin Veteran's Day Parade I went ahead and ordered a replacement 24v alternator. If Keith wants to monkey around with the old one then I can just have a spare for backup. The new alt showed up this morning and I got to work making it usable. First thing to do was swap out the pulleys. The old pulley had a 1" nut while the new one was 15/16th. Unfortunately I didn't have either of those sizes in an impact socket so had to go buy some new tools (darn). Once back from Home Depot both nuts zipped off without any issues. Luckily the shaft on both were the same size and the threads matched as the nut on the old pulley had a threaded shoulder that fit down into the pulley. The new alt nut wouldn't have had enough threads to grip it well enough (well maybe it would but why risk it?). Everything went back together as easily as it came apart and now we have 28.8v at both the alt and at the batteries. To celebrate I took it for a spin down to the gas station to get a little Super Unleaded. I have to admit it's a bit scary to drive with all the rattling and thumping coming from underneath. Having never had one of these before I don't know how much of that is normal and how much is something about to explode.

IMG_3469.jpgIMG_3470.jpgIMG_3471.jpgIMG_3472.jpg
 

mkcoen

Well-known member
Steel Soldiers Supporter
5,637
380
83
Location
Spring Branch, TX
Starting to “think” about the body repairs on the Champ. It’s a little difficult not having a “correct” example to compare things to so hopefully some of the limited number of owners can chime in here.

The front end end has some obvious damage but not really obvious as to how things should line up once repaired. The grille, hood, fender areas don’t match up but the grille doesn’t look so damaged as to be off by that much. The first question is does the top of the grille line up with the outside edge of the hood or does it sit back any?
 

Attachments

Top
AdBlock Detected

We get it, advertisements are annoying!

Sure, ad-blocking software does a great job at blocking ads, but it also blocks useful features of our website like our supporting vendors. Their ads help keep Steel Soldiers going. Please consider disabling your ad blockers for the site. Thanks!

I've Disabled AdBlock
No Thanks