• Steel Soldiers now has a few new forums, read more about it at: New Munitions Forums!

  • Microsoft MSN, Live, Hotmail, Outlook email users may not be receiving emails. We are working to resolve this issue. Please add support@steelsoldiers.com to your trusted contacts.

XM757 progress

cranetruck

Moderator
Super Moderator
Steel Soldiers Supporter
10,350
75
48
Location
Meadows of Dan, Virginia
With the weather improving more will be done, got the steering knuckle boots ready to install, the fuel burning heaters will be worked over again, little things like license plate holders, freeing up a stuck pintle hook, replacing some kinked copper air lines, installing the "hose tenna" hardware, testing the winch and more.

Also got a small oil leak from the oil filter bracket to engine gasket to tackle.
Measured all the tire circumferences, so that they can be matched for minimum rolling resistance the other day.
Will soon begin to clear my own private off-road trail for some test drives (it's boxier than the deuce and lots of overhanging branches need to be trimmed off). Pictures to be posted.

Note: I don't care much for really long threads, so many details on this project are posted under individual headings, .
 

cranetruck

Moderator
Super Moderator
Steel Soldiers Supporter
10,350
75
48
Location
Meadows of Dan, Virginia
Installed the engine hatch cover for the first time yesterday (takes two people to lift it on and off) after the silicone rubber gasket was epoxied in place.
It's a far cry from opening and closing the hood on a deuce, that's for sure. The openings are for access to dip sticks etc. It's all water tight for swimming, since the engine runs submerged when doing so.
The cover is a single deep drawn(?) piece of aluminum and has a sound proofing covering added. Probably cost a small fortune to make and it's not hard to see why this series of trucks may have been "cost prohibitive" (David Doyle wrote that somewhere) to the military.
 

Attachments

Stalwart

Well-known member
1,739
33
48
Location
Redmond, WA
Installed the engine hatch cover for the first time yesterday (takes two people to lift it on and off) after the silicone rubber gasket was epoxied in place.
It's a far cry from opening and closing the hood on a deuce, that's for sure. The openings are for access to dip sticks etc. It's all water tight for swimming, since the engine runs submerged when doing so.
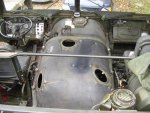
Exactly right, although I had to do mine ALONE and do it with the top on the truck. It wasn't that hard, just think it through before trying to move a 4' cover through a 3' hole :wink: You can remove it out through the passenger door, if done carefully. Removing the top would make it an easy one person affair. At 350 lbs. I was used to getting my way with difficult objects and at 225 now I haven't learned yet what I cannot move with a little planning and working smart. Heck, I even unloaded a mounted 16.00 20 with HEMTT wheel (500 lbs) from the back of my truck without the use of the crane or lifting device. Just sneak up on a problem and stay clear if Mr. Murphy shows up. :D No, I didn't just drop it . . .

No doubt about it, one of the most unique and rewarding trucks to own and drive. I must say I will miss it, it has a character like no other truck I've owned. The HEMTT is a little too refined and easy to drive, the Ford 8x8's are easy with a little "strange" mixed in to give you a rewarding experience. I'm sorry I couldn't keep 'em both, all the Stalwarts I won't miss, I had my fun with them and the honeymoon is long over.
 
Last edited:

Coldfusion21

Member
227
6
18
Location
Tualatin, Oregon
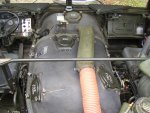
Where else can a person, follow such an interesting and odd piece of American History, being put back into operating condition(with some owner improvements), in such detail and be a part of it(with comments, suggestions or leads to parts, or just enjoying the pictures and reading, etc). Bjorn, Thank you, for "sharing" it with us, I am grateful to you. :wink:

I totally agree. Its neat seeing stuff like your truck being posted Bjorn but it is so much better when you can follow all the "little projects" that turn into big projects. You always include so much info and detail in your posts that it really make it a treat for the rest of us.

So again, thanks for sharing with the community.


Jared
 

cranetruck

Moderator
Super Moderator
Steel Soldiers Supporter
10,350
75
48
Location
Meadows of Dan, Virginia
You are very welcome Jared! My pleasure, I always learn something by posting the "little" things, gives everybody a chance to participate.
I'll be running the fuel burning heater next to see how much the temperature drops through the duct works, I'd like to be able to use black neoprene ducting up front instead of the orange silicone stuff...it's a bit of a distraction there (the color, I mean).
 

Attachments

cranetruck

Moderator
Super Moderator
Steel Soldiers Supporter
10,350
75
48
Location
Meadows of Dan, Virginia
Ran some temperature tests today. Results in the image below. It looks like neoprene type ducting ("CAT") will be fine at the defroster end of the fiberglass duct.
The highest temp noted at the heater discharge end, was 298 degrees before it stabilized (I started in "HI" and switched to "LO" after a few seconds).
 

Attachments

steelsoldiers

Administrator
Staff member
Administrator
5,259
3,971
113
Location
Charleston, WV
Thanks for the update, Bjorn. Looks like you are making some good progress. I am glad you got the silicone gasket adhesive figured out. What kind of glue did you end up using?
 

WillWagner

The Person You Were Warned About As A Child
Super Moderator
Steel Soldiers Supporter
8,465
2,578
113
Location
Monrovia, Ca.
Looks great Bjorn. You ready to put highway miles on it yet? I wish I were closer, that thing would be a blast to watch move around!
 

cranetruck

Moderator
Super Moderator
Steel Soldiers Supporter
10,350
75
48
Location
Meadows of Dan, Virginia
Chris, JB Steel Weld epoxy did the job.

http://www.steelsoldiers.com/5-ton-up/41751-adhesive-silicone-rubber-2.html

(I prefer to separate my project into separate threads and get better response that way for specific questions)

Will, with my limited budget, I narrow my 757 projects down. The cost to put her on the road would cover several months of work on the "little" stuff, fuel burning heaters, torque rods etc. I put the interbogie drive shafts back on though, since driving off road won't cost me much more than fuel. Just hang in there...one of these days. :)
 

cranetruck

Moderator
Super Moderator
Steel Soldiers Supporter
10,350
75
48
Location
Meadows of Dan, Virginia
Just "hanging in there" (on my part) eats away at the fun factor, but making little things into big projects becomes an art..... kind'a explains your injector cleaning job EZ. :wink:
 
Last edited:

EZFEED

New member
880
0
0
Location
Lafayette, LA
Yes but isn't it fun kinda snooping around everywhere on your vehicle just tidying up here and there and making things anew again or seeing areas that can be improved upon and making certain little upgrades? :D Surely it does drag the project out....but it sure does make your vehicle "YOURS" when your done :) I wanna say we both are thinking the same way here :)

I was just thinking about your tires today. The museum has their LCVP on that old tank trailer and I noticed the trailer uses the same tires as the XM757.....kinda a wide tire.
 

cranetruck

Moderator
Super Moderator
Steel Soldiers Supporter
10,350
75
48
Location
Meadows of Dan, Virginia
Next time you go to your museum, please get some more info on those tires. As far as a I know they were only used experimentally on the Lockheed Twister other than the m656/xm757 series.
I agree with you on the "small" projects thing, if you go back and look at all my xm757 posts, you'll see nothing but. I'm currently researching the possible reasons for running the air pressure gauge tubing all the way to the air tank instead of connecting it to an existing line behind the instrument panel, as shown in the TMs. The modification must have been done from factory with a dedicated feed-thru connector through the cab and all...I'm learning all the time.
 

cranetruck

Moderator
Super Moderator
Steel Soldiers Supporter
10,350
75
48
Location
Meadows of Dan, Virginia
About the air gauge hook-up, there are 3 tanks and the TM version has the gauge showing the pressure in the check valve protected tanks, while the dedicated plumbing goes to the first tank, which could lose pressure before the other tanks...hmmm, may have figured it out just mentioning it here....
 
Top
AdBlock Detected

We get it, advertisements are annoying!

Sure, ad-blocking software does a great job at blocking ads, but it also blocks useful features of our website like our supporting vendors. Their ads help keep Steel Soldiers going. Please consider disabling your ad blockers for the site. Thanks!

I've Disabled AdBlock
No Thanks