

- 13
- 17
- 3
- Location
- Maple Ridge / BC
I am scratching my head on this one - the air brake guages have stopped working.
I've got a first-gen M1078 A0 truck, mostly in excellent running order. Apart from needing to replace some rotten connectors on marker lights, it worked pretty well from when I received it from Memphis Eq. Been slowly been doing upgrades such as replacing the 3 lever light switch with the newer push-button unit (works great), new LED lights all round, other minor stuff like adding a back-up alarm and rear view camera.
So about the air brakes. The service and Park brakes apply and release as they should, but the for awhile the truck was having trouble building air after stepping on the brake pedal. I eventually found some kinked air lines at the rear cross member, another one at the left cab pivot point, one more on one of the front check valves under the cab at the driver's wheel well and yet one more under the dash at the Park Hand Valve. I also found that there was sometimes an air leak around the stem of the Park Valve handle, so I ordered one of the new combo Haldex controls from DP Equip. It took a bit of cussing and reading TM's to get the new unit installed, with new air lines to the floor fittings. Since I had Memphis upgrade the truck with an Air Con unit there was hardly any room for anything else under the dash, so that's how the air line got kinked I guess. All good fun.
Other stuff I've done on the air brake system:
- replaced 2-way check valve and old air lines on rear cross member
- replaced gladhand seals and filters, the dummy plugs were not sealing well
- rebuilt the unloader valves on the air compressor as one was gummed up and was probably why the truck refused to build air pressure after a heavy push on the brake pedal
- found some loose connections on Front and Rear stoplight switches, where the Park and Emerg indicator lights on the dash display would go off when they should be on
- confirmed no leak at Tractor Protection Valve, yet anyway. I hear they are notorious for venting air off once the diaphragms go bad. Along with the check valves
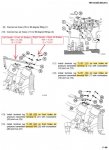
While I was under the dash replacing air lines and trying to figure out why I was not getting back up to 120 psi on the gauges, I noticed two air pressure transmitters / sending units that are conected to the front and rear air pressure gauges on the dash. Took the wires off the transmitters so I could read the TL markings. I then noticed that the transmitters were wired opposite to what is in the TM's. Okay... so I rewired them according to spec, see TM page below. All good right? Maybe not.
I tightened up the wires on the posts too much and stripped one. Not good. I ordered a replacement air pressure sender from Will at LMTVParts.com. He was extremely helpful in helping me identify where things might be going wrong. I now know more than before, a big thank-you goes out to Will... but there is still much I need to learn apparently!
Started truck up, air pressure gauges started at zero, then after a few minutes went hard over to maximum (above 120 psi) and stayed there, even if I stepped on the brake pedal. I put a voltmeter on the terminals with the Master Power switch on (but truck not running) and both transmitters are seeing -24 V (with the GND lead held on the G post on transmitters). CB76 was not popped on the breaker panel. Did not try swapping out any relays yet.
I thought, maybe the wires on the senders were right (the gauges worked before I started messing around) and if so, perhaps the wiring was backwards elsewhere. So I put the wiring on the senders back to non-TM mode (wires 150 and 156 switched, same with 151 and 157). Now the gauges read -12 V and were maxed out as soon as the Master Power was switched on. Started the truck up, let it run and it built air. After a few minutes, the needles suddenly dropped to about 65 psi and from then on they increased as air pressure built up to 120. Then the dryer purged and unloaded the compressor, as it should. I ran the truck up and down the driveway to test the brakes, they seemed fine. I then pumped the brake pedal to dump air and at 85 psi the front and rear stop indicator lights came on and the pressure gauges increased back to 120 psi as the compressor filled up the system.
But it does not seem right to have the gauges pegged high, then jump down and begin working normally. Also having the senders wired in reverse seems wrong. Nobody here where I live knows much about LMTV's, I've only seen one other rig like mine here and it was in way worse shape than mine... Air brakes are important and something I want to be able to count on. Any suggestions?
I did read another thread on SS where a member had encountered a similar problem with gauges maxing out. He found a broken wire on a sender unit. Maybe this is what I need to look at too. What about next steps - relay swapping? What voltage should the senders be working at, 12 or 24? I'd greatly appreciate any help anyone can give me as I am running out of ideas.
I wondered about grounding the sending units to the chassis as the TM mentions ensuring they are tightened into their fittings on the 2-way check valve assembly and also that the mounting bracket is free of corrosion. I cleaned up all that and realized I had used teflon tape when installing the new sender. Cleaned that off, remounted with a little antiseize. No change on the electrical response, so that doesn't seem to the root of the problem.
I've got a first-gen M1078 A0 truck, mostly in excellent running order. Apart from needing to replace some rotten connectors on marker lights, it worked pretty well from when I received it from Memphis Eq. Been slowly been doing upgrades such as replacing the 3 lever light switch with the newer push-button unit (works great), new LED lights all round, other minor stuff like adding a back-up alarm and rear view camera.
So about the air brakes. The service and Park brakes apply and release as they should, but the for awhile the truck was having trouble building air after stepping on the brake pedal. I eventually found some kinked air lines at the rear cross member, another one at the left cab pivot point, one more on one of the front check valves under the cab at the driver's wheel well and yet one more under the dash at the Park Hand Valve. I also found that there was sometimes an air leak around the stem of the Park Valve handle, so I ordered one of the new combo Haldex controls from DP Equip. It took a bit of cussing and reading TM's to get the new unit installed, with new air lines to the floor fittings. Since I had Memphis upgrade the truck with an Air Con unit there was hardly any room for anything else under the dash, so that's how the air line got kinked I guess. All good fun.
Other stuff I've done on the air brake system:
- replaced 2-way check valve and old air lines on rear cross member
- replaced gladhand seals and filters, the dummy plugs were not sealing well
- rebuilt the unloader valves on the air compressor as one was gummed up and was probably why the truck refused to build air pressure after a heavy push on the brake pedal
- found some loose connections on Front and Rear stoplight switches, where the Park and Emerg indicator lights on the dash display would go off when they should be on
- confirmed no leak at Tractor Protection Valve, yet anyway. I hear they are notorious for venting air off once the diaphragms go bad. Along with the check valves
While I was under the dash replacing air lines and trying to figure out why I was not getting back up to 120 psi on the gauges, I noticed two air pressure transmitters / sending units that are conected to the front and rear air pressure gauges on the dash. Took the wires off the transmitters so I could read the TL markings. I then noticed that the transmitters were wired opposite to what is in the TM's. Okay... so I rewired them according to spec, see TM page below. All good right? Maybe not.
I tightened up the wires on the posts too much and stripped one. Not good. I ordered a replacement air pressure sender from Will at LMTVParts.com. He was extremely helpful in helping me identify where things might be going wrong. I now know more than before, a big thank-you goes out to Will... but there is still much I need to learn apparently!
Started truck up, air pressure gauges started at zero, then after a few minutes went hard over to maximum (above 120 psi) and stayed there, even if I stepped on the brake pedal. I put a voltmeter on the terminals with the Master Power switch on (but truck not running) and both transmitters are seeing -24 V (with the GND lead held on the G post on transmitters). CB76 was not popped on the breaker panel. Did not try swapping out any relays yet.
I thought, maybe the wires on the senders were right (the gauges worked before I started messing around) and if so, perhaps the wiring was backwards elsewhere. So I put the wiring on the senders back to non-TM mode (wires 150 and 156 switched, same with 151 and 157). Now the gauges read -12 V and were maxed out as soon as the Master Power was switched on. Started the truck up, let it run and it built air. After a few minutes, the needles suddenly dropped to about 65 psi and from then on they increased as air pressure built up to 120. Then the dryer purged and unloaded the compressor, as it should. I ran the truck up and down the driveway to test the brakes, they seemed fine. I then pumped the brake pedal to dump air and at 85 psi the front and rear stop indicator lights came on and the pressure gauges increased back to 120 psi as the compressor filled up the system.
But it does not seem right to have the gauges pegged high, then jump down and begin working normally. Also having the senders wired in reverse seems wrong. Nobody here where I live knows much about LMTV's, I've only seen one other rig like mine here and it was in way worse shape than mine... Air brakes are important and something I want to be able to count on. Any suggestions?
I did read another thread on SS where a member had encountered a similar problem with gauges maxing out. He found a broken wire on a sender unit. Maybe this is what I need to look at too. What about next steps - relay swapping? What voltage should the senders be working at, 12 or 24? I'd greatly appreciate any help anyone can give me as I am running out of ideas.
I wondered about grounding the sending units to the chassis as the TM mentions ensuring they are tightened into their fittings on the 2-way check valve assembly and also that the mounting bracket is free of corrosion. I cleaned up all that and realized I had used teflon tape when installing the new sender. Cleaned that off, remounted with a little antiseize. No change on the electrical response, so that doesn't seem to the root of the problem.
Attachments
-
 69.4 KB Views: 15
Last edited:


