• Steel Soldiers now has a few new forums, read more about it at: New Munitions Forums!

  • Microsoft MSN, Live, Hotmail, Outlook email users may not be receiving emails. We are working to resolve this issue. Please add support@steelsoldiers.com to your trusted contacts.


M-52 Recovery

jeffhuey1n

SMSgt, USAF (Ret.)
Steel Soldiers Supporter
1,806
1,239
113
Location
Laramie County, Wyoming
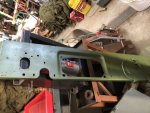
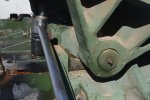
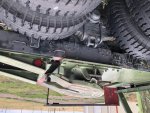
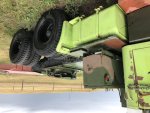
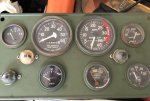
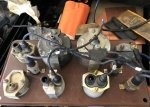
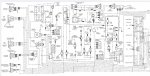
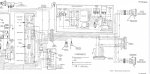
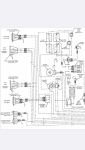
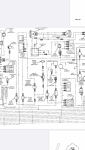
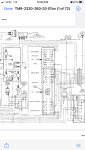
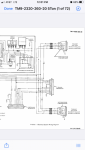
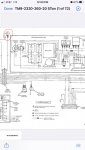
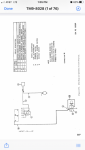
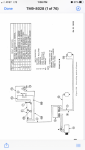
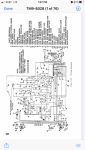
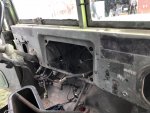
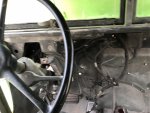
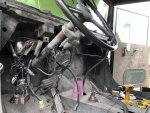
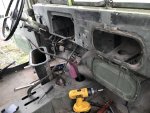
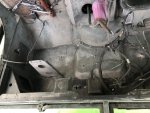
Wow, it’s been a long time since I updated this thread. I’ve got the M931 fifth wheel assembly in place. Still pondering how it will get attached to the frame. One of the myriad tasks that need completing is replacing the dash. I’ve had the replacement for quite some time but I’ve had other more urgent tasks to complete. Since my barn/shop roof needs replacement, I have to get the trucks moved. One of the immediate tasks to complete is finishing the install of the dash. Not something I was looking forwards to. I had nightmares of spaghetti like wiring that would have to be completely replaced. I got the old dash off and found as a pleasant surprise, the wiring ain’t bad! I don’t want to tempt fate by extolling the wondrous wiring harness. So I’ll leave it at “the wiring came as a pleasant surprise. Pics:
 

Attachments

NDT

Well-known member
Steel Soldiers Supporter
10,107
5,713
113
Location
Camp Wood/LC, TX
Your VIN 9524-130XX comes back as a 1968 Kaiser Jeep. I think some depot didn't have the proper data plates at rebuild time and used some older plates they had.
 

jeffhuey1n

SMSgt, USAF (Ret.)
Steel Soldiers Supporter
1,806
1,239
113
Location
Laramie County, Wyoming
Got the old and nasty dash removed. Only broke one screw. I also had to cut the head off another. Stripped it of all usable parts and I’ll set it aside for now. Not sure if I want to mess with it. Got the replacement all scuff sanded, rust managed and primered. I like using Rustoleum Rusty Metal Primer. I get the best results with it. Since the instrument cluster on the old dash was heavily fubared, I replaced it with a complete cluster. Since it was an ugly, nasty, otherworldly funky green, I sand blasted it and am going to paint it the same overall color, which is 383 CARC substitute. No particular reason for the choice, other than I have a few cans of it on hand. Pics:
 

Attachments

jeffhuey1n

SMSgt, USAF (Ret.)
Steel Soldiers Supporter
1,806
1,239
113
Location
Laramie County, Wyoming
Your VIN 9524-130XX comes back as a 1968 Kaiser Jeep. I think some depot didn't have the proper data plates at rebuild time and used some older plates they had.
Thank you for the info! I found a new replacement data plate. I’ll use it based on the title. It gets too confusing if I do it any other way.
 

fasttruck

Well-known member
1,265
622
113
Location
Mesa, AZ
The 5th wheel pic in post 20 shows the wedges that keep the 5tth wheel from oscillating in highway service are in backwards as the narrow end goes under the trunnion bar on the fifth wheel. Also there is a second fuel pump for these trucks which pumps the fuel in the right tank over to the left tank and thence to the engine. As built these trucks had no cross over line to equalize both tanks. The switch is located on the right side of the dashboard in the lower center hole that has the shape of the data plate that goes with the switch on the dash. The tools issued in the OVM will not fit on the bolts that hold the wedges in place: a 1 1/8" tool is required.
 

Attachments

fasttruck

Well-known member
1,265
622
113
Location
Mesa, AZ
The fuel transfer pump is mounted between the battery box and the passenger's side fuel tank. As the pump will pump the fuel over faster than the engine burns it you need to run for a while to make room in the left tank and then start the pump. Set the fuel gauge for the right tank and shut then pump off before it completely drains the tank and then ruin the pump with no fuel going through it.
 

jeffhuey1n

SMSgt, USAF (Ret.)
Steel Soldiers Supporter
1,806
1,239
113
Location
Laramie County, Wyoming
The 5th wheel pic in post 20 shows the wedges that keep the 5tth wheel from oscillating in highway service are in backwards as the narrow end goes under the trunnion bar on the fifth wheel. Also there is a second fuel pump for these trucks which pumps the fuel in the right tank over to the left tank and thence to the engine. As built these trucks had no cross over line to equalize both tanks. The switch is located on the right side of the dashboard in the lower center hole that has the shape of the data plate that goes with the switch on the dash. The tools issued in the OVM will not fit on the bolts that hold the wedges in place: a 1 1/8" tool is required.
The fifth mount that I’m using came off a M931. I searched high and low for the parts I needed for my correct 5th mount but no luck. I got pretty much everything from the spare tire carrier to the ramps from either a M931 or a M818. The problem with going this way comes from the re-enforcement pieces that connect the outer mount holes to the frame. I’m trying various ideas on how straiten this bowl of spaghetti. Pics. I can’t figure out why but my pictures look fine but when I post them, they’re rotated 180 degrees! Very frustrating.
 

Attachments

jeffhuey1n

SMSgt, USAF (Ret.)
Steel Soldiers Supporter
1,806
1,239
113
Location
Laramie County, Wyoming
Not much to report. I’ve been chasing and repairing wiring. Also been rebuilding the instrument cluster. While the wiring hasn’t been the mess I suspected it might be, there’s still quite a few repairs to make. I’ll post pictures once all the myriad problems get fixed.
 
Last edited:

jeffhuey1n

SMSgt, USAF (Ret.)
Steel Soldiers Supporter
1,806
1,239
113
Location
Laramie County, Wyoming
Finished with the repairs to the instrument panel. Replaced and repaired broken wires, broke Gauges, corrosion, etc. Had to pick up some heat shrink from HF. Good stuff and a good price. Didn’t have any left over from the last big repair job..
Pics:
 

Attachments

jeffhuey1n

SMSgt, USAF (Ret.)
Steel Soldiers Supporter
1,806
1,239
113
Location
Laramie County, Wyoming
Hit a bit of a blockage. The wiring is proving difficult to determine where to attach the various components. Some are easy; the oil pressure, fuel quantity, temperature and some of the lights. What’s really confusing are wires that aren’t numbered, weren’t identified by previous owners, wired willnilly with little to no schematic to help identify wires to components. I’ve been searching high and low for a wiring schematic similar to the ones in just about every TM for all types of military vehicles. No luck. The M35 diagram doesn’t help at all. I’ve started looking at the M809 series TM’s for help. It appears promising in that the wires going to similar components have the same wire numbers as the M54 series. I’ll print me a copy of the 809 schematic and using markers, pens, pencils or any other device to match up the two wiring schemes. Pics:
 

Attachments

jeffhuey1n

SMSgt, USAF (Ret.)
Steel Soldiers Supporter
1,806
1,239
113
Location
Laramie County, Wyoming
I printed up the M809 series schematic. It is very close to the M54 series. I’ve been able to track down wire numbers 10, 17, 27, 28, 27, and others. Still having difficulty with the no longer identified wires. It’s slow going but that’s the only choice. Get too frisky with speeding up and I risk fried wires. I you need a copy, print the pages, trim excess paper and take them together. Pics:
 

Attachments

jeffhuey1n

SMSgt, USAF (Ret.)
Steel Soldiers Supporter
1,806
1,239
113
Location
Laramie County, Wyoming
Good news! Installed batteries and very carefully touched the cable to the battery. No massive sparks, no smoke, nothing. Almost anticlimactic. Went ahead and fully connected the batteries (after replacing all four terminals). Then went around to the driver side and turned the battery switch. Op check good! Low air pressure buzzer went off, just like it’s supposed to. I shut it off and started checking around for malfunctions. Right off, the driver’s side fuel line on top of the tank sprung a leak. So, took it apart after tightening didn’t work. Put several wraps of Teflon tape around each connection and no more leaks. Tomorrow, hopefully, I’ll be able to install the various gauges, cables and miscellaneous hardware. If I really luck out, I might even get to start it!
 

jeffhuey1n

SMSgt, USAF (Ret.)
Steel Soldiers Supporter
1,806
1,239
113
Location
Laramie County, Wyoming
Not much of an update. Got the pull switch attached to the shut off. Now when I get it running, I’ll be able to stop! Almost got the throttle hooked up but ran out of daylight. It’s waiting patiently for me to finish up. Part of my wiring issues was, in addition to age, some post service mods. I was looking through my stack of stuff and found a large wiring harness. Couldn’t remember where I got it but is a M54 5 ton series Front wiring harness. Once the roofing people are done, I can think about swapping it out. Sorry, no new pics. Overall, it doesn’t look like much has been done but that’s because it’s a lot of little stuff getting fixed.
 

jeffhuey1n

SMSgt, USAF (Ret.)
Steel Soldiers Supporter
1,806
1,239
113
Location
Laramie County, Wyoming
I was looking for something other than wiring and came across this manual. It’s TM 9-8028 and on pages 171, 271 and 282. Looks like the complete diagram. Other than that, I’m fixing my farm pro tractor (fouled fuel tank, sediment bowl and fuel filter. Cleaned everything up and she started right up.
 

Attachments

jeffhuey1n

SMSgt, USAF (Ret.)
Steel Soldiers Supporter
1,806
1,239
113
Location
Laramie County, Wyoming
I’m on a temporary hold on all my various projects. Got into an argument with a pair of pigs and lost. I hope to get the stitches out early next week. After that, back to bending, beating, cutting and welding.
 

Ajax MD

Well-known member
1,567
1,414
113
Location
Mayo, MD
I’m on a temporary hold on all my various projects. Got into an argument with a pair of pigs and lost. I hope to get the stitches out early next week. After that, back to bending, beating, cutting and welding.
Holy crap. My wife's cousin farms hogs. One day, the boar abruptly copped a major attitude with her and probably would have killed her had she not ventilated his skull with a .357 she carries. My point being that I'm glad you made it out OK.
 
Top
AdBlock Detected

We get it, advertisements are annoying!

Sure, ad-blocking software does a great job at blocking ads, but it also blocks useful features of our website like our supporting vendors. Their ads help keep Steel Soldiers going. Please consider disabling your ad blockers for the site. Thanks!

I've Disabled AdBlock
No Thanks