• Steel Soldiers now has a few new forums, read more about it at: New Munitions Forums!

  • Microsoft MSN, Live, Hotmail, Outlook email users may not be receiving emails. We are working to resolve this issue. Please add support@steelsoldiers.com to your trusted contacts.

My new 1992 M998 Avenger

springer1981

Well-known member
844
1,150
93
Location
Maine
Awesome thread!

I remember back when this truck was for sale. I was super tempted, but just couldn't swing it at the time. I'm glad someone on here ended up with it, and it's getting the attention it deserves.
Thanks I really appreciate that.

I've put a lot of time and effort into it and tried to document it here in hopes that maybe it will help someone else.
 

springer1981

Well-known member
844
1,150
93
Location
Maine
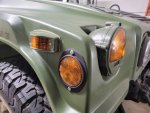
I finally got the hood back on today. Also finished replacing the side marker lights, the rear were done but I hadn't got to the front yet. Also replaced the reflectors on the front, still have to paint the screws. This completes the lighting, 4 side markers replaced with LED. Front directional's, taillights, all light buckets and housings replaced. Headlights replaced with LED's. Reverse lights installed (not functional yet).

Next is 2 new batteries, going with cheap Walmart 24 batteries. Also going to wire the reverse lights to a switch for now.

frontlight.jpg
 

springer1981

Well-known member
844
1,150
93
Location
Maine
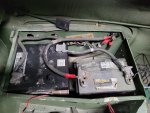
Not much of an update but when I bought the HMMWV it had 2 differrent batteries, 6TL (Exide) and a Deep cycle marine battery. Although they would start the truck I would have to charge them up after a few days. If I ran the engine everyday and drove it they would be OK but not great.

Battery1.jpg

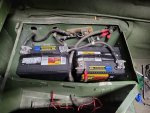
Added 2 Walmart Everstart Maxx batteries. I was going to go with the $98 batteries but they were only 650 CCA. I upgraded to the $129 800 CCA group 34 batteries. 3 year free replacement and then 2 years pro rated is hard to beat. Made by Johnson Controls and they rate high on the good batteries list. Also Made in USA.

Next I'm working on the hold down system. The stock parts will be used but the batteries aren't as tall so I have to adjust for that.

Battery2.jpg
 

osteo16

Well-known member
Steel Soldiers Supporter
585
585
93
Location
Evansville, IN
I use those Wally World batteries.. Sit for weeks and start right up.. Haven't even hooked up my NOICO charger yet. ..Work great.. Suggest you get em secured or at least get some caps on those posts before driving.. 24v shorting out is a bad thing.. They will bounce around with the stiff suspension and could hit anything.. POOF.. Some high density foam between the battery and hold down works for me..

Ocho out
 

springer1981

Well-known member
844
1,150
93
Location
Maine
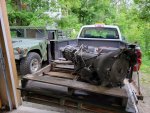
This weekend drove 1200 miles in 18 hours round trip to pick up a new transmission for the HMMWV. 4L80 and 242 transfer case. I've collected many of the other parts for the conversion and pretty much just needed the transmission and transfer case.


trans.jpg
 

osteo16

Well-known member
Steel Soldiers Supporter
585
585
93
Location
Evansville, IN
Lots of good stuff going on there.. Love it 👍👍👍
Now if you can get your wipers parked on the correct "passenger" side , you'll be in good shape..😂😂😂

Ocho out...
 

springer1981

Well-known member
844
1,150
93
Location
Maine
Lots of good stuff going on there.. Love it 👍👍👍
Now if you can get your wipers parked on the correct "passenger" side , you'll be in good shape..😂😂😂

Ocho out...
If the most criticism you have out of the last 10 pages of this thread is the windshield wipers on the wrong side, I must be doing something right!
 

Coug

Well-known member
Steel Soldiers Supporter
2,976
4,360
113
Location
Olympia/WA
If the most criticism you have out of the last 10 pages of this thread is the windshield wipers on the wrong side, I must be doing something right!
I park mine on the driver's side. With lots of Rain-X on the windshield, having it parked on the driver's side above my line of sight keeps it from dripping/streaming down in front of my eyes.
 

springer1981

Well-known member
844
1,150
93
Location
Maine
Couple of updates....

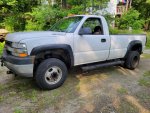
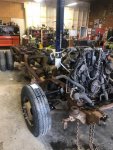
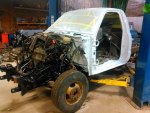
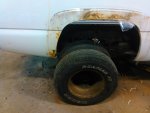
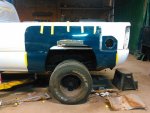
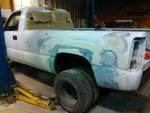
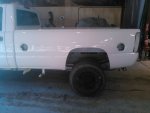
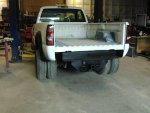
Before that I just want to say this is a recreational vehicle to me, basically just for fun. Sometimes it seems like it takes a long time to get something done or even seems like it isn't getting done. I'm not in a rush other than I want to drive it more but for the most part it has been drive-able just not practical. To put it in perspective a little, I have attached pictures of a truck I rebuilt from the ground up. On the same day I purchased my Humvee I also bought a 2002 Chevy Duramax with 89,000 miles that was rusted out. The intention was to use the drive train in the Humvee but when I realized the Humvee ran great and had the 6.5 GEP I decided not to go the Duramax route.

The Chevy ... It was bad, the frame was gone, the cab was in really rough shape. I found another one with 300K miles with a good frame and cab. I took 2 trucks completely apart and started with the good frame. Fixed minor issues with the cab, replaced all lines, fuel lines, brake lines, transmission lines, oil lines, coolant lines, everything. They were actually cab chassis trucks with dump bodies. I wanted a regular truck bed but they were dually's. Not just dually's, cab chassis dually's, they are narrower and the wheelbase is longer. It took 2 truck beds and moving the wheel wells back 6 inches to make fit. I also stuffed dually's under a regular bed, no added dually fenders. To top it off none of the regular beds had dual tank fillers and I had to add another fuel filler too. The frame is narrower so I had to make all the bed mounts and even built supports under the bed to mount a fifth wheel hitch that was completely removable. Added a lift tailgate and a plow. I built that truck in a year from January 2020 to November 2020. That is the truck I drove to Pennsylvania to pick up the transmission and transfer case. At this time I am rebuilding a Dana 60 and I am going to cut out the independent front suspension and convert it to a solid axle. I want to do that before winter (not much time left).

HMMWV Updates

#1 - AC installation.
I have installed the Compressor as displayed earlier in this thread. The Evaporator is going to be installed flush in the back cab wall. It will protrude into the rear cargo area. In the Avenger the cab space is extremely limited and there is just no easy place to put it. The Condenser/fan unit will mount on the back of the cab wall in the cargo are also and will cover the Evaporator that protrudes in the cargo area and hide it. Ultimately it will just look like the Condenser is mounted there.

All the hoses need to be made or adapted to the system. I'm probably going to use some combination of the Red Dot fittings and crimped fittings. As a side project to go along with this I found a used Robinair AC recovery and recharge machine that works but could use a little tune up. I have a few vehicles that need charges and some minor work and this will save me money in the long run. But it turns out that EPA has regulated the sale of refrigerant to certified AC technicians. I just passed my Certification and can now do all of this legally to my own vehicles with the proper equipment.

It will likely be next year before the AC installation is complete and functioning.

#2 - 4L80 & 242 Transmission Install
There is a lot this conversion. I have been collecting parts for about 2 years for this project. If I had just gone out and bought all the parts at once it would have probably cost me twice as much or more. Along with the transmission I'm changing the fuel tank and adding reverse lights.

TCU. I went with the US Shift Quick 4. I looked at many controllers and this seems like the best one for the money and is feature-full. It has a display on the controller but doesn't support idiot lights or gauges. The display has useful information so I want to place it where it can be seen. I've decided to mount it behind the dash and make a mount that will allow the display and control knob to be easily seen and accessed where the air filter gauge is now. The install will not require any modifications to the dash.

The plan is to pull the 3 spd transmission and transfer case, cross member, driveshafts, shifter, parking brake and fuel tank. Replace the fuel tank first then run the AC lines, install the parking brake and shifter and wire the reverse lights. Add wiring for the TC Lock light also. The TCU will already be mounted and wiring 90% complete prior to the start of the installation. I have to relocate the fan shut switch and mount the TPS on the injection pump. At this point it will be ready for the 4L80 and 242 TC with the new cross member, hook up linkage and wiring. Replace the yoke on the rear differential and install the new driveshafts.

The goal is to do this install in the next 6 or 8 weeks and drive it home 15 mph faster than I drove it to the shop.


1.jpg
 

Attachments

springer1981

Well-known member
844
1,150
93
Location
Maine
I bought a dipstick from a dipstick. I bought a dipstick for the transmission swap coming up, on epay. I received it and it is twisted, bent on the width (not the thin flat part) and in general poor condition. As I'm sure many of you know, when you push a dipstick into the tube it is pretty flimsy and if it is bent anywhere it kind of folds rather than pushing it down into the tube. Sure you can hand feed it down into the tube but who wants to do that?

So the dipstick is crap. I sent a message to the epay user and he asked for pictures so I sent them. Basically his response is "it's functional". So this surplus company on the eastern seaboard of the US would rather lose a good repeat customer over a $14 dipstick than make it right. I'm out a total of $27 and he's out a customer for life. Not the business model I use but more power to him. Funny thing is he was in the running for where I was going to buy the transmission and transfer case, glad I dodged that bullet.
 

springer1981

Well-known member
844
1,150
93
Location
Maine
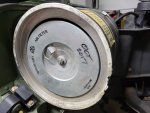
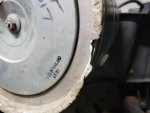
My Air Cleaner assembly was in less than great shape. I bought a used replacement and it was in great condition. In changing it out I noticed a few things. First there are 3 clamps on it and only 2 of them actually hold it? Do all have 3 clamp and is one just a spare? On mine 1 is spare now.

Here are some pictures of the old corroded AC
AC1.jpg

AC3.jpg

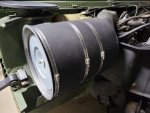
Here is the new AC installed

AC5.jpg

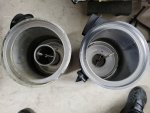
Here's the differences in the AC Housings
Old on the left
The new one seems to have considerably less restrictions to air flow. No long tube in the center of the air filter, The baffle around the inside is much smaller. About 40% versus the entire inside circumference.

The air flow on the old was like and "S". Air enters the AC and the baffle forces to have to travel to the inside end before passing through the air filter, then it would have to travel back towards the cap end to enter the tube to leave the ac toward the engine. That's a ton of restriction. The new filter the air enters and can pass through the filter at any point and then head right to the engine outlet. Maybe this is an AC off a Turbo engine??

AC4.jpg
 

osteo16

Well-known member
Steel Soldiers Supporter
585
585
93
Location
Evansville, IN
My Air Cleaner assembly was in less than great shape. I bought a used replacement and it was in great condition. In changing it out I noticed a few things. First there are 3 clamps on it and only 2 of them actually hold it? Do all have 3 clamp and is one just a spare? On mine 1 is spare now.

Here are some pictures of the old corroded AC
View attachment 842516

View attachment 842518

Here is the new AC installed

View attachment 842520

Here's the differences in the AC Housings
Old on the left
The new one seems to have considerably less restrictions to air flow. No long tube in the center of the air filter, The baffle around the inside is much smaller. About 40% versus the entire inside circumference.

The air flow on the old was like and "S". Air enters the AC and the baffle forces to have to travel to the inside end before passing through the air filter, then it would have to travel back towards the cap end to enter the tube to leave the ac toward the engine. That's a ton of restriction. The new filter the air enters and can pass through the filter at any point and then head right to the engine outlet. Maybe this is an AC off a Turbo engine??

View attachment 842523
hmm..looking at the new one, how then heck you gonna be able to get to that fancy dust boot...
 

Milcommoguy

Well-known member
Supporting Vendor
1,710
2,265
113
Location
Rosamond, CA
If you mean the water drain (?) sticking out at 7 o'clock, the old one has it also but you can't see it with the angle of the camera.
Don't hold me to it.... I read the do nothing third clamp is to keep the canister from resonating. A lot of suction / air going on in there. Kinda of like a girdle on a big girl. Leave it off and parts are going to fall off or out LOL. Follow the TM or be mansplaining to the motor pool SGT.

Extra parts. Maybe not, CAMO


springer1981

Well-known member
844
1,150
93
Location
Maine
In another thread by Tobash, I posted about running 17" tires on stock HMMWV steel wheels by modifying the rim. It involves removing the bead area on a donor rim and attaching it to the stock steel rims. This is much more complicated than it sounds ... if it sounds easy LOL.

Today I worked on the "Proof of Concept" using a junk rim. I am not welding this on and I will no be using the piece off this rim.

The bead lock rims rely on the inner bead lock pressing the tire into the bead lip on the rim. On the HMMWV rims there is a simple taper where a regular rim has a bead seal. Because of the taper and the design of a regular rim only 1 side of the donor rim has the right dimensions to modify HMMWV stock rim. This means it would will take 10 rims to modify 5 HMMWV rims to fit standard 17" tires.

In the diagram below the BLUE represents the HMMWV Rim.
The GREEN is the Front of the 17" rim I cut off in the following pictures
The RED is the Rear of the 17" rim
The RED/YELLOW is the rest of the 17" rim

The GREEN piece fits perfectly. The lip on the HMMWV would be turned down and welded. It would also be welded where the GREEN and the BLUE meet on the inside at the base of the taper. Keep in mind this is an rough drawing but it's a good representation of the concept.

The RED piece won't work because it doesn't meet the taper. The YELLOW is the gap and could not be welded. It will take another GREEN piece in place of the RED in order to work. So basically it will take two 17" rims to modify 1 HMMWV rim.

wheeloutline.jpg

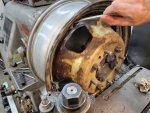
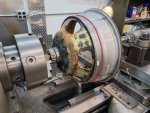
Here is the rim chucked up in the lathe as I cut the front bead section off. Applying cutting oil as it cuts.

Wheel1.jpg

Here is the donor rim after I cut the bead section off. I'm using 2003-2018 Dodge Dually Wheels for 2 reasons. It's thick and designed for a higher load like the HMMWV wheels. Also it has a 8 x 6.5 bolt pattern and I'm using a HMMWV Spindle in the chuck to mount the wheel.

Wheel2.jpg

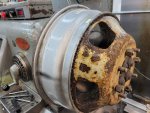
Here is the HMMWV front rim section with the 17" bead section set in place.

Wheel3.jpg

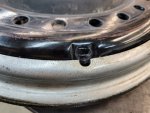
Here is a close up where the valve goes. The 17" rim will need to be opened up a little to allow the nut to be put on after welding.

Wheel4.jpg

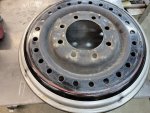
Here I turned the rim around to plan next cut. In order for it to meet the HMMWV rim it would have to be cut approximately at the red line in the picture. Keeping in mind this is already a heavy wheel it would be adding a lot of extra weight to the already heavy HMMWV wheel. This is the point I decided to stop. I do have another donor rim that I am going to cut the same as this one to continue the proof of concept.

In this picture you get a better shot of the spindle.

Wheel5.jpg
 

TNDRIVER

Well-known member
Steel Soldiers Supporter
333
508
93
Location
Cleveland,TN
In another thread by Tobash, I posted about running 17" tires on stock HMMWV steel wheels by modifying the rim. It involves removing the bead area on a donor rim and attaching it to the stock steel rims. This is much more complicated than it sounds ... if it sounds easy LOL.

Today I worked on the "Proof of Concept" using a junk rim. I am not welding this on and I will no be using the piece off this rim.

The bead lock rims rely on the inner bead lock pressing the tire into the bead lip on the rim. On the HMMWV rims there is a simple taper where a regular rim has a bead seal. Because of the taper and the design of a regular rim only 1 side of the donor rim has the right dimensions to modify HMMWV stock rim. This means it would will take 10 rims to modify 5 HMMWV rims to fit standard 17" tires.

In the diagram below the BLUE represents the HMMWV Rim.
The GREEN is the Front of the 17" rim I cut off in the following pictures
The RED is the Rear of the 17" rim
The RED/YELLOW is the rest of the 17" rim

The GREEN piece fits perfectly. The lip on the HMMWV would be turned down and welded. It would also be welded where the GREEN and the BLUE meet on the inside at the base of the taper. Keep in mind this is an rough drawing but it's a good representation of the concept.

The RED piece won't work because it doesn't meet the taper. The YELLOW is the gap and could not be welded. It will take another GREEN piece in place of the RED in order to work. So basically it will take two 17" rims to modify 1 HMMWV rim.

View attachment 843835

Here is the rim chucked up in the lathe as I cut the front bead section off. Applying cutting oil as it cuts.

View attachment 843836

Here is the donor rim after I cut the bead section off. I'm using 2003-2018 Dodge Dually Wheels for 2 reasons. It's thick and designed for a higher load like the HMMWV wheels. Also it has a 8 x 6.5 bolt pattern and I'm using a HMMWV Spindle in the chuck to mount the wheel.

View attachment 843837

Here is the HMMWV front rim section with the 17" bead section set in place.

View attachment 843838

Here is a close up where the valve goes. The 17" rim will need to be opened up a little to allow the nut to be put on after welding.

View attachment 843839

Here I turned the rim around to plan next cut. In order for it to meet the HMMWV rim it would have to be cut approximately at the red line in the picture. Keeping in mind this is already a heavy wheel it would be adding a lot of extra weight to the already heavy HMMWV wheel. This is the point I decided to stop. I do have another donor rim that I am going to cut the same as this one to continue the proof of concept.

In this picture you get a better shot of the spindle.

View attachment 843841
Why not cut the rim off the donor, cut the face of the HMMWV wheel to fit the inside of the donor???? Have it welded professionally (from the looks of your toys this might be right down your alley) Inspect often! Just sayin....
 

springer1981

Well-known member
844
1,150
93
Location
Maine
Why not cut the rim off the donor, cut the face of the HMMWV wheel to fit the inside of the donor???? Have it welded professionally (from the looks of your toys this might be right down your alley) Inspect often! Just sayin....
There are a few reasons why that doesn't work but the main reason is the rim is only 6" wide and would not fit the tires. Also I would have to make 24 fake bolts for the rim.
 

TNDRIVER

Well-known member
Steel Soldiers Supporter
333
508
93
Location
Cleveland,TN
There are a few reasons why that doesn't work but the main reason is the rim is only 6" wide and would not fit the tires. Also I would have to make 24 fake bolts for the rim.
Good enuff.......... rims can be widened ......... the world is full of fake nuts, a few more will not hurt a thing!
 
Top
AdBlock Detected

We get it, advertisements are annoying!

Sure, ad-blocking software does a great job at blocking ads, but it also blocks useful features of our website like our supporting vendors. Their ads help keep Steel Soldiers going. Please consider disabling your ad blockers for the site. Thanks!

I've Disabled AdBlock
No Thanks