• Steel Soldiers now has a few new forums, read more about it at: New Munitions Forums!

  • Microsoft MSN, Live, Hotmail, Outlook email users may not be receiving emails. We are working to resolve this issue. Please add support@steelsoldiers.com to your trusted contacts.

LMTV CTIS Question

Hobie_rat

Member
43
64
16
Location
North Carolina
Realistically, they probably aren't very easy to kill. Military electronics have to meet extremely rigorous specifications (e.g. temp, overvoltage, polarity, EMP, EMI, etc.). But we have a member ( @Stellaevil who I haven't seen in a while), that worked at Spicer, and said that there are capacitors(?) inside that fail after many years, and the potting makes them irreparable. Repairability just wasn't something the government cared about, compared to being vibration and water proof.
👍🏻
 

Ronmar

Well-known member
3,845
7,474
113
Location
Port angeles wa
They may not be easy to kill, but they do appear to have a fairly high failure rate:)

IRT your battery voltages, they are OK, but they also illustrate one of the biggest issues with the LMTV. Depending on the battery type those resting voltages indicate a range of 70-85% state of charge. You are not running the vehicle enough to fully charge the batteries, and the small 12v vampire load that slowly siphons away power on the outer pair of batteries Is evident by the lower voltage there. The 6TL, 4 battery bank is grossly oversized for the 100A alt. Even more so if they are AGM’s(they want nearly twice the charge current of normal wet cells). The large size means they take a long time to charge, so unless you run a lot, they just never make it. this also means the alt is running at full load most of the time you are running. Your running voltages being .1-.2v low possibly indicate this to me Also(Should be 14.1/28.2V).

Low state of charge is the largest killer of batteries there is. Failing batteries keep the alt in a constant state of overload…

Do yourself and that $2500 alternator a favor and drop to 2 batteries(one inner and one outer). That will get you a lot closer to a good alt/battery relationship. Cat specced a pair of group 31 batteries for these engines…

Add a maintenance charger and a small battery balancer to keep the batteries nearer 100% SOC and they will last a lot longer…

Good Luck!
 

Hobie_rat

Member
43
64
16
Location
North Carolina
.
What about all 4 batteries as individual batteries?
.
[/QUOTE
Thanks for asking I did include them, each (ea) one of the 2 back batteries is 12.5v apiece with the ignition off and 12.4v apiece on the 2 front batteries and 14.0v each one of the back batteries and 13.9 each one on the 2 front either the ignition on
 

Hobie_rat

Member
43
64
16
Location
North Carolina
They may not be easy to kill, but they do appear to have a fairly high failure rate:)

IRT your battery voltages, they are OK, but they also illustrate one of the biggest issues with the LMTV. Depending on the battery type those resting voltages indicate a range of 70-85% state of charge. You are not running the vehicle enough to fully charge the batteries, and the small 12v vampire load that slowly siphons away power on the outer pair of batteries Is evident by the lower voltage there. The 6TL, 4 battery bank is grossly oversized for the 100A alt. Even more so if they are AGM’s(they want nearly twice the charge current of normal wet cells). The large size means they take a long time to charge, so unless you run a lot, they just never make it. this also means the alt is running at full load most of the time you are running. Your running voltages being .1-.2v low possibly indicate this to me Also(Should be 14.1/28.2V).

Low state of charge is the largest killer of batteries there is. Failing batteries keep the alt in a constant state of overload…

Do yourself and that $2500 alternator a favor and drop to 2 batteries(one inner and one outer). That will get you a lot closer to a good alt/battery relationship. Cat specced a pair of group 31 batteries for these engines…

Add a maintenance charger and a small battery balancer to keep the batteries nearer 100% SOC and they will last a lot longer…

Good Luck!
Thank you very much. I charge the batteries periodically. Run time is still limited because I’m waiting for the title. In the mean time I’m doing what maintenance I can do when it’s time to be inspected I won’t have any issues. I’ll remove 2 of the batteries and see if that helps with changing and look into installing a balancing device
 

Hobie_rat

Member
43
64
16
Location
North Carolina
Thank you very much. I charge the batteries periodically. Run time is still limited because I’m waiting for the title. In the mean time I’m doing what maintenance I can do when it’s time to be inspected I won’t have any issues. I’ll remove 2 of the batteries and see if that helps with changing and look into installing a balancing device
I’ve noticed an air leak has developed in the air system av the the service tanks are empty in the morning when they were showed 120psi the night before
 

Mullaney

Well-known member
Steel Soldiers Supporter
Supporting Vendor
7,716
19,766
113
Location
Charlotte NC
I’ve noticed an air leak has developed in the air system av the the service tanks are empty in the morning when they were showed 120psi the night before
.
Crank the truck. Air to full, then off the truck. Maybe you can hear it or maybe note. Get a spray bottle and use dish soap and warm water. Spray everything in sight that looks like an air hose or air line. Start up front with the glad hands at the bumper. Get the lines behind the grille too. Under the truck. Start at the 3 tanks on the drivers side. Spray the valves, spray the hose (line) connections on the tanks. ESPECIALLY spray an air hose (for inflating tires) if it happens to be on or near the tanks. Follow the air lines to both axles.
 
Last edited:

Ronmar

Well-known member
3,845
7,474
113
Location
Port angeles wa
What Mullaney said! I start with my ears, then my hands, then bubble mix. I would add check the glad-hands and normal vents(right under heater behind grill, bottom of relays and qr valve). Also don't forget the park and trailer plumbing in the dash. The seals on the push-pull control on the valves is a common leak down spot…
 

Hobie_rat

Member
43
64
16
Location
North Carolina
.
Crank the truck. Air to full, then off the truck. Maybe you can hear it or maybe note. Get a spray bottle and use dish soap and warm water. Spray everything in sight that looks like an air hose or air line. Start up front with the glad hands at the bumper. Get the lines behind the grille too. Under the truck. Start at the 3 tanks on the drivers side. Spray the valves, spray the hose (line) connections on the tanks. ESPECIALLY spray an air hose (for inflating tires) if it happens to be on or near the tanks. Follow the air lines to both axles.
Will do!👍🏻 I saw the glad hand seal are looking a little rough. Definitely start by replacing those and climb around to look for leaks. Both cages are broken on the driver side. Had to tell the guys towing it back to my place to air up the tanks to release the parking brakes
 

Third From Texas

Well-known member
2,766
6,498
113
Location
Corpus Christi Texas
Do yourself and that $2500 alternator a favor and drop to 2 batteries(one inner and one outer). That will get you a lot closer to a good alt/battery relationship. Cat specced a pair of group 31 batteries for these engines…

Add a maintenance charger and a small battery balancer to keep the batteries nearer 100% SOC and they will last a lot longer…
So much THIS ^

Even with my A1R and 260a alt, I'm only running dual batteries (the other pair is for the habitat and charge via shore power).

Now if your truck is a daily driver operating above the arctic circle, then the extra cranking amps are needed. But S&S really screwed the design tossing 100a alts into the mix.
 

Hobie_rat

Member
43
64
16
Location
North Carolina
So much THIS ^

Even with my A1R and 260a alt, I'm only running dual batteries (the other pair is for the habitat and charge via shore power).

Now if your truck is a daily driver operating above the arctic circle, then the extra cranking amps are needed. But S&S really screwed the design tossing 100a alts into the mix.
Appreciate. Will look into reconfiguring the battery box. Would have saved $500 in batteries if I’d found you guys sooner. Thanks for all the tips and info
 

Ronmar

Well-known member
3,845
7,474
113
Location
Port angeles wa
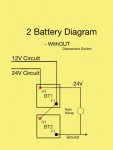
Super simple, no lie. I would like to install a master disconnect switch, though
The simplest way is to add a high current switch on that ground lead. This will stop the truck from drawing any current(and kill that 12v vampire). It will NOT however remove the difference in potential between 12 and 24V, so you can still run into issues when working on the truck electrical, like say wrenching on the alternator as you will still see 12V across the 12-24 terminals. So you should still lift battery leads when performing electrical maintenance.
 

Hobie_rat

Member
43
64
16
Location
North Carolina
The simplest way is to add a high current switch on that ground lead. This will stop the truck from drawing any current(and kill that 12v vampire). It will NOT however remove the difference in potential between 12 and 24V, so you can still run into issues when working on the truck electrical, like say wrenching on the alternator as you will still see 12V across the 12-24 terminals. So you should still lift battery leads when performing electrical maintenance.
Kk so remove 1 front & back battery and add a “kill” switch (I’ve been looking at this one ) to the neg side. I believe the neg cable coming from the batteries goes to the charging port, towards the back, outside of the box. Would you recommend making the interrupt there, between the charging port and the neg post?
 

Attachments

Ronmar

Well-known member
3,845
7,474
113
Location
Port angeles wa
Kk so remove 1 front & back battery and add a “kill” switch (I’ve been looking at this one ) to the neg side. I believe the neg cable coming from the batteries goes to the charging port, towards the back, outside of the box. Would you recommend making the interrupt there, between the charging port and the neg post?
There are 2 neg leads attached to the battery. One goes to the nato port, the other goes to the starter negative. It is the one that goes toward the starter that you want to interrupt. I don’t know the specs on that switch you showed. Whatever switch you choose it needs to be able to handle at least 500A for short durations. Blue sea systems makes some nice ones, reasonably priced and decent quality.
 

Hobie_rat

Member
43
64
16
Location
North Carolina
There are 2 neg leads attached to the battery. One goes to the nato port, the other goes to the starter negative. It is the one that goes toward the starter that you want to interrupt. I don’t know the specs on that switch you showed. Whatever switch you choose it needs to be able to handle at least 500A for short durations. Blue sea systems makes some nice ones, reasonably priced and decent quality.
Thanks. It looks like a marine switch. Ah! Blue Sea. Makes sense. That’s where I‘be seen them, at West Marine Products
 

Hobie_rat

Member
43
64
16
Location
North Carolina
Thank you very much. I charge the batteries periodically. Run time is still limited because I’m waiting for the title. In the mean time I’m doing what maintenance I can do when it’s time to be inspected I won’t have any issues. I’ll remove 2 of the batteries and see if that helps with changing and look into installing a balancing device
Removed two batteries and now while the engine is run at idle and at 1500rpm (no tach just sounds like 1500 definitely less than 200) reading are 14.1v and 28.0v. Trying to find a way to get that extra .2v’s maybe that’s where the balancer comes in to play?
 
Top
AdBlock Detected

We get it, advertisements are annoying!

Sure, ad-blocking software does a great job at blocking ads, but it also blocks useful features of our website like our supporting vendors. Their ads help keep Steel Soldiers going. Please consider disabling your ad blockers for the site. Thanks!

I've Disabled AdBlock
No Thanks