• Steel Soldiers now has a few new forums, read more about it at: New Munitions Forums!

  • Microsoft MSN, Live, Hotmail, Outlook email users may not be receiving emails. We are working to resolve this issue. Please add support@steelsoldiers.com to your trusted contacts.


1952 M135 W/Winch

NDT

Well-known member
Steel Soldiers Supporter
10,163
5,843
113
Location
Camp Wood/LC, TX
Getting geared up to do some more welding in a few weeks, I ran across this. It appeared to be some small bubbles at first until I started pushing on it with my finger.
View attachment 616414

This is on the passenger side above the toolbox. What is the best way to go about fixing this? One of my parts trucks possibly has this part rust free, however I am not sure what all would be involved removing this whole side of the cab. Has anyone repaired this piece or changed that side of the cab for a better one? I would appreciate advice here.
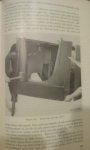
I swapped out the rusted side panels on my truck a long time ago. I did not need to remove anything to get them off, but some bending and prying was required. It was a lot of work. Try to get some kind of rust inhibitor in the hat channel that runs horizontally along the floor, that catches dirt and water and causes the rust.
 

hendersond

Well-known member
Steel Soldiers Supporter
1,171
29
48
Location
Galesville, WI
Nice Can!
The cab side... Should take a 1/2 socket and a wrench to hold the nuts on the other side. Knock it up with a big rubber hammer. I do not remember any welds or anything holding it in. I believe the TM shows a pic of the removal.
 

USMC 00-08

Well-known member
1,163
130
63
Location
Skiatook, OK
This looks like it could be a little difficult. Lots of stuff to come off. I found out how to do it in my downloaded copy of TM9-1819.

NDT...Did you have to remove the back panel and everything else the TM says? I only need to replace the passenger side. Also what is the best way to remove the arm pivot pin on the door?
 
Last edited:

NDT

Well-known member
Steel Soldiers Supporter
10,163
5,843
113
Location
Camp Wood/LC, TX
This looks like it could be a little difficult. Lots of stuff to come off. I found out how to do it in my downloaded copy of TM9-1819.

NDT...Did you have to remove the back panel and everything else the TM says? I only need to replace the passenger side. Also what is the best way to remove the arm pivot pin on the door?
I did not have to remove the rear panel. I had to do some prying and bending, but it went together OK. Memory of this is a little fuzzy, I did this replacement around 1985. There are still a few bolts I have yet to put back, but I will get a round tuit one day.
 

USMC 00-08

Well-known member
1,163
130
63
Location
Skiatook, OK
100_2795.jpg

I have started removing things to get the rusted panel out but have a few questions since I am not understanding what the TM is saying to remove. It says to remove the window frame.

Do I remove it from here?
100_2798.jpg

Or here?
100_2797.jpg

Also what is the best way to get this pin out?
100_2799.jpg

I ran out of daylight and will start again tomorrow.
100_2803.jpg
 

m1010plowboy

Well-known member
Steel Soldiers Supporter
3,805
2,367
83
Location
Edmonton, Canada
I can't even find the book where Mr. Henderson dug up the first picture so feeling a little useless. It looks like the 2 bolts are still holding the lifting hook plate in place so it makes sense that the big bolts get pulled on the window frame. I have beat that keeper pin up with a small hammer and punch but it's a tough spot. Can we drill it out and replace it?

It's so good to get back at it.
 

hendersond

Well-known member
Steel Soldiers Supporter
1,171
29
48
Location
Galesville, WI
I gotta be honest. the first time I took the door off I cut the strap with a sawzall. Not the best way. Then I started cutting the head off the pin with the grinder and driving the pin down. Now, I just quit taking the doors off.

I think I have a truck with roll pins. That works fine too. I'll go look
 

USMC 00-08

Well-known member
1,163
130
63
Location
Skiatook, OK
This has not gone as easily as I had hoped. After removing the bolts the TM said, and attempting to pry the panel out and hammer down, I found out that at some point in this trucks life, someone decided to tack weld these panels together. Not the normal military spot welds. I sure wish I had noticed that before I went through all the trouble. I'll sure look closer if there is ever a next time.

I ended up having to grind the top off the door pivot pin and then drove it out with a punch.

While the grinder was out, I started cutting the rust spots out. Looks like we will have to weld in patches. I don't think I have any other choice at this point since there is no way I could cut through all those tack welds without causing an unrealistic amount of work for myself for what I am trying to accomplish.

0409161612.jpg0409161552.jpg
 

Another Ahab

Well-known member
17,825
4,157
113
Location
Alexandria, VA
That's a lot of unexpected work you ran into there for sure.

It's pretty clear that "plug-and-play" modular components were not part of the original design concept when that rig was on the drawing board.
 

USMC 00-08

Well-known member
1,163
130
63
Location
Skiatook, OK
After receiving these words of wisdom from Another Ahab in reference to questioning weather I should use a Battery Tender, I did some research and decided to get one. Thank you Ahab for making this easy for me.

Because if you do, it'll make your life easier and that might turn you into a lazy bum?

S-A-A-A-Y; is this a trick question!?
This is what I decided to get, believing it is what is best for my needs right now.

Battery Tender.jpg

Battery Tender has this example as what would be best for our application.
Batteries in series.gif
I had thought about using the slave cable port and an old slave cable end to wire a 24v tender to for an easy quick connect. Then I realized that it would not solve the problem of having to rotate batteries on occasion and that one battery would probably always be a little weaker than the other.

My Battery Tender came in on Friday. The batteries had not been charged since the end of December and the battery gauge in the truck was telling me they could use a charge. They were still strong enough to start the truck. I wired in the permanent quick connects to each battery as opposed to using the normal battery cable type clip connectors, turned the tender on and all seems to be working well. After 2 days, it is still in the trickle charge mode and had not reached the maintain mode. The trucks battery gauge is showing voltage in the green as opposed to almost being on the line between red and yellow.
0415161701.jpg0415161702.jpg100_2805.jpg

Yesterday morning, OkieM1008morrison and I left at 4AM to go get #4984 from western Kansas. It was a 785 mile round trip, but it could not have gone any smoother. We got back home and unloaded about 8:30PM. We had a great time and ended the day with our families getting together for supper.
100_2804.jpg0416161329.jpg

I have owned this truck for 10 years but have not done much with it. After I get #5314 painted and back to where I can enjoy driving it again, I will start on this truck. It has been started twice since about 1985. I will probably take some video of it coming back to life and post it up. Should I start a new thread for #4984 or keep everything in this one?
 

m1010plowboy

Well-known member
Steel Soldiers Supporter
3,805
2,367
83
Location
Edmonton, Canada
G749 transmission trouble-shooting

I was going to push this into the transmission re-build thread but still trying to grasp all the lingo so we'll Xperiment on you first.

Do you still want these? They're over 30 years old, like most of our underwear. We got shut down with some cold and rain so pushed the schedule up a bit. Let's hope they ship safely. Should have left them in Colombus!

P4232132.jpg

The team working on the most recent G749 to see Alberta pavement, is fighting a mean transmission. We're still getting solid advice from the golden trani guru and found a few more things to take apart, clean and reassemble. Some updates on the G749 Preservation thread.

The kids wanted to run oil through the trans a few times to be sure they got all the bugs out but it's not behaving. After the last dump, including the torus, the 3 gallons of Hy-trans didn't want to leave the fill tube. It's an odd symptom so guru advised the team to pull this spring / valve out. It was sticking in the housing which stopped the oil from moving into the pan. I'll get pics of the location on the trans before you need them.

P4232123.jpgP4232133.jpg

The rest of the pics cover the Transmission Control Valve(TCV)......which sits under the cover on the side of the transmission. NOT to be confused with the box that sits on the back of the transmission. You can see that shiny part that sits on the front of the TCV. That is the spring/valve that gets hung up and won't allow gear changes and/or selection.

Its just another piece we can take off and clean up without a trans removal.

P4232110.jpgP4232108.jpgP4232109.jpgP4232107.jpgP4232136.jpg
 
186
1
16
Location
Dalhousie N.B. Canada
Transmission band template

IF you tear down a transmission in the future, do you have the template that you NEED to adjust the band anchor? I saw this on YT, and would like to get the exact dimensions to hand fab my own when that moment arrives. I know I'm asking a stupid question, but is there something we could use to "flush" the transmission, and then refill with the 10 w oil? Like suppose...... a mix of 1 gallon brake cleaner to remaining 10 wt oil, and just disconnect the output shaft from the transfer case and transmission. Run it through all ranges and gears for 1/2 hour and then dump ALL the fluid and refill? I don't see this harming the trans, because there would never be a load on it but would circulate the cleaner to all the "sticky bits" and very likely free them up. Then adjust the band and road test. What do you think? Nothing to lose if you are faced with the last resort of pulling it all apart.
 
186
1
16
Location
Dalhousie N.B. Canada
Flushing fluid

As for compatibility, don't worry about it, as the brake cleaner will naturally evaporate during use after the flush is done, and completely disappear. All you need to do is MAKE SURE you have drained everything as best as possible, and top up with 10wt as needed after, that's all you need to do.I think it's almost foolproof. Nothing bad will be left behind, and no harm should come to the transmission. All or nearly all the sludge will come out and the varnish should be removed also.Do this remedy a couple of times to be sure, and bob's your uncle.... Remember to disconnect the coupling between the trans and the t-case, and run for as long as you think appropriate to get the best results. I will do this as soon as I can on my unit as a test bed.
 

USMC 00-08

Well-known member
1,163
130
63
Location
Skiatook, OK
I was going to push this into the transmission re-build thread but still trying to grasp all the lingo so we'll Xperiment on you first.

Do you still want these?
We definitely need a transmission rebuild thread. This is great info! All those parts make this look a little intimidating but I think I can do it.

I could still use those, but if you need to wait a while, that will be fine. I'm going to try checking linkage, TCV, etc. before I tear into the transmission on the orange truck.

is there something we could use to "flush" the transmission, and then refill with the 10 w oil?
Maybe this is a crazy idea but what if we used diesel? Completely fill the transmission to the top with it, let it set a while, drain, repeat as necessary and then run a little through the system. After that run some oil, drain and refill with oil for the final time.
 

USMC 00-08

Well-known member
1,163
130
63
Location
Skiatook, OK
Last Saturday I had a little time and ended up washing 30 years worth of dirt out of the engine compartment and cab of the orange M135 (#4984) and looking things over before I try to start it back up.

Does anyone know what the rear wheel (right wheel in the pic) here belongs too? It is different than the wheels on my other M135's. All the others I have are like the left wheel.
100_2810.jpg

I am also going to add a slave cable port and got to looking at what it would take to wire it in. I discovered that this truck is different than my other one and has an extra piece so I am not sure how things are supposed to be hooked up. I could not read the metal tag on the cables.
100_2811.jpg

My other truck does not have this part with the three cables/wires sticking out. How should this be hooked up and where should I connect the slave port wires? The short cable has another cable attached to it and hooks up to ground over on the driver side where that ground is connected. I know this is not original and would like to put things back how they are supposed to be.
100_2812.jpg100_2813.jpg100_2814.jpg
 
Top
AdBlock Detected

We get it, advertisements are annoying!

Sure, ad-blocking software does a great job at blocking ads, but it also blocks useful features of our website like our supporting vendors. Their ads help keep Steel Soldiers going. Please consider disabling your ad blockers for the site. Thanks!

I've Disabled AdBlock
No Thanks