• Steel Soldiers now has a few new forums, read more about it at: New Munitions Forums!

  • Microsoft MSN, Live, Hotmail, Outlook email users may not be receiving emails. We are working to resolve this issue. Please add support@steelsoldiers.com to your trusted contacts.

1988 Humvee Project: Installed my "Bed Divider" today.

JoeJrTheBarber

New member
268
20
0
Location
Chicago, IL
1988 Humvee Project: Installed my "Bed / Cargo Divider" today.

Had the day off and took advantage of the "heat wave" Chicago was having with temps in the lower 50's and installed my "Bed Divider" I picked up offa good ol
Ebay. I am by no means a mechanic but I have built a few racecars and motorcycles in my day so I wasn't too afraid to attack something like this (spray paint fixes everything !)..

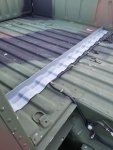
How the truck looked as I got it. Was lovely to have water rushing into the cab when raining or even better after a car wash. Plus whatever heat the truck did make ran right out into the bed with the 1'' gap.
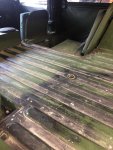
BedDivider.jpg

I see this as a temp thing as I am going to get a "iron curtain" back window / wall thing-e eventually so I didn't want to go all out and rivet the thing in place as the directions said so I got a few tubes of industrial silicone and a few self taping screws and off I went.
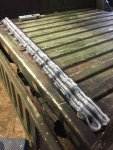
BedDivider1.jpgBedDivider2.jpg

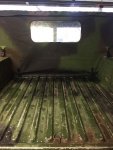
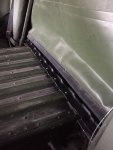
Install went pretty straight forward. Piece is about 1/2'' short on both sides so I had to get creative with some duct tape and silicone to fill in those gaps but all in all came out great and should do a pretty good job of keeping what's in the bed in the bed. Could prob make a better fitting piece with some L-channel minus fitting the grooves of the bed like this piece did (this piece is some kinda hard plastic / maybe fiberglass)..

Had some matte black spray paint lyin around so I sprayed it black and "dusted" back into the bed so it kinda (and I stress the word Kinda) looks like it wasn't a recent add on. No matter what I do to this truck add-on wise I want to keep it looking alittle rough around the edges...
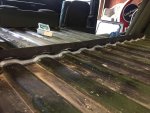
BedDivider4.jpg

Inside view. Plan to get some matching green paint eventually and spray this so it doesn't stick out so much (being black against the green). Also need to get a long strip of Velcro and run that between the bottom of the rear window and the divider to get a better fit. But, for now it's fine and I feel a good use of a hour or so of my time..
BedDivider3.jpg

Lots more little projects to come which I plan to document and post the best I can.
Stay tuned...

* NOTE: After driving the truck in the rain for the first time with the above installed I soon realized that the curtain itself needed to go on the outside of the divider (and not on the inside as it is shown above) to keep water out of the cab. This way the water rolling down the curtain would stay in the bed and not puddle up inside the divider itself. So, a quick fix and some industrial Velcro and we should be good to go..
 
Last edited:

juanprado

Well-known member
Steel Soldiers Supporter
5,605
2,898
113
Location
Metairie/La (N'awlins)
Looking good and I have been wanting to do the same. The OE moulding uses a rope type seal underneath it to seal against the wavy surface.

Am General does make that piece I think it is abs or some type of plastic but it has been on back order for quite some time. Unfortunately because it is a $40 item and I am not willing to fork over $125, I will keep on waiting patiently for AM to restart production. ;-)
 

JoeJrTheBarber

New member
268
20
0
Location
Chicago, IL
Looking good and I have been wanting to do the same. The OE moulding uses a rope type seal underneath it to seal against the wavy surface.
This piece also came with the same rope rubber seal thing as you mentioned. I wasn't satisfied with that alone so out came the 3 tubes of silicone !
 

juanprado

Well-known member
Steel Soldiers Supporter
5,605
2,898
113
Location
Metairie/La (N'awlins)
This piece is some sort of fiberglass / injection molded plastic of some sort.
He must have someone making an aftermarket reproduction for him. When I searched epay, I also noticed another guy selling an aluminum black reproduction for $150 but it does not look like he has the groove for the cargo divider to slide into and just a few rivet holes.
 

Action

Well-known member
3,576
1,557
113
Location
East Tennessee
He must have someone making an aftermarket reproduction for him. When I searched epay, I also noticed another guy selling an aluminum black reproduction for $150 but it does not look like he has the groove for the cargo divider to slide into and just a few rivet holes.
There is no groove for rhe bullhead on these. It is basically an "L" cross sectionshape. You can screw or rivet these to the bulkhead if you wish.
 

juanprado

Well-known member
Steel Soldiers Supporter
5,605
2,898
113
Location
Metairie/La (N'awlins)
There is no groove for rhe bullhead on these. It is basically an "L" cross sectionshape. You can screw or rivet these to the bulkhead if you wish.
That might be why the guy on epay with the gray plastic one for $125 offered his as it has a groove for the bulkhead to rest into. I did not realize he had improved the design.

The black aluminum one on epay for $150 is just an L.
 

tage

Active member
679
68
28
Location
LOS ANGELES / CALIFORNIA
If it's fiberglass. Way too much money.
Al is worth the money. That's extra tooling though to get the groves.

Either way I wouldn't buy it lol as soon as you use the bed it'll rip the curtain...
 

Action

Well-known member
3,576
1,557
113
Location
East Tennessee
That might be why the guy on epay with the gray plastic one for $125 offered his as it has a groove for the bulkhead to rest into. I did not realize he had improved the design.

The black aluminum one on epay for $150 is just an L.
That isn't a slot for the bulkedhead. The raised line from one side to the other is for the seal to rest in, between the bracket and body. It looks just like the real aluminum one, just fiberglass.

s-l1600.jpg
 

teteacher101

Member
127
4
18
Location
WI
Had the day off and took advantage of the "heat wave" Chicago was having with temps in the lower 50's and installed my "Bed Divider" I picked up offa good ol
Ebay. I am by no means a mechanic but I have built a few racecars and motorcycles in my day so I wasn't too afraid to attack something like this (spray paint fixes everything !)..

How the truck looked as I got it. Was lovely to have water rushing into the cab when raining or even better after a car wash. Plus whatever heat the truck did make ran right out into the bed with the 1'' gap.
View attachment 716303

I see this as a temp thing as I am going to get a "iron curtain" back window / wall thing-e eventually so I didn't want to go all out and rivet the thing in place as the directions said so I got a few tubes of industrial silicone and a few self taping screws and off I went.
View attachment 716304View attachment 716305

Install went pretty straight forward. Piece is about 1/2'' short on both sides so I had to get creative with some duct tape and silicone to fill in those gaps but all in all came out great and should do a pretty good job of keeping what's in the bed in the bed. Could prob make a better fitting piece with some L-channel minus fitting the grooves of the bed like this piece did (this piece is some kinda hard plastic / maybe fiberglass)..

Had some matte black spray paint lyin around so I sprayed it black and "dusted" back into the bed so it kinda (and I stress the word Kinda) looks like it wasn't a recent add on. No matter what I do to this truck add-on wise I want to keep it looking alittle rough around the edges...
View attachment 716306

Inside view. Plan to get some matching green paint eventually and spray this so it doesn't stick out so much (being black against the green). Also need to get a long strip of Velcro and run that between the bottom of the rear window and the divider to get a better fit. But, for now it's fine and I feel a good use of a hour or so of my time..
View attachment 716307

Lots more little projects to come which I plan to document and post the best I can.
Stay tuned...

* NOTE: After driving the truck in the rain for the first time with the above installed I soon realized that the curtain itself needed to go on the outside of the divider (and not on the inside as it is shown above) to keep water out of the cab. This way the water rolling down the curtain would stay in the bed and not puddle up inside the divider itself. So, a quick fix and some industrial Velcro and we should be good to go..
I made a divider out of some scrap 3/4" plywood. Cut the bed pattern out with a band saw an made little L brackets an screwed them into place, 2 coats of black paint, an window an door caulk around the edges. Seals up great an eliminated the "back draft" effect and you can't hardly tell its not factory since its mostly covered up anyway. My favorite part is it was almost free. :)
 

dilvoy

Active member
733
25
28
Location
San Francisco, Ca.
I took a photo of how the original piece of flashing was used. The fiberglass replica would work just fine, it just doesn't really ad in any strength to the vehicle like the original might. As mentioned before, it would have had a long round seal trapped beneath it's ridge and the bed to make a water seal if the outer caulking failed.


therooster2001

Active member
824
44
28
Location
Colorado
I just ordered an original aluminum one. $77. I'll post my adventure in here. Still need a rope sealer, and might go for silicone, as I like it to be able to come out, but I like stability, so might rivet it. Decisions!
 

therooster2001

Active member
824
44
28
Location
Colorado
From where Rooster? I am having a four man divider cut down and have the two brackets so...
MacMotors. Their website only accepts part numbers, no browsing. Let me get mine in and I'll write it up. If might be flimsy tin foil. I have a two man that needs to be cut, and no brackets. Alum C channel is what I am thinking for me.
 

Action

Well-known member
3,576
1,557
113
Location
East Tennessee
Are you two talking about the bulkhead or the currogated piece between that and the bed? The bed piece is longer in the 4 man version.
 
Top