• Steel Soldiers now has a few new forums, read more about it at: New Munitions Forums!

  • Microsoft MSN, Live, Hotmail, Outlook email users may not be receiving emails. We are working to resolve this issue. Please add support@steelsoldiers.com to your trusted contacts.

803A Hits a Wall at 9.3kW

handyjay03

New member
14
4
3
Location
LA
Doing some PMs on a recently acquired 803A, and couldn't find my small strap wrench to get the fuel/water separator off. Tried removing the generator left side panel between front control panel and side door to get better access, and it turns out, it is all bolts with nuts on the other side of the panel. I figured no problem, I'll just take the top off and get them bolted back up. Well, the top has the same setup. After some head scratching and a break, I spent a few minutes and found the strap wrench that worked to get the fuel/water separator off, but now I/m stuck with a bunch of panels that won't come off and half of the nuts dropped to the bottom of the case. Any trick to get into this thing?

Before swapping the separator, I also did some testing with 5000W heaters. Ammeter was way off (showing ~80% at 19.1A). Going to try cleaning the contacts, but it dropped completely out when I tried adjusting it down. It also wouldn't stay running with any more than 35.5A, so that's something I've got to sort out. The previous owner never ran it hard, so I am trying to work up on load, but it just can't make it past 35.5A without killing the engine after almost two hours of running at that level.


6/22 update: changed thread title for next issue
 
Last edited:

2Pbfeet

Well-known member
668
1,333
93
Location
Mt. Hamilton, CA
Doing some PMs on a recently acquired 803A, and couldn't find my small strap wrench to get the fuel/water separator off. Tried removing the generator left side panel between front control panel and side door to get better access, and it turns out, it is all bolts with nuts on the other side of the panel. I figured no problem, I'll just take the top off and get them bolted back up. Well, the top has the same setup. After some head scratching and a break, I spent a few minutes and found the strap wrench that worked to get the fuel/water separator off, but now I/m stuck with a bunch of panels that won't come off and half of the nuts dropped to the bottom of the case. Any trick to get into this thing?

Before swapping the separator, I also did some testing with 5000W heaters. Ammeter was way off (showing ~80% at 19.1A). Going to try cleaning the contacts, but it dropped completely out when I tried adjusting it down. It also wouldn't stay running with any more than 35.5A, so that's something I've got to sort out. The previous owner never ran it hard, so I am trying to work up on load, but it just can't make it past 35.5A without killing the engine after almost two hours of running at that level.
Welcome to the '803 club. Yes there are a zillion #10 nuts in awkward places, and I think as it is not desirable to have them vibrating around, I think it is important to find them all. Magnetic pickup wands and a vacuum with a crevice nozzle helped me. Bonus: I found fasteners that I was not missing, not all of them #10s. I find that using an impact driver to loosen them can often get "hidden" nuts off, but I would bear in mind that if you don't replace the nut with rivet nuts, you will still have to get in there to reattach the nut. With some socket extensions and contortions, it should be doable. I find putting a spacer inside my socket holds the nut up to engage with the bolt more easily. YMMV...

FWIW: The original filter fuel filter / water separator on mine resisted my strap wrench, so I moved to a chain wrench and the discussion was over.

Which voltage/phase mode was the generator operating at? 120V, 120/240, or 3-phase 208? How was your voltage/current switch (S6) set when you were taking your current readings? Did you double check the current reading with a known good ammeter?

All the best,

2Pbfeet
 

handyjay03

New member
14
4
3
Location
LA
Welcome to the '803 club. Yes there are a zillion #10 nuts in awkward places, and I think as it is not desirable to have them vibrating around, I think it is important to find them all. Magnetic pickup wands and a vacuum with a crevice nozzle helped me. Bonus: I found fasteners that I was not missing, not all of them #10s. I find that using an impact driver to loosen them can often get "hidden" nuts off, but I would bear in mind that if you don't replace the nut with rivet nuts, you will still have to get in there to reattach the nut. With some socket extensions and contortions, it should be doable. I find putting a spacer inside my socket holds the nut up to engage with the bolt more easily. YMMV...

FWIW: The original filter fuel filter / water separator on mine resisted my strap wrench, so I moved to a chain wrench and the discussion was over.

Which voltage/phase mode was the generator operating at? 120V, 120/240, or 3-phase 208? How was your voltage/current switch (S6) set when you were taking your current readings? Did you double check the current reading with a known good ammeter?

All the best,

2Pbfeet
I was able to find most of them with a magnet and some careful feeling around. Only missing two now, and I just can't get to them.

As far as the current readings, the machine is on single phase 120/240V, and I had S6 on single phase, L1-L3 voltage, and monitoring the L3 leg. Was using a Fluke 301 measuring current on the heater wiring going to the generator lugs. These heaters are rated at 5000W. They each pull around 4590W wide open and about 3960W on the 4000W setting.


Edit: Cleaned ammeter with deoxit, started back up, and now tripping on overload running ~8000W. Not sure if it was me digging around trying to find nuts, or there is a bigger issue. So now I've got a dead ammeter and a genny that trips on overload under what it was yesterday(n)
 
Last edited:

kloppk

Well-known member
Steel Soldiers Supporter
2,285
4,037
113
Location
Pepperell, Massachusetts
False overloads are almost always due to corroded contacts inside the S6 and/or S8 switches. A common issue with the 802's and 803's.
Countless threads on here about owners having the same issue.

The current from the CT's to the Burden Resistors and the %Load meter flow through S6 & S8. If there is contact resistance in S6 and/or S8 it causes the voltage to the inputs of K8 to be falsely high triggering a false overload.

Most people cure the issue by cleaning both the S6 and S8 switches with Deoxit and exercising the switches - with set NOT running.

At an actual 100% load the AC voltage across K8 terminals 1 & 4, 2 & 4 and 3 & 4 would all be 5.6 volts AC.

Here is a simplified interconnect diagram of the %Load and Overload Detection circuit.
In the CT3 path S8 connects Burden resistor R13 in parallel with Burden resistor R12 when in 120/240 mode.
Sometimes that switch contact causes the false overload.
1749931162623.png
 

handyjay03

New member
14
4
3
Location
LA
Thanks, I will try cleaning them tomorrow. They seemingly feel like all older switches that I've messed with. No grit or resistance to switching, but I'll give it a go. The K8 relay does have some rust on the terminal screws, so they will need to be cleaned as well.

Any idea on why it can't handle a full load after a few hours of running loaded? It does roll a little bit of coal at 35.5A, but nothing excessive. Just bogs to the point where I have to switch one of the heaters lower once I went over that threshold. It would kill the engine if not.
 
Last edited:

Ray70

Well-known member
Steel Soldiers Supporter
2,842
6,865
113
Location
West greenwich/RI
Can you explain the smoke situation in more detail, when you exceed 35.5A?
When the engine begins to bog down, are you seeing a moderate to heavy dark smoke or just a slight amount.
When it goes from maintaining the load at just under 35A to bogging down at >35A is there a decent increase in visible smoke?
Trying to determine if you are lacking fuel or lacking power.
I'm thinking if there is plenty of fuel, you may have a clogged or partially clogged injector(s) or possibly a metering pump / governor issue / droop adjustment issue.
Normally you should have clear exhaust up to and a bit over 10Kw.
As you get into the 12Kw range you will still maintain RPM but will begin to see a slight amount of smoke, but you may not even notice it, unless you stand back and look at it.
at 13Kw the smoke will be obvious but the motor still should not be bogging down more than 1 - 1.5Hz
Above 13.5Kw -14Kw it may begin to droop beyond 2 Hz depending on the machine's overall health, some can handle 14Kw+ and some will fall just shy of that before bogging down.
 

handyjay03

New member
14
4
3
Location
LA
As far as the smoke, it is slightly visible when above say 7200W power levels. I suspect I wouldn't be able to see it if the generator wasn't up against green trees. I have to get down and look up to see it. Just slightly more at 8520W. Smoke is always present though
Engine speed drops immediately when I turn up the heaters, and would kill the engine in just over 2 seconds if I let it go. From no load to 8520W, it goes from 61.5Hz to 58.9 or 59Hz.

Doesn't "sound" like it's starving for fuel, rather lacking power. I'd guess it could use a little heavier of an exercise, but can't maintain engine speed at this point. Was trying to do it because the previous owner just had it hooked up to his shop panel with 10AWG wiring and switched to running what he needed on an 802A.
 

vrzff

Member
25
81
13
Location
Mont Vernon, NH
While it's running, do you have an IR thermometer? I'd temp each cylinder's exhaust on the header and check if you have a large discrepancy between cylinders. It's possible that you have an IP stuck closed, or an injector clogged-- which is essentially a dead cylinder.

Have you taken any of the fuel system apart yet?

How much carbon was shooting out of the exhaust during your two hour 5kW run cycle?
 

handyjay03

New member
14
4
3
Location
LA
While it's running, do you have an IR thermometer? I'd temp each cylinder's exhaust on the header and check if you have a large discrepancy between cylinders. It's possible that you have an IP stuck closed, or an injector clogged-- which is essentially a dead cylinder.

Have you taken any of the fuel system apart yet?

How much carbon was shooting out of the exhaust during your two hour 5kW run cycle?
I have an IR thermometer. Just need to find a 9V battery to make it work.

The only thing I did for the fuel system was change filters and tighten the loose fuel hoses going to the injectors. One came loose when the seller was running it for me, and I found all of the clamps loose when I got it home. Hoses were tight up against the vertical post, so I had to use a 1/4“ hand crank ratchet.

Nothing was visibly shooting out of the exhaust when I was running it initially. It was more like burning carbon off, but nothing I would consider excessive.


Edit: After spraying some QD cleaner and exercising S6 and S8, it can now hold the original ~9kW, but still dies if I go above that. Temps on the painted portion of the block just under the manifold are all 199-201, which is what my water temp gauge is reading. Ambient is 94 right now.

Oil pressure gauge is showing 10psi. Not gonna take that to the bank though. Looking at the exhaust next to my white-colored house, it is steady blowing black smoke while under this load, but not a large amount.
 
Last edited:

vrzff

Member
25
81
13
Location
Mont Vernon, NH
You'll want to check the exhaust manifold itself, not the block. It's not an exact science, but there's a few spots you'll learn to hit at certain angles.

The goal is to see what the exhaust gas temperatures of the cylinders are, which can start to tell you if you're starved for fuel or not. When you really get into it, you can start to play around with the IP rotation to increase / decrease the fuel going to each cylinder to even things out.

I'm not a diesel expert by any means, but smoke like that when you're not pushing the engine definitely makes me think a fuel / air imbalance.
 

handyjay03

New member
14
4
3
Location
LA
You'll want to check the exhaust manifold itself, not the block. It's not an exact science, but there's a few spots you'll learn to hit at certain angles.

The goal is to see what the exhaust gas temperatures of the cylinders are, which can start to tell you if you're starved for fuel or not. When you really get into it, you can start to play around with the IP rotation to increase / decrease the fuel going to each cylinder to even things out.

I'm not a diesel expert by any means, but smoke like that when you're not pushing the engine definitely makes me think a fuel / air imbalance.
Ordered a new air filter for it today just in case that might be an issue. The last service looks to be in 2013. So I would take the readings on the manifold itself, or try and get the heads? I shot it a couple of times playing with my IR gun before reading your post, and the temps vary wildly depending on where you hit. IIRC, I saw anywhere from 250 to 450F.

The IPs seek to be as far counterclockwise as they can go. Tight enough where I couldn't get a pear head 1/4" ratchet in there easily on the hose clamps. Might be able to get a little extra out of them if that's the correct way to turn.
 

2Pbfeet

Well-known member
668
1,333
93
Location
Mt. Hamilton, CA
Ordered a new air filter for it today just in case that might be an issue. The last service looks to be in 2013. So I would take the readings on the manifold itself, or try and get the heads? I shot it a couple of times playing with my IR gun before reading your post, and the temps vary wildly depending on where you hit. IIRC, I saw anywhere from 250 to 450F.

The IPs seek to be as far counterclockwise as they can go. Tight enough where I couldn't get a pear head 1/4" ratchet in there easily on the hose clamps. Might be able to get a little extra out of them if that's the correct way to turn.
How bad did the air filter look?

FWIW: After probing around to get a sense of the range of temperatures, and finding the areas that are the hottest, I try to keep the IR temperature probe perpendicular to the location I want to measure on the manifold, at the same distance to the manifold, the approximate height, and the same relative location on the manifold. Most IR temperature probes do not probe exactly where the laser dot is, so it is worth playing around to get a sense of where yours is, at a given distance, rather like sighting in a rifle. Mostly, I try for the spot opposite of the exhaust port on the block, more or less.

All the best,

2Pbfeet
 

Ray70

Well-known member
Steel Soldiers Supporter
2,842
6,865
113
Location
West greenwich/RI
One other comment on the IR thermometer, I usually put a piece of cardboard up near the front of the engine to block the airflow from the fan while taking exhaust temps.
I've noticed that the fan will tend to make the front cylinder appear cooler than the rear when in fact it's just the additional airflow.
Block the air and shoot at the underside of the head's exhaust port. Then repeat the test shooting at the manifold itself and compare the results.
I like shooting the head's exhaust port area because there is no coolant anywhere nearby and that area is not influenced by exhaust gas from other cylinders.
The manifold temp near cylinders 2 and 3 is somewhat influenced by the exhaust coming from cylinders 1 and 4, making it more difficult to identify smaller temp differences on the center 2 cylinders.
 

handyjay03

New member
14
4
3
Location
LA
One other comment on the IR thermometer, I usually put a piece of cardboard up near the front of the engine to block the airflow from the fan while taking exhaust temps.
I've noticed that the fan will tend to make the front cylinder appear cooler than the rear when in fact it's just the additional airflow.
Block the air and shoot at the underside of the head's exhaust port. Then repeat the test shooting at the manifold itself and compare the results.
I like shooting the head's exhaust port area because there is no coolant anywhere nearby and that area is not influenced by exhaust gas from other cylinders.
The manifold temp near cylinders 2 and 3 is somewhat influenced by the exhaust coming from cylinders 1 and 4, making it more difficult to identify smaller temp differences on the center 2 cylinders.
I was finally able to look at it again this afternoon. Set my frequency to 60HZ with the 4590W load on it, and it stays around 61.5Hz with no load. It will now hold about 9300W at 58.5Hz, but cannot hold engine speed above that. I have about 3hrs of loaded runtime on it since picking it up. It still blows black smoke steady from 8520W and above, but it is not heavy.

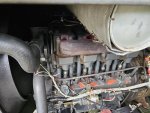
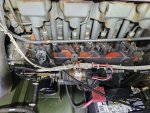
Shot temps where the red circles are, which seems to be the valve covers, inboard the exhaust manifold. Typically getting 350 on the cylinder closest to the radiator, and 425-430 on the subsequent three. Also looked at the placement of the metering pumps, and the one for the outlying cylinder has some room to rotate counterclockwise a little bit. I have attached pics of both.
 

Attachments

Last edited:

handyjay03

New member
14
4
3
Location
LA
Have an update from running today:

Turned the injection pump all of the way clockwise with no change. Seems like it can take a stepped up load to 9300W. I do this with a carpet drying fan that pulls 250/500/750W. It will hold it if I go straight from nothing to 750W about 50% of the time. Will always allow me to step it up (slightly less surge). Still can't get it to go from the 4000W setting to the 5000W setting on a heater (with the other at 5000W), and I've tried both in case there was an issue. While running with 9300W and a Fluke monitoring frequency, it puts out 58.9Hz.

Once it drops below ~57Hz, it's going to fall on it's face and no stopping it. I can adjust engine speed with a load on it while running, but don't want it to be putting out such a high frequency with minimal load.

New fuel with Seafoam didn't make any change on ability to take a load. It might possibly be smoking more, but that could be a placebo affect.
 
Last edited:

vrzff

Member
25
81
13
Location
Mont Vernon, NH
Have you tried adjusting the governor droop?

The visible smoke is still slightly worrisome to me, as I never see it on units until approaching 100% load, and even then it's very light.

Something is still telling me you have a fuel / air problem.

I'm going to bump one of my generators on today and get some manifold readings for comparison, in addition to some pictures of where I'm hitting it. My 803 is off for now, so it will be the 802-- same engine less two cylinders.
 

handyjay03

New member
14
4
3
Location
LA
Have you tried adjusting the governor droop?

The visible smoke is still slightly worrisome to me, as I never see it on units until approaching 100% load, and even then it's very light.

Something is still telling me you have a fuel / air problem.

I'm going to bump one of my generators on today and get some manifold readings for comparison, in addition to some pictures of where I'm hitting it. My 803 is off for now, so it will be the 802-- same engine less two cylinders.
Adjusted the droop three turns clockwise, and it'll hold 9420W @ 59.0Hz. No load is 61.3Hz and half is 60.0Hz. Also had to correct frequency after every droop adjustment. Response to load is better, but any more than what I've got on it will kill the engine. It is also visibly smoking now, but not what I would consider heavy, just easily visible.
 
Last edited:

handyjay03

New member
14
4
3
Location
LA
After wondering what the suggested limit was on droop adjustment, I searched the forum for droop screw adjustment. Looks like I picked up a problem child from a member who never resolved the issues.

One thing that I need to seriously look at is oil pressure. Got mentioned in one of the previous owner's posts, but after putting in new Delo 15W-40, it'll run 45psi until it is hot and loaded, then drops to 18. Need to get a gauge on it to confirm. Only 1490hrs on it now.
 
Top