• Steel Soldiers now has a few new forums, read more about it at: New Munitions Forums!

  • Microsoft MSN, Live, Hotmail, Outlook email users may not be receiving emails. We are working to resolve this issue. Please add support@steelsoldiers.com to your trusted contacts.


84 m1009 cucv chevy blazer build-up

2INSANE

Well-known member
722
819
93
Location
Belgrade, Montana
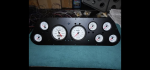
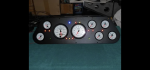
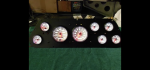
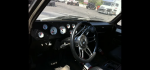
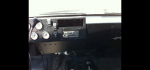
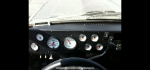
2013 cluster on test bench and pics of the dash powder coated and installed.
 

Attachments

2INSANE

Well-known member
722
819
93
Location
Belgrade, Montana
Chevymike I guess I did post up the dash pics on Post #91 page 5 but not as many. Hope these pics helps you.

Come to think on it... I do actually have one complaint about the DIY4X dash...

Heater Core access! There is none! I will have to pull out 1/2 the dash to get to the Heater Core. So with that being said, best to install a new fresh heater core while doing the Dash upgrade!
 
Last edited:

LT67

Well-known member
654
499
63
Location
Bowdon, GA
Right now she is set at 7psi boost and it feels and sounds great going around the block! It turns a lot of heads!

I can tell the Th400 does not like the additional HP and Torque.

After the Downpipe and Exhaust is fully done in 1 1/2 weeks, I will up the boost to 10 psi max and take her on a nice long voyage and give full reports!

There are a few more add ons I want to do but can’t until the exhaust is complete.
Just curious; how is the extra power and torque effecting the turbo 400? In my experience a turbo 400 is a very stout transmission..
 

2INSANE

Well-known member
722
819
93
Location
Belgrade, Montana
Just curious; how is the extra power and torque effecting the turbo 400? In my experience a turbo 400 is a very stout transmission..
It feels like there is more lag time or slippage between shifts. I have not made any vacuum adjustments yet so that could be the problem.

The Exhaust shop called and said they got a cancellation this Friday so I’ll be able to get it in a week earlier! :)
 

chevymike

Well-known member
578
449
63
Location
San Diego, CA
Chevymike I guess I did post up the dash pics on Post #91 page 5 but not as many. Hope these pics helps you.

Come to think on it... I do actually have one complaint about the DIY4X dash...

Heater Core access! There is none! I will have to pull out 1/2 the dash to get to the Heater Core. So with that being said, best to install a new fresh heater core while doing the Dash upgrade!
Thanks for all the pics. Looks very nice. Two things I am curious about. First, it seems there is not really a glove box, in the sense it is very shallow and not likely very useful. Second, if the stock heater core box is tight, I would guess an aftermarket A/C system is not likely going to fit, correct?
 

2INSANE

Well-known member
722
819
93
Location
Belgrade, Montana
Thanks for all the pics. Looks very nice. Two things I am curious about. First, it seems there is not really a glove box, in the sense it is very shallow and not likely very useful. Second, if the stock heater core box is tight, I would guess an aftermarket A/C system is not likely going to fit, correct?

I do not know what your definition of “Useful” is but I got...


Registration Papers

Insurance Papers

Mini Mag Light

Fuses

Bulbs

Condoms

KY

Tampons

Napkins

Hand written Electrical Diagram Papers

Toothbrush

Toothpaste


With room to spare In my glovebox.


I have no idea about the A/C fitting with the dash. Never had a square body with A\C. That would be a question for DIY4X.
 

2INSANE

Well-known member
722
819
93
Location
Belgrade, Montana
The exhaust is done! I spared no expense on this mod and went all out!

Diamond eye down pipe modified with a 90 degree and 45 degree mandrel bend elbows and wrapped with heat wrap. The frame was notched slightly so I could keep the Oem exhaust heat shield on the firewall.

Diamond eye cross over that has been shortened with a 45 degree elbow on the passenger side and wrapped with heat wrap.

A 4” exhaust mated to the 3” downpipe with no muffler going all the way to the back of the bumper as straight as one could.

We did a flex test on all four tires to make sure nothing would get hit.

Here is a plethora of pictures.
 

Attachments

Last edited:

2INSANE

Well-known member
722
819
93
Location
Belgrade, Montana
8 more pictures! Here is the parts list minus the downpipe and elbows ofr the down pipe.
 

Attachments

Last edited:

Ilikemtb999

Active member
691
42
28
Location
Denver, CO
That’s a tight squeeze! I bought a diamond eye turbo back and gave up for now I trying to fit the downpipe inside the frame and just put on my external frame exhaust. I was really trying not to trim the frame at all but it has that bump out right where the downpipe fits.

The front drive shaft doesn’t hit the crossover when the passenger side flexes upwards? Mine is a modded flowmaster crossover and it’s much more tucked to the inspection cover.
 

2INSANE

Well-known member
722
819
93
Location
Belgrade, Montana
That’s a tight squeeze! I bought a diamond eye turbo back and gave up for now I trying to fit the downpipe inside the frame and just put on my external frame exhaust. I was really trying not to trim the frame at all but it has that bump out right where the downpipe fits.

The front drive shaft doesn’t hit the crossover when the passenger side flexes upwards? Mine is a modded flowmaster crossover and it’s much more tucked to the inspection cover.
Yes it is a tight squeeze but it fits well and no rubbing on anything.

Flex test shows no rubbing on the crossover.
 

Ilikemtb999

Active member
691
42
28
Location
Denver, CO
Well I guess I’ll have to shave the frame a touch and get that downpipe in there finally!

also interesting how you did the rear over the axle, I’ve got the same shock inboard setup going on and it looked like a tight squeeze. Ditching the bump stop brackets I guess fixes that space issue.
 

2INSANE

Well-known member
722
819
93
Location
Belgrade, Montana
Well I guess I’ll have to shave the frame a touch and get that downpipe in there finally!

also interesting how you did the rear over the axle, I’ve got the same shock inboard setup going on and it looked like a tight squeeze. Ditching the bump stop brackets I guess fixes that space issue.
I did the DIY4X spring plates in the rear. Also have 64” long rear leaf springs with the DIY4X 6” shackles and flip kit. I don’t have rear bump stops. The front has bump stops.

I was just thinking how close my new exhaust is to the tank. I’ll add some heat wrap and a stick on heat shield in that area.
 

2INSANE

Well-known member
722
819
93
Location
Belgrade, Montana
As promised, here are the rebuilt alternators I had O’RILEYs order from Wilson. These are the isolated ground alternators specifically for CUCVs.
 

Attachments

2INSANE

Well-known member
722
819
93
Location
Belgrade, Montana
I also installed a LMC truck battery tray on the passenger side. It bolted right up with no modifications or drilling.

The driver side LMC truck battery tray did have to be modified and holes drilled in the fender.

I also cleaned up the battery cables better and used insulated clamps on the radiator shroud.
 

Attachments

Last edited:

2INSANE

Well-known member
722
819
93
Location
Belgrade, Montana
Since I relocated the battery trays, the coolant reserve tank no longer fits on the driver side. To fix this problem, I ordered a 1988 Chevy Blazer coolant reserve from eBay for only $23 and mounted it to the passenger fender.

I intentionally mounted it not level so I could make room for the new enclosed air filter box on the way. I called Summit directly and we talked over 1 hour about the different styles and filters that they had. We came up with a couple of solutions. I ordered 2 models and will choose which one will work best. They should be here sometime next week. Stay tuned!
 

Attachments

Last edited:

2INSANE

Well-known member
722
819
93
Location
Belgrade, Montana
Pictures of the other model air filter box I ordered. I will return the one I will not use.

K&N has similar models but they are not rated for diesel and do not filter out particles as well since they are 4 layered filters and these Spector models are 7 layer filters.
 

Attachments

Sharecropper

Well-known member
Steel Soldiers Supporter
1,814
942
113
Location
Paris KY
Since I relocated the battery trays, the coolant reserve tank no longer fits on the driver side. To fix this problem, I ordered a 1988 Chevy Blazer coolant reserve from eBay for only $23 and mounted it to the passenger fender.

I intentionally mounted it not level so I could make room for the new enclosed air filter box on the way. I called Summit directly and we talked over 1 hour about the different styles and filters that they had. We came up with a couple of solutions. I ordered 2 models and will choose which one will work best. They should be here sometime next week. Stay tuned!

Thanks for your great detailed write-ups. Please let us know which in-line air filter you decide to use. I will soon have the same decision to make after I get my Bullet Supercharger installed. The supercharger blower intake comes out of the blower housing in the rear on the passenger side (see photo below), and then I will have to fabricate all piping and bracketry to install an inline filter and then route an intake pipe from the inline filter to the knock-out in the front grille. Again, great write-ups!

2-supercharger-6.5-chev-lr.jpg
 

2INSANE

Well-known member
722
819
93
Location
Belgrade, Montana
Thanks for your great detailed write-ups. Please let us know which in-line air filter you decide to use. I will soon have the same decision to make after I get my Bullet Supercharger installed. The supercharger blower intake comes out of the blower housing in the rear on the passenger side (see photo below), and then I will have to fabricate all piping and bracketry to install an inline filter and then route an intake pipe from the inline filter to the knock-out in the front grille. Again, great write-ups!

View attachment 839855
Your welcome!

Almost every 6.5 swap I have seen has minimal info with not a lot of pictures. Once the motor is in people tend to quit posting the other mods used to make it work.

For example, it’s best to install the rubber fuel inlet tube to the injection pump before you install the intake manifold because the 6.5 has no access areas like the 6.2 diesel does to tighten the hose clamp on the injection pump. I learned the hard way.

Also there are only a handful snorkel builds that has no good remedy to make the snorkel water tight. Most just use a flex pipe with the 6.2 housing which is not water tight. It is pointless to install a snorkel if it is not water tight. So the info I am providing in regards to the snorkel on the square body with a 6.5 will be a first and crucial info for others wanting to do this mod.
 

Sharecropper

Well-known member
Steel Soldiers Supporter
1,814
942
113
Location
Paris KY
Your welcome!

Almost every 6.5 swap I have seen has minimal info with not a lot of pictures. Once the motor is in people tend to quit posting the other mods used to make it work.

For example, it’s best to install the rubber fuel inlet tube to the injection pump before you install the intake manifold because the 6.5 has no access areas like the 6.2 diesel does to tighten the hose clamp on the injection pump. I learned the hard way.

Also there are only a handful snorkel builds that has no good remedy to make the snorkel water tight. Most just use a flex pipe with the 6.2 housing which is not water tight. It is pointless to install a snorkel if it is not water tight. So the info I am providing in regards to the snorkel on the square body with a 6.5 will be a first and crucial info for others wanting to do this mod.
Regarding that rubber fuel line under the intake, I changed mine to a new -06AN line. No more sucking air. See Post #294 in my rebuild thread -

 
Top
AdBlock Detected

We get it, advertisements are annoying!

Sure, ad-blocking software does a great job at blocking ads, but it also blocks useful features of our website like our supporting vendors. Their ads help keep Steel Soldiers going. Please consider disabling your ad blockers for the site. Thanks!

I've Disabled AdBlock
No Thanks