• Steel Soldiers now has a few new forums, read more about it at: New Munitions Forums!

  • Microsoft MSN, Live, Hotmail, Outlook email users may not be receiving emails. We are working to resolve this issue. Please add support@steelsoldiers.com to your trusted contacts.


'96 6.5t/4L80E

southdave

Active member
1,986
6
38
Location
ripley, oh/TDY Lordstown,Oh
I have used heads for 6.5 t and 6.2 .. figure out what you are going to do any way heads are easy to find.. just have to fine good one for your build..
here is what I heard over the years.. 6.2 pre cups will give better milage but more heat, valve are smaller which makes head stronger.. there is and issue valve seat mushrooming ect with earlier 6.2 and 6.5 causeing cracking.6.2 heads on 6.5 block pushes compression up .. it can be reduced by decking and combnation of head gaskets.. ect.. ect...
 

V8Astro

New member
118
1
0
Location
StL/MO
Pic update!

I got the 4L80E parts installed. Whoever rebuild the trans installed the center support snap rings in the wrong places. OOPS. I installed a Trans-Go correction kit as well.

A few friends came by on Friday night and helped me get the TH400 out as well as change the motor mounts. The drivers side was sitting on the frame. We got farther than I expected fueled by beer and pizza.

On Saturday I started the install for the Quick1 trans controller. I got the unit mounted and the harness half installed.
 

Attachments

richingalveston

Well-known member
1,715
120
63
Location
galveston/Texas
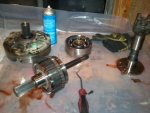
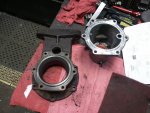
Addapter wont work without machining, you can use the 4l80e 4x4 spacer, it has the same bolt patern but the foot that mounts to the crossmember is 4.25 inches shorter than the th400 spacer. I built a bracket between trans and crossmember. I had a two wheel drive 4l80e that I converted to 4x4. you only need to change the output shaft and tail piece. Tail piece bolts on externally, outputshaft change requires rebuild. looks like you have already accomplished this. I bought my output shaft and rear tail piece from 'AOK used transmision parts in houston tx (old bammel rd) for $45 you can find them on the internet if you need the tail piece, it is probably cheaper than a machine shop.

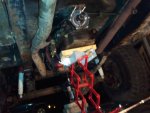
I installed my 4l80e without trans jack, IF you install it like the tm says, you dont have to worry about tearing up the seals in the torque converter. Put the torque converter on the trans, bolt the trans to the engine, bolt the torque converter to the flywheel. If you install the torque converter on the flywheel then you need a trans jack in order to line things up propperly an not tear things up. By doing it like the TM, you can muscle it into place, there are allignment pins on the engine. I used a 4 wheel dolly, wood blocks and two small jacks. I rolled the trans under the truck on the dolly, and with blocks and jacks slowly jacked and blocked it up the the hieght i needed then rolled it into possition, a little bit of muscle to get it alligned and ratchet with 4 extensions and a swivel head let me put the bolts in.

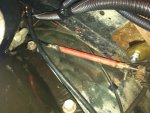
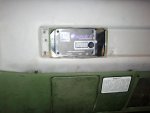
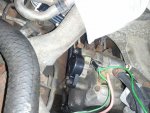
hardest part was actually stabbing the dipstick tube. the tube needs a little bit of custom bending and the anchor bracket for the tube will not reach the top bolt hole so it is loose at this time until i get the extension bracket built. It does not move very much at this time because there is no room for it to move but I worry that it may work its way up out of the hole it goes in. I am working on a post of my install. use the tube from your doner if you can.

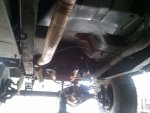
Other things you have to do: make extension bracket for shifter, extend shift rod, move crossmember back and get your back shaft shortened and your front shaft lengthened.

I installed my 4l80e last week and I am currently installing the Fast tci controller. I still have to get something for a tach signal and also figure out how the throtle position sensor and wiring will be accomplished. after installation, I found the 4l80e to be about 1.5 inches longer than the th400. My driveshafts are supposed to be finished tomorrow.
I will post my entire build with pics as soon as it is finished.
Rich
 

V8Astro

New member
118
1
0
Location
StL/MO
Thanks for the comments.

I always install the converter in the trans first. Like you said, if you don't you risk tearing the seal or worse damaging the pump. Much easier to get the converter in the trans first then set it against the engine.

While installing the TC bolts I noticed the flexplate...uh...flexing rearward more than normal. I don't think the converter hub set into the crankshaft pocket all the way and the result was the flexplate twisting back. Instead of taking the trans out and fussing I'm going to use some 1/16" converter shims. I had to use them on my Impala project to get the correct converter to pump engagement.

I'm using the original tcase adapter and having my machinist friend mill down the centering ring. I'll owe him some help on his all-electric Toyota MR2 but that's what friends do.

Lokar makes an adjustable shifter rod for column-shift GM's. I've had my fill of making every little bracket and doohickey I think this time I'll be lazy and buy the kit for $50.
 

soule64

New member
66
0
0
Location
Huntsville, AL
Here is a pic of my 4L80E installed. I never did a write up, but it installed fairly easy. x2 on the dipstick tube - it was a son of a gun to get it to fit. I used the OptiShift controller with their stock diesel tune. I mounted the TPS on a bracket on the throttle body, opposite side of the linkage. had to remove the old TH400 shift control (don't need it anymore) and fab up an arm in it's place to move the TPS lever. I found an adapter on ebay that mounted the 4L80 and NP208 without any cutting or grinding. It was much shorter than the original adapter, so I had to weld up a mount to fit it to the crossmember. I have over 1k miles on it and it runs fantastic! I lucked out on the 4L80 - its a HMMWV version, fresh rebuild but never installed, turned in to DRMO because dataplate was missing. Got it from GL a little over $200....UH60 TRB Pitch Horn 016.jpg
 

NDT

Well-known member
Steel Soldiers Supporter
10,174
5,883
113
Location
Camp Wood/LC, TX
I dunno...the TPS looks out of place on this pump ;)

The trans harness is complete. Now I need a trans jack that will extend 30"
What is the part number of the TPS? Where do you get it? The Optishift looks like the way to go for sure!
 

V8Astro

New member
118
1
0
Location
StL/MO
My helpful friend got the machining done on the tcase adapter yesterday. We took .050" off the diameter of the centering ring. When I got home it fit perfectly but the ring was too tall and bottomed out in the trans. Thus not allowing the flange to sit flush. At 8:30 pm I decided to "file to fit" with a flat file and all is good to go.

I had a full blown "D'OH!" moment. I had an organizer tray of all the bolts for the trans under the truck. Went to tighten down the adapter to the trans. One of the bolts went POP! and kept spinning. ??? The TH400 has 3/8-16 bolts and the 4L80 are M10x1.5. The standard bolts will thread in but the engagement is slight. It pulled the threads right out of the trans case. FFFFFUUUUUUUUUU!!!! aua

Cost another $40 for a helicoil kit but I got it fixed up....
 

Attachments

FMJ

In Memorial
In Memorial
4,210
37
0
Location
Las Cruces, NM
My helpful friend got the machining done on the tcase adapter yesterday. We took .050" off the diameter of the centering ring. When I got home it fit perfectly but the ring was too tall and bottomed out in the trans. Thus not allowing the flange to sit flush. At 8:30 pm I decided to "file to fit" with a flat file and all is good to go.

I had a full blown "D'OH!" moment. I had an organizer tray of all the bolts for the trans under the truck. Went to tighten down the adapter to the trans. One of the bolts went POP! and kept spinning. ??? The TH400 has 3/8-16 bolts and the 4L80 are M10x1.5. The standard bolts will thread in but the engagement is slight. It pulled the threads right out of the trans case. FFFFFUUUUUUUUUU!!!! aua

Cost another $40 for a helicoil kit but I got it fixed up....
Been there, done that, got the helicoil, a few more than you though. . . . "huh, wonder why these aren't getting tight.... :doh:"
 
Last edited:

V8Astro

New member
118
1
0
Location
StL/MO
Almost done! I'm just waiting on the driveshaft shop to call...

Got the shifter linkage modified for the trans and xfer case. I noticed the column shifter mechanism doesn't have enough travel to engage all the gears on the trans. If I adjust the linkage in Park then the shifter runs out of travel and stops in "2". If I adjust the shifter in "1" then it won't get to Park.

I'm probably not the only one to experience this. Is shortening the "lever" on the trans-side the only way to fix this? Or is there a "gate" in the column somewhere I can put another notch in?
 

richingalveston

Well-known member
1,715
120
63
Location
galveston/Texas
I did not have a problem with mine, I had to extend the shift rod and make a new bracket to move the bottom linkage, the part that has all the bends that actually goes into the trans forks. The detents (bumps in the linkage) are not in the column, they are actually in the trans. when the linkage is disconnected, the gear lever will fall all the way to the bottom once taken out of park. Check to make sure your bottom linkage, the bent up one is not binding, making you think there is not enough room. that was my problem, I was in the same position as you before I figured this out. You have to move the end that goes through the hole on bracket which is attached to the frame. This will keep the linkage from binding and not allowing the travel you need. The attached picture shows the add on bracket I made, it actuall bolts through the hole that the rod used to go through and there is a new hole in the bracket. I actually did not get the hole in the right spot the first time and had to make another in the bracket, that is why you see two holes in the picture.
After making the new bracket and getting the shift linkage to work at the bottom, I had to extend the rod to make it reach.
 

Attachments

kassim503

New member
383
3
0
Location
Stony Brook, NY
I noticed your compressor in the pic a few pages back is missing the shroud- craftsman recalled the shrouds on that series air compressor for overheating, try giving them a call they will ground ship you a new one free of charge!
 

V8Astro

New member
118
1
0
Location
StL/MO
I noticed your compressor in the pic a few pages back is missing the shroud- craftsman recalled the shrouds on that series air compressor for overheating, try giving them a call they will ground ship you a new one free of charge!
Wow. I had no idea. It actually caught on fire 2 years ago. The switch melted and the plastic housing burnt up. It had been continuously running for an hour. I just replaced the switch and unloader when I moved to this house. At the time of the failure the compressor was in my basement. THAT was exciting
 
Last edited:

V8Astro

New member
118
1
0
Location
StL/MO
I got my driveshafts back from the shop. I had the rear shaft shortened 2" and the front extended 2".

The rear is perfect. I marked the slip yoke and after the mod I installed the shaft and it's about 1/8" off from where it was. The front shaft *looks* a bit too long. After I installed it I measured again and it's 1/4" off the original measurement. That's close enough.


Unfortunatly I won't be able to work on it again until Saturday afternoon. I got the "just about to hit the key the first time after a big project" jitters....
 
Top
AdBlock Detected

We get it, advertisements are annoying!

Sure, ad-blocking software does a great job at blocking ads, but it also blocks useful features of our website like our supporting vendors. Their ads help keep Steel Soldiers going. Please consider disabling your ad blockers for the site. Thanks!

I've Disabled AdBlock
No Thanks