• Steel Soldiers now has a few new forums, read more about it at: New Munitions Forums!

  • Microsoft MSN, Live, Hotmail, Outlook email users may not be receiving emails. We are working to resolve this issue. Please add support@steelsoldiers.com to your trusted contacts.


A1 Cab -> A0 Chassis Swap

yertnamreg

Member
92
21
8
Location
Houston TX
Still working on getting the brakes fixed. I have to be able to drive the truck over to another shop with a crane before I can really make any progress on the cab.

If you saw the auction pics, you may have noticed the rear relay valve was completely disconnected. I took it and the anti-compounding valve off last week and ordered rebuild kits for them. Got the rebuild kits today ad well as the unloader kit I had ordered. Was able to get the new unloader pistons installed and both valves rebuilt today.

The truck is also missing two airlines that connect to the drivers side middle tire. I believe these are supply lines for the service brakes, but I'm not entirely sure. I had been having a **** of a time finding the air system schematic since its not searchable in the PDFs I have. Finally found it late today :)

My plan tomorrow is to get some lines made. Hook everything back to stock specs and then see if there are still any leaks. Am I correct in thinking I could use an external air compressor fed through the front emergency glad hand to pressurize the system sans engine? I feel like it will be way easier to hear any leaks this way.
 

NDT

Well-known member
Steel Soldiers Supporter
10,169
5,860
113
Location
Camp Wood/LC, TX
Still working on getting the brakes fixed. I have to be able to drive the truck over to another shop with a crane before I can really make any progress on the cab.

If you saw the auction pics, you may have noticed the rear relay valve was completely disconnected. I took it and the anti-compounding valve off last week and ordered rebuild kits for them. Got the rebuild kits today ad well as the unloader kit I had ordered. Was able to get the new unloader pistons installed and both valves rebuilt today.

The truck is also missing two airlines that connect to the drivers side middle tire. I believe these are supply lines for the service brakes, but I'm not entirely sure. I had been having a **** of a time finding the air system schematic since its not searchable in the PDFs I have. Finally found it late today :)

My plan tomorrow is to get some lines made. Hook everything back to stock specs and then see if there are still any leaks. Am I correct in thinking I could use an external air compressor fed through the front emergency glad hand to pressurize the system sans engine? I feel like it will be way easier to hear any leaks this way.

Yes, charge shop air through front emergency gladhand. Chock the wheels. If the truck won't take air that way, the check valve behind the front bumper is stuck.
 

yertnamreg

Member
92
21
8
Location
Houston TX
I'm still trying to figure out which line is which. The schematic diagram only shows two connections to each rear brake chamber, but there are 3 in real life. Can someone shed some light?
 

yertnamreg

Member
92
21
8
Location
Houston TX
It's right next to mine haha. Looks like its just a vent for the front of the service brake chamber. Shame on the engineer that drew up that schematic for not including it.

For anyone wondering, theres a line on each side that goes between the two axles brakes vent ports. This line has a bleeder valve in the middle but is otherwise not connected to the air system.

Edit:
Was able to figure out the lines I need. Houston folks, any recommendations on a hose place that would be open tomorrow? The holidays are making it difficult to find anywhere to make my hoses. All I want for Xmas is some air hose haha
 
Last edited:

yertnamreg

Member
92
21
8
Location
Houston TX
Wooo! Today was a very productive day. Now that businesses are open, I was able to get some new air lines made this morning. Threw them on the truck, connected up the rebuilt relay valve and pressurized the system using a glad hand adapter I made. The system held pressure up to about 30psi, but there was still some hissing. I did a walk around and tightened anything I could hear before I pulled the gladhand and tried for real with the trucks compressor.

I kicked over the engine and the system built up just like it was designed too. With the wheels chocked I released the parking brake and was able to easily remove all the caging bolts (YAYYYYY!!!!!).
IMG_20171226_183135.jpg

Did some basic checks applying the service and parking brakes to make sure the system was functioning nominally and everything seemed ok. Ended up taking it out for a drive around the shop complex and terrorizing the neighbors. It was a blast and I'm glad to have the truck functioning as designed. Now I can get on to what this thread is supposed to be about...the cab swap!

I got some requests for more pics of the cab so others can make an informed decision about buying one... Here they are! Let me know if you're curious about anything.
IMG_20171226_182759.jpgIMG_20171226_183105.jpgIMG_20171226_183044.jpgIMG_20171226_183024.jpgIMG_20171226_183005.jpgIMG_20171226_182945.jpgIMG_20171226_182935.jpgIMG_20171226_182909.jpgIMG_20171226_182851.jpgIMG_20171226_182829.jpgIMG_20171226_182810.jpg

To the service man or woman who put the dash bolts on the ledge like that, I thank you!
 

sargentwolf

Member
195
1
18
Location
st louis/mo
Looks great, I started bidding on a cab as well. Heres hoping mine is a good as yours!

Congrats on the first "annoy and scare the neighbors" drive! Mine is stored at one of my warehouses and STILL freaks out everyone in the office complex. Helps theres a rock climbing gym across the parking lot...muwhahaha
 
Last edited:

yertnamreg

Member
92
21
8
Location
Houston TX
Life has been crazy lately, but I finally got some time to post an update on the cab swap.

Two weeks ago, I was working on prepping the new cab for the swap when the landlord for the shop I'm working at showed up to change the locks. With some careful negotiation I was able to get some time to get all my stuff out of the shop. In one evening me and a friend ended up loading the cab, 6 new tires from simp5782 (Thanks!!), and a whole mess of tools and other parts. We didn't have a fork lift and the dock at the shop didn't quite line up with the bed of the 1085. We ended up pulling the sled the cab was on up onto the truck using some piping to make a ramp and 4wd SUVs to pull it onto the bed. It was super sketchy haha

IMG_20180110_002917.jpgIMG_20180110_005129.jpgIMG_20180109_234740.jpg

After we got everything loaded, we took the trucks over to another local business' yard temporarily. This was my first time really driving the truck on real roads with a load and it drove like a champ!
IMG_20180110_130327.jpg

I'm now working on the actual cab swap and I'm doing it in the yard where it's currently sitting. As FMTV Truck sales mentioned, the first step is taking all the electrical out. This is no small task. I'm not planning to give a step by step here, but I started by tagging all the wires in the dash, pulling the heater units out, and then carefully yanking on the harness. I've been able to get the driver side harness out of the dash and into the heater area on both the old and new cabs, but I haven't figured out how to get it through the passenger side behind the wiper motor. I'm thinking I may have to drill out some of the spot welds and fully remove the wiper motor mounting plate to remove the harnesses without damaging them. Any advice or recommendations?

IMG_20180123_161837.jpgIMG_20180122_151932.jpgIMG_20180109_150235.jpg

I'm also curious if anyone has any insight on getting the power harness on the old cab out? Seems like I'll need to disconnect it somewhere outside of the cab and feed the line up through the cab so I don't have to disconnect every wire on the panel.

On the mechanical side of things, I've gotten all the air lines labels and disconnected. I tried getting the steering shaft off the power steering box, but its on there pretty good. I took the bolt out and hammered at the slot with a screw driver to loosed it, but I think I'm going to need a real chisel. Went ahead and soaked it with some PB Blaster to hopefully make the job easier.

EDIT:
I know some of y'all didn't get quite so lucky with the cab gamble. What they're doing is deplorable and no way to run a business. Hope everyone gets their cab situations resolved. Not trying to rub salt in any wounds :)
 

Attachments

Last edited:

yertnamreg

Member
92
21
8
Location
Houston TX
Well its been a busy week and a half, but I have the cab swapped!

Picking up where I left off, I had to finish removing the harnesses and swapping them between the cabs. This is probably the most difficult part of the project. Getting the main dash harness behind the wiper motor is the most difficult part, but it can be done without any cutting or drilling of spot welds. Just take your time and move the harness through connector by connector. I used some dish soap to help lubricate the harness and a friend to push the connectors through as I was pulling on the other side. Be careful with these older harnesses, I ended up chaffing off some of the insulation as I was pulling it through.

Once the cab is empty you can start the fun of pulling the old cab off. Make sure the air lines are removed, electrical harnesses are dangling off the hinge, and the steering column is disconnected. The steering column was a little tricky but a couple smacks with a chisel will separate the clevis enough to slide it off.

We ended up removing the cab using a telehandler and a lifting strap through the windows. We did not use a spreader bar as specified in the TMs but didn't have any issues.
IMG_20180129_140632.jpgIMG_20180129_140622.jpgIMG_20180129_141542.jpg

We used a the same technique to lift the new cab on. It took a little persuasion to get the cab on, but eventually we got it lined up enough to get a few bolts in the front hinge and the lift cylinder.
27331838_866217401513_8829733020798740159_n.jpg27331781_866217421473_4045096597033352829_n.jpg27067294_866217371573_8853937139547798721_n.jpg

I got most of the electrical hooked back up enough to try to start the truck yesterday, but I couldn't get it to try to crank. Relays click and lights come on, but the starter doesn't even try. I don't have all the electrical hooked up, so I'm going to spend some more time on it before I start crying for help.

Quick question: On the A0s, are the two air sending units on the left underside of the drivers dash for the air gauges? The A1 cab has a medalion box with air lines going to it in a similar location which makes me think I need to move these senders over to the new cab.
 

Attachments

Hermannator

New member
67
3
0
Location
San Antonio, TX
After reading Scott's 50% nightmare, I filed a claim & tried to stop the purchase. Aaron assured me ( IN WRITING) that the two cabs I bought were M1157 as shown in the pictures. HMMMM??? It could be Pandora's "Crates" when the two cabs arrive and I will post the results. I'm not sure if it is GL desperate attempt to get rid of these items or I lucked out. Time will tell.
 
Last edited:

Hermannator

New member
67
3
0
Location
San Antonio, TX
Impressive work. Thanks for working out the kinks before I do the same thing! [thumbzup]

The number of LMTV owners in Texas seems to be growing. A friend & I are currently doing S280 build-outs at my shop in Jourdanton, TX. I think collectively we have five different S280 variant boxes that we are building into campers, as well as a mobile medical clinic complete with operating room lights and bed, and mobile command center for humanitarian relief activities.... Field surgery ANYONE?
 

NDT

Well-known member
Steel Soldiers Supporter
10,169
5,860
113
Location
Camp Wood/LC, TX
Yert,
after all your experiences with this, is a cab swap worth the trouble? My cab is decent, no rust or dents. Other than the "new car smell", what are the advantages? I suppose the better door latches?
 

Hermannator

New member
67
3
0
Location
San Antonio, TX
How about swapping a CAT C7 ACERT engine with the cab? (ANYONE,ANYONE?)

Maybe the money spent on an electrically controlled engine would save pulling wires?

Sounds interesting but I have no clue if that would work or be even more complicated...

i will ill go with my standard answer when I make something in THE BEAST inoperative or change the configuration to suit my inability to get parts for a particular system.

**** It Jim, I am a DOCTOR not a mechanic!!!
 

yertnamreg

Member
92
21
8
Location
Houston TX
NDT,
It depends on how good your current cab is. Mine had a fair amount of rust and didn't have a turret cover. I figured for the money I would spend on a turrent cover and cutting out/replacing metal, I could have a brand new cab. For me this worked out to be true. If you have access to the lifting equipment needed to do the swap I say go for it. It's honestly not as bad as you'd think.

Hermannator,
Thats not a bad plan. There sure does seem to be quite a few C7s coming up. I think the issue you'll run into though is needing to change out some of the wiring harness on the chassis too. I'm not sure where you would source that. With the following the 6BT has and its mechanical nature, I'd be curious to see one of them swapped into a FMTV. You can get them with air compressors and it looks like SAE No. 2 bell-housings are available. With a little tuning it would be easy to match the power numbers from a 3116.
 

yertnamreg

Member
92
21
8
Location
Houston TX
Yesterday I got the truck to move again under it own power with the new cab!! The no start issue appears to be caused by a bad wire in the harness that goes between the cab and the chassis. I think I may have accidentally pinched the bundle during some of the heavy lifting. No worries though, because security is much improved. Only those that know where to touch the magic screwdriver can start the truck hahaha.

Air senders:

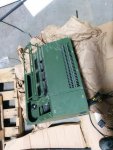
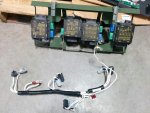
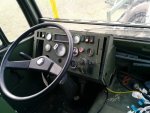
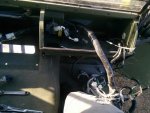
The A1 cabs have a medallion instruments box under the driver side dash that drive the A1 dash instruments. This box has two air lines going to it which are used to read the pressure in each system and report it to the user with the gauges. This box can be removed, but you'll need to find a way to hook up the air senders from your old cab. In the A0 cab, the air senders are in a similar location under the left drivers side dash. The two senders are connected to a valve which is suspended from the dash. I just cut all those air lines and unbolted the valve and sender assembly as a unit.

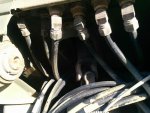
Once the senders are out, you'll need a way to connect them to the 1/4" air lines that were going to the medallion box. I picked up a couple DOT push connect fittings and adapters. Grainger or Fastenal are good sources for these. The senders have are a metric thread, but already have an adapter on them that is 3/8" pipe thread. I ended up with a 3/8 coupler, bushing down to 1/4, and then the 1/4 air fitting. Air fittings with 3/8" thread and 1/4" tube connection are readily available, but my local store was out so I have more adapters than I really need.

IMG_20180220_105158_01.jpg

There are two primary connections on these senders: gauge and warning. These are marked on top of the sender with "G" and "WK" respectively. I don't think anything will blow up if you get these backwards, but your air gauges definitely won't work. The senders have a third secret connect...ground. In the A0 cab the senders are grounded through the valve suspended from the dash. We no longer have that valve so we need to find a way to ground these. I improvised a solution with some zip ties and wire for testing purposes, but I plan to make a more permanent solution using some hose clamps.

Brakes:

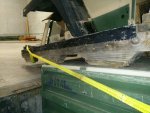
Brakes were surprisingly straight forward. I cut the ferrules off the old air lines and simply shoved them in the QC fittings on the front of the cab in the same order/orientation as they were on the A0. This was probably the easiest part of the swap.

Throttle:

I ended up moving the throttle from the A0 cab into the A1. Despite the A1 having an electronic throttle, the cab still has the original port for the throttle cable. The dash also has holes for mounting of the cable and to allow the pedal rod to pass through. I picked up some #14x3/4" self tappers and screwed the original pedal to the mounting plate for the A1 pedal. I measured the position of the pedal in the A0 cab so I could transfer it to the A1. Its important you don't screw this up so the rod can travel freely.

You'll also need to transfer over the in dash components of the throttle. The hand throttle is connected to a bracket and lever arm which is what actually actuates the throttle. This assembly is what you're after. There are 8 spot welds that should be easily visible with the heater box removed. Go ahead and drill these out. There are also 3 spot welds to the bottom of the dash. These were a pain for me to remove as they were nearly invisible. Hopefully the are easier to see on your cab. Once all the welds are drilled, get in there with a chisel and hammer away until it pops off.

Go ahead and measure the position of the bracket in the old cab, so you can locate it in the same relative position when you spot weld it in the new cab.

IMG_20180219_165653.jpgIMG_20180219_173023.jpg

Still working on a few more little things, but with any luck I'll be able to get it registered soon!
 
Top
AdBlock Detected

We get it, advertisements are annoying!

Sure, ad-blocking software does a great job at blocking ads, but it also blocks useful features of our website like our supporting vendors. Their ads help keep Steel Soldiers going. Please consider disabling your ad blockers for the site. Thanks!

I've Disabled AdBlock
No Thanks