• Steel Soldiers now has a few new forums, read more about it at: New Munitions Forums!

  • Microsoft MSN, Live, Hotmail, Outlook email users may not be receiving emails. We are working to resolve this issue. Please add support@steelsoldiers.com to your trusted contacts.

Airbornebandsman's M109 Conversion

silverstate55

Unemployable
Steel Soldiers Supporter
2,070
868
113
Location
UT
Why not sandblast?
Mainly because of the cost of the blasting media, and because I'd have to use a pressure washer attachment with it to minimize/eliminate dust since I'm in a residential area.

I've thought about it on the front at least; I have about 25-pounds of coarse media left over I could try on an area, and I don't think that the flash rust would be too bad as it's really warm & dry here...water evaporates pretty quickly. And what flash rust is present can be quickly removed with a wire cup wheel on a grinder.
 

silverstate55

Unemployable
Steel Soldiers Supporter
2,070
868
113
Location
UT
It's just a matter of finances; Mik is strapped in trying to get ready for his pending move, and he's had to buy a LOT of extra parts for his M109 box, in order to complete it. It's a nickel-and-dime thing, it's cheaper for both of us to do it this way. I'm in the middle of a repair job for my Deuce, and it's nickel-and-diming me to death lately....

I appreciate the tips & suggestions though, thanks!! Hope your M109 blast & paint comes out how you hoped for it!
 

silverstate55

Unemployable
Steel Soldiers Supporter
2,070
868
113
Location
UT
Slowly but surely; made more progress today. Some areas (mainly the large, flat expanses) seem like the paint is baked on, it's tough as nails! But in other areas, the paint just flakes right off. So I think for now I'll follow the easy route & get as much of the easy spots chipped off first, then maybe rethink the need for media blasting (with a pressure washer) on the tough spots left over.

I also took the time to fabricate some locking spring clips made out of coat hangers...they'll work until Mik can save up to buy some "real" ones! :mrgreen: But they do work...

ETA: Just added photos of one of the lifting shackle pins removed, with the broken spring clip...I cleaned it up and repainted it, added one of my homemade spring clips, and also cleaned up & painted the lifitng shackle. Not a bad-looking combo now! The spring clip is a little long, but I figured better to have it too long than too short.
 

Attachments

Last edited:

silverstate55

Unemployable
Steel Soldiers Supporter
2,070
868
113
Location
UT
As it turns out, Airbornebandsman has a pressure washer that I believe will work just fine with my sandblasting attachment...I think I have about 30-35 pounds of sand media left, hopefully that will get the front done & part of the sides. Especially if I use my needle scaler around edges & on compound surfaces, and keep the wetblasting to the large flat areas.

I shall keep this updated; tomorrow I'll make a lot of progress as I have the whole day to myself!
 
Last edited:

silverstate55

Unemployable
Steel Soldiers Supporter
2,070
868
113
Location
UT
Well, DANGIT. I hooked up my sandblasting attachment to Airbornebandsman's pressure washer (rated at 2550psi), and it didn't work so well. I think I went through about 5 pounds of abrasive material, and it didn't even scratch the CARC paint. Plenty of sand everywhere else though, but no abrasive power on this paint job. CRAP!! I was able to remove the tan paint from the frame rails & undercarriage with just the pressure washer, so at least that went quick.

I then broke out my regular sandblaster and after about 20 pounds of blasting media (extra coarse sand), I managed to send a huge dust cloud down the street and clear a 4-square-inch area just below the front right reflector in the photo. WTH, over?!?

So, I guess it's back to the needle scaler....I found that if I hold it farther away from the work area, the hammering action of the needles work better at loosening paint. Also, when I hold it at around a 20-degree angle, it chips away the paint much faster. So it might take a little longer, but if I keep at it over the next few days I should at least have the entire front done & ready for primer/paint. The sides & rear were much much easier to remove paint from, somehow the front is just a PITA. Some areas chip right off, other areas the paint is tough as woodpecker lips. I'll just have to stay after it until it's done.

With all the racket the needle scaler generates, it looks like I'll owe several of my neighbors a good BBQ party soon.
 

Attachments

Last edited:

resqur

New member
104
1
0
Location
Las Vegas, NV
SS55,
I have been using the braided cup wheels from HF and / or the metal abrasive disks on a 4 inch sander to knock the paint off of my truck. These might be an option.
 

silverstate55

Unemployable
Steel Soldiers Supporter
2,070
868
113
Location
UT
SS55,
I have been using the braided cup wheels from HF and / or the metal abrasive disks on a 4 inch sander to knock the paint off of my truck. These might be an option.
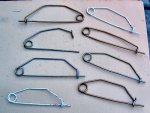
Thanks for the suggestion! We've been using these same items; the areas that were brought down to bare metal in the pics were done with those same wire cup wheels...right now the average time to remove paint is about the same between those and the needle scaler. I've found that I prefer to use the needle scaler to remove the heavy stuff, then follow up with the wire cup wheels to really smooth things out.

One side effect of the wire cup wheels is that when I hit a tough area, and the going is slow with the wheels, heat buildup really starts to affect the thin sheetmetal and it starts to warp. I tried using my heat gun in a small area to see if it would melt the paint or at least allow it to be scraped off...it did, but the amount of heat required caused that area of sheet metal to warp.

But thanks for the suggestions, I do appreciate them! If you ever want to come get a first-hand look at it, just PM me. Thank you!
 

resqur

New member
104
1
0
Location
Las Vegas, NV
SS55,
I will be moving all this week but will have a few hours of down time. Let me know when you plan on working on it next, I would like to come see what you are doing.
 

Katahdin

Active member
1,303
24
38
Location
Scarborough, ME
3M Paint Stripping wheels are the best non-sand blasting tool I've tried, but would be expensive the entire box. You'll want something fast to spin it, a typical drill is too slow. I use a pneumatic angle grinder.

Another way that might work better than the needle scaler is 40 grit sanding disks on a DA or orbital sander. I've bought mine at the local NAPA.

If the Carc is sticking well, you might want to consider just leaving it be. You can build up or transition the bare metal areas to the same thickness as the carc with bondo or some other body filler.
 

silverstate55

Unemployable
Steel Soldiers Supporter
2,070
868
113
Location
UT
3M Paint Stripping wheels are the best non-sand blasting tool I've tried, but would be expensive the entire box. You'll want something fast to spin it, a typical drill is too slow. I use a pneumatic angle grinder.

Another way that might work better than the needle scaler is 40 grit sanding disks on a DA or orbital sander. I've bought mine at the local NAPA.

If the Carc is sticking well, you might want to consider just leaving it be. You can build up or transition the bare metal areas to the same thickness as the carc with bondo or some other body filler.
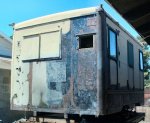
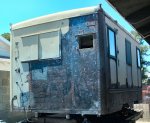
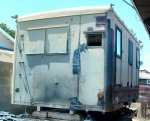
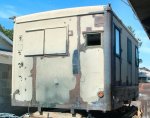
About half of the CARC is flaking off; I figured it would be easier to just remove as much as we could in order to start over with properly-applied coats of primer & paint. Not to mention the rust in a few places.

Thanks for the advice & the tips on the NAPA abrasives!!
 

silverstate55

Unemployable
Steel Soldiers Supporter
2,070
868
113
Location
UT
A-HA! Found a good method today: used my angle grinder & 4-inch braided wire cup to remove the tan paint; this left a primer coat on top of the original CARC 383 green & red oxide primer. Then, I switched to a flat 4-inch braided wire wheel on the angle grinder, which did a fine job of removing the remaining primer & green paint, down to the red oxide primer. So even though I only had about 2 hours this morning to work on it, I made some really good progress. Tomorrow should see a lot more, and I should be able to start priming the front by this weekend, if everything continues like it did today. :mrgreen:
 

Attachments

Top
AdBlock Detected

We get it, advertisements are annoying!

Sure, ad-blocking software does a great job at blocking ads, but it also blocks useful features of our website like our supporting vendors. Their ads help keep Steel Soldiers going. Please consider disabling your ad blockers for the site. Thanks!

I've Disabled AdBlock
No Thanks