• Steel Soldiers now has a few new forums, read more about it at: New Munitions Forums!

  • Microsoft MSN, Live, Hotmail, Outlook email users may not be receiving emails. We are working to resolve this issue. Please add support@steelsoldiers.com to your trusted contacts.


Another New (old) M1009 Driver

Mainsail

Well-known member
Steel Soldiers Supporter
1,424
1,437
113
Location
Puget Sound, WA
GP?

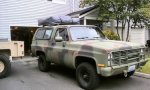
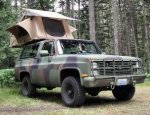
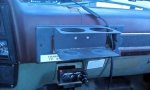
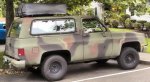
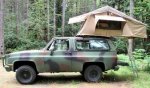
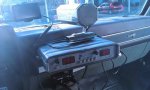
I'm building the 1009 to serve as a hiking and backpacking vehicle. I have a beautiful 2005 Jeep Grand Cherokee that I'm nervous to leave at the trailhead for several days. It's great for day-hikes though. Incidents are rare, but it could be life threatening to be out somewhere without a drivable vehicle after several days in the woods. The solargizer is my attempt to keep the batteries topped up and in good shape internally to make sure the thing starts after sitting for several days.

The next project will be the fuel filter. Parking nose up causes it to start, stall, then start with great difficulty. Everything I've read here, and some noodling about it, says there's air leaking into the filter. The next small project is to mount a chain so the hood cannot be opened without the padlock key (I got a set of four keyed-alike padlocks, one is for the steering wheel chain, another will be the hood.) I also need a locking gas cap.

http://www.topohiker.com/news/newspics/Rock5.png
 

Attachments

Last edited:

Mainsail

Well-known member
Steel Soldiers Supporter
1,424
1,437
113
Location
Puget Sound, WA

Attachments

Last edited:

Mainsail

Well-known member
Steel Soldiers Supporter
1,424
1,437
113
Location
Puget Sound, WA
I got the box with the door seals and new fuel gauge after work today. Before I could get to either of those I wanted to run by the self-serve car wash and check the body seals and window seals now that the roof is back on. Those all checked out good, the sliding windows will leak under a direct spray though. Back at home I got to work pulling the dash panel off to get to the fuel gauge. With the new gauge installed I turned the key and the needle settled where it should given how much fuel I think is in the tank. An operable fuel gauge is a great thing to have.

After that I pulled the torn and rotten outer door window seals and put in the new ones.
http://www.topohiker.com/news/newspics/CUCV/Fuel1.png
http://www.topohiker.com/news/newspics/CUCV/Fuel2.png
 

Attachments

Mainsail

Well-known member
Steel Soldiers Supporter
1,424
1,437
113
Location
Puget Sound, WA

Attachments

Mainsail

Well-known member
Steel Soldiers Supporter
1,424
1,437
113
Location
Puget Sound, WA
I converted a Whelen Edge police lightbar to an offroad light. I removed the strobes and flashers, modified the reflector cups, and installed HIDs. So now it has SIX 35 watt HID bulbs in the reflector cups, TWO 55 watt halogen bulbs in the corners, and I left the stock bulbs in the alley lights. I had a NOS Federal Signal switchbox that I got for free, so that is what I'm using to operate it.

With just the HIDs the lights are brighter than and out shine the headlights, even on highbeam. The light is also a brilliant white (vs the headlight's yellow) and it lights up the entire area around the front of the truck.

if it's going to be the brightest thing on the road, it may as well be the loudest too, so I have a Whelen siren/PA connected to the speaker that sits on top of the bar. I have a second speaker for the brush guard to install, for the second 100 watt output. I've only fired the top speaker and it's end-of-the-world LOUD.

I'll post up more details as I find the time, but for now just a few pictures:

This is what I bought; the picture is from the ad on craigslist. I forgot to take a picture before I started the work.


Here it is gutted and cleaned. I painted the top OD green.


Here it is on top.


All lit up. It's hard to see but notice how the center of the bar is whiter than the outer edge- this is because the halogens are in the corners and alleys.


I still have to loom up some of the wiring, and finish connecting the siren/PA (I only slaved it up to test it) but it works like gangbusters and the roof holes don't leak.

OnTop1.jpg
 

Attachments

Last edited:

Mainsail

Well-known member
Steel Soldiers Supporter
1,424
1,437
113
Location
Puget Sound, WA
Wow! Nice work. Did you go through Whelen to order clear lenses?
I found the clear lenses on ebay, in fact most of the parts that I didn't already have came from ebay.

On the back I was going to go with just black lenses and no lights. I didn't like the way it was looking so I cleaned up two of the amber lenses and was going to just use them without anything behind, to break up the monotone a little. Then I decided to find some lights and use a standard flasher for warning to the rear if I break down, noodled it a bit, and decided to go with LEDs so I could run them a long time without draining the battery. I found some rectangular gang LED panels on ebay and mounted them behind the amber lenses- but they don't draw enough current to flash with a standard flasher, so back to ebay for a wig-wag controller. Now the rear ambers flash in any of a dozen or so patterns- wig-wag, flash, strobe, and several combinations.

The roof rack came from http://www.prolineracks.com/.

OnTop2a.jpg OnTop2b.jpg
 
Last edited:

martindc1

New member
22
0
0
Location
La Crosse, WI
Nice build, when I get my CUCV someday I am going to use it for the same purposes as yours. Did you ever have the starting trouble after you replaced the starter relay? One time I was putting gas in my old 67 K20 and went to start it when done and nothing happened. It had a 250 straight 6 in it, which has easy access to the starter from the top, so I stuck my long screwdriver down and bridged the terminals on the starter solenoid and it started right up. Turned out to be a bad connection in the terminal connector going to the solenoid.
 

Mainsail

Well-known member
Steel Soldiers Supporter
1,424
1,437
113
Location
Puget Sound, WA
Did you ever have the starting trouble after you replaced the starter relay?
No, no problems at all. I've been driving it almost every day since I got it and it's been 100% even when it's cold here. The only negative right now is that I have to park it level or nose down if I'm not going to drive it for a day. I think the fuel filter has a very slight seep and nose- up lets air into the system.

The siren is all hooked up now and I have one more wire to run before I can loom them all up. There's a feed that needs to go out to the horn that will allow the air horn to blow when I press the horn button on the steering wheel. I can't see how to get to the horn without pulling the radiator. With the second 100watt speaker in the grill, it's some kind of LOUD.
 

Mainsail

Well-known member
Steel Soldiers Supporter
1,424
1,437
113
Location
Puget Sound, WA
Funny, my horn is mounted on the driver side fender well inside and can be accessed easily.
I wish mine was there. It's behind the grill just inboard of the headlight. Does the grill itself come off? I really haven't looked too hard. I tried pulling the radiator overflow bottle but that doesn't get me there.

By the way, does anyone know if the overflow bottle is unique to the diesels? Mine leaks out the bottom but I don't see a diesel on LMC.
 

richingalveston

Well-known member
1,715
120
63
Location
galveston/Texas
the bottle is a little unique, they switched to a square bottle that sits on top of the fender i beleive this was done around 84 or 85 for the civy models. The CUCV's were all 83 model parts so they kept the funny shaped bottle next to the radiator for all cucvs I had this problem with mine, the plastic weld where the two halfs of the bottle were put togather started to leak so I poured a small amount of model glue in it, just enough to cover the bottom of the bottle and it stopped the leak. plug up the output holes with it full of water and you should be able to find the leak. It is plastic which can be glued once you find the leak

the grill comes off with screws accross the top (accessed with hood open, in front of radiator) and accross the bottom (accessed from under the bumper) the bottom screws have one in the center and one on each side.
and yes you have to remove it to get to the horn. be careful, the plastic ears on the grill break easy
 

Mainsail

Well-known member
Steel Soldiers Supporter
1,424
1,437
113
Location
Puget Sound, WA
Looking at page 60 of the LMC catalog, I dont see anything that looks like my tank. http://www.lmctruck.com/icatalog/CSB/full.aspx?page=60

Mine is split beyond repair, so I'd rather just get a new one.

In other news, I got the Whelen siren connected to the horn button on the steering wheel, so I get 200 watts of air horn when I push on it. I'll post up more details if anyone is interested. I found a perfect spot on the firewall for running a 6 or 8 gauge wire through, and the wiring/ fusing for the lights & siren.
 

Mainsail

Well-known member
Steel Soldiers Supporter
1,424
1,437
113
Location
Puget Sound, WA
The second speaker is installed on the grill, so both 100 watt feeds are working now. I got the horn ring connected to the siren box, so the air horn blows when you mash down on it. The wires are mostly loomed up but I need to re-do some of it.

Next up is the landing lights for the grill, thanks to popacom I have the 450 watt bulbs and cans.

This picture shows some of the lightbar guts. On the left and right edges you can see two of the six HID ballasts, the junction in the middle, and the wig-wag module for the rear amber LEDs just to the left of that.

Guts2.jpg
 
Last edited:
Top
AdBlock Detected

We get it, advertisements are annoying!

Sure, ad-blocking software does a great job at blocking ads, but it also blocks useful features of our website like our supporting vendors. Their ads help keep Steel Soldiers going. Please consider disabling your ad blockers for the site. Thanks!

I've Disabled AdBlock
No Thanks