-
Steel Soldiers now has a few new forums, read more about it at: New Munitions Forums!
Artisan's M916
- Thread starter Artisan
- Start date

More options
Who Replied?Cut the shroud. Use a mini torch to weaken the plastic and razor to trimJust hit a snag...
The old fan is 32" in Diameter.
The new fan is 34.25" in Diameter.
I have fan shroud clearance issues.
The new fan is BALANCED, old fan is not.
1- Cut shroud?
2- Use old fan?
3-Knarfle the Garthark
Or die grinder with buff wheel
I just looked at it again.Cut the shroud. Use a mini torch to weaken the plastic and razor to trim
Or die grinder with buff wheel
If I cut shroud, if radiator centers perfect, I "might" have 3/16" clearance
from tips of blades to shroud...
New fan protrudes well past DS and PS radiator limits by over 3" !
If I use old fan I am done.
Old fan moves plenty airI just looked at it again.
If I cut shroud, if radiator centers perfect, I "might" have 3/16" clearance
from tips of blades to shroud...
New fan protrudes well past DS and PS radiator limits by over 3" !
If I use old fan I am done.
Yea,,, The only other option that is probably too much of a PITAOld fan moves plenty air
is; I bet the A1-A2's that came w/ BC3's , I bet they have a bigger
shroud...
I am prob gonna just use the old and move on...
- 8,698
- 3,204
- 113
- Location
- Monrovia, Ca.
Yes just use the old fan.
Getting close to makin' smoke!
I got a bazillion lil things done and the punch list b4 lift off is pretty short!
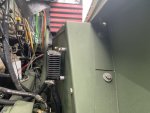
Got the Power Steering Cooler moved away from the fender
wall like I said I might do...
I got a bazillion lil things done and the punch list b4 lift off is pretty short!
Got the Power Steering Cooler moved away from the fender
wall like I said I might do...
Attachments
-
 108.5 KB Views: 26
Only A0 m916s came with a cummins engine. All newer variants have detroit diesels.Yea,,, The only other option that is probably too much of a PITA
is; I bet the A1-A2's that came w/ BC3's , I bet they have a bigger
shroud...
I am prob gonna just use the old and move on...
M915A0 and M915A4s are big cam I's. 915A1s are big cam iii's
WIsh I could quit adding to my punch list but at leastYou're a good story teller, with lots of photos. I'm almost as excited as you are, for the first start-up!
it is now a finite list !
__________________
Re-Tilt radiator (Plumb to fan)
Anti-Mouse Air Intake (Expanded metal)
(I found a mouse nest bottom of air cleaner can in pulse purge dump)
Torque Tranny Bolts
Pull 3 wires at Fuel Solenoid so it will not start
so as to build oil pressure several times prior to
start up.
18 Gallons
Fill Power steering fluid
Fill Oil
Fill tranny Fluid
Check Torque on tube at oil pan
Consider replacing radiator hose clamps
(Find quality clamps)
Fill radiator w/ water.
Consider replacing 2.5" ID Hose first.
Leak check all
Strap Crankcase Vent extension under Truck
Install 2 seat bottoms
Close dash gauge panel Dzus
Connect Batterys
MAKE SMOKE!
Exhaust extension install
(Because were starting it uncorked)
Reinstall Exhaust Rain Cap
Paint touch up
Retorque ALL hose clamps
Hang hood, grill, front cage & towbar
Wash all, start on tilt trailer for dozer.
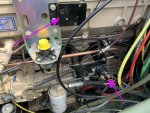
When I went to connect the Tranny heater strip wires they were 2" too short.
Even though EVERYTHING, all air lines, fuel lines etc are now WAY more relaxed
then then when I started so I simply moved it's solenoid. It is a LOT of work to
attempt to get every last line in a good home. I replaced the tach cable too and
rerouted it, it was melting and broke at the fuel pump. I do NOT know how
that happened, it was working on old engine. Someone on ebay had a huge
pile of them! $11
Attachments
-
 154.1 KB Views: 31
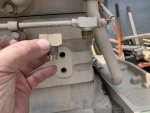
The brass fitting in my hand is from new engine. One of the few F up's I did
was the acelerator pedal linkage was hitting the fuel return line that attaches
to this brass fitting. So I pulled line, adjusted and when I went to reconnect
I f'n cross threaded that brass fitting. OK, no problem, just pull it and swipe
one off old engine, NOT! I am guessing at the inverted flare sizes but the old
engines brass return line fitting is; 1/4" Inverted Flare X 1/4" Inverted Flare X 1/2" MJIC.
On the new engine, it is 1/8" Inverted Flare X 1/4" Inverted Flare X 1/2" MJIC.
DAM!
I had to get busy w/ a tiny pie saw and I was able to salvage the threads, Whew!
Attachments
-
 97.4 KB Views: 18
- 8,698
- 3,204
- 113
- Location
- Monrovia, Ca.
Call BPS truck parts to see if they are open, bring the dipstick to them, the probably have one.

 www.bpstruckparts.com
Doubt they will even know of the trans, but the stoppers come in all kinds of sizes, OR buy one of these, https://www.mcmaster.com/2527k16, and pull the rubber off of it.
Home | Bpstruckparts
www.bpstruckparts.com
Doubt they will even know of the trans, but the stoppers come in all kinds of sizes, OR buy one of these, https://www.mcmaster.com/2527k16, and pull the rubber off of it.
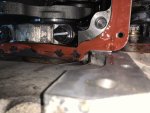
Well the good news is IT RUNS and it started almost instantly.
I was all smiles, I have a video, later w/ that. All was good, hitting
54ish PSI of oil pressure at like 1950 RPMs and all of a sudden
my buddy says SHUT IT DOWN.
Oil .... LEAKING from REAR of oil pan.
New oil pan gasket ordered. Have to drain $450 of oil and pull pan.
I am pretty sure I f'd up that rear seal when I did the rear main cover.
I hope anyways... I took great pains w/ that rear main seal. I mean
I was anal as phuq. I did realize in retrospect I prob should have pulled
pan... If this is my only OH Phuq moment I will be ok w/ that...
Sigh...
- 8,698
- 3,204
- 113
- Location
- Monrovia, Ca.
You know not to toss the oil. Drain into a clean catch vessel, re install after the pan is back up. 7.5 gal low, 9 high. Check the stick calibration, remark if needed.
I used Permatex UltraBlack on the Bellhousing to block bolts...I had a hard time getting the CAT to not leak back thru the bellhousing since the big cam iii oil pan did not bolt the same way to the bellhousing that the Big cam Iii did. About 6 or 8 bolt differences between pans
A lil on the threads and on the captive washers and then finger
wiped things...
We shall see on that. I am just hoping my issue is just the pizz-poor
job I may have done... Like I said, in retrospect I should have pulled
the pan to do the rear main seal cover. . .
The oil leak was MY FAULT.
I should have pulled the dam pan to do the rear main... period.
I knew going into this I would F up here and there... At least it
can get fixed for my time and a few parts.
I was VERY focused on perfection, well perfection as good as my untrained
hands can do on that rear main seal. I remember having to use an alignment
tool to get the rear 2 pan bolts on the PS to go and I inadvertantly pushed
the dam gasket aside . Live and learn.
What is that, 2 mistakes so far?
Attachments
-
 121.2 KB Views: 24
- 114,329members
- 167,222threads
- 2,354,096posts
- 3,013online users