• Steel Soldiers now has a few new forums, read more about it at: New Munitions Forums!

  • Microsoft MSN, Live, Hotmail, Outlook email users may not be receiving emails. We are working to resolve this issue. Please add support@steelsoldiers.com to your trusted contacts.


Big problems - my shaking was a broken crankshaft!

Edis06

Active member
104
38
28
Location
Florida
So I started a new thread to illuminate the importance of checking "shake" in Humvees. This was my first so I assumed it was normal.

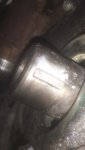
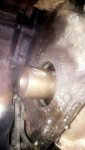
I removed my crank pulley and harmonic balancer this weekend, which by the way was a beeotch. Once removed I noticed the key channel was intact only toward the end of the tube of the balancer. The area toward the front was completely warn and the metal was etched away. Once I went back to examine the crank, I noticed the key was missing and there was bite out of the metal where it used to be. Turns out the vibration was caused by the balancer's rotation due to the missing key, throwing the weight off time.

Guess it's time for a new engine.
 

Attachments

TOBASH

Father, Surgeon, Cantankerous Grouch
Steel Soldiers Supporter
3,172
2,799
113
Location
Brooklyn, NY
YIKES!

EDIT - You might try using a Dremmel to grind a new channel on the crankshaft (in a new area and not the old area), and use a new balancer. Might save your engine for a few years. Certainly easier than an engine swap.
 
Last edited:

Edis06

Active member
104
38
28
Location
Florida
This is not entirely uncommon, it’s caused by a failing harmonic balancer Most of the time.
plenty of takeout 6.2 and 6.5‘s on the market, easy swap
I agree it's an easy swap, but in Florida (the sunny place for shady people) I'm getting $10,000 labor quotes and that's if I supply the engine.
 

Edis06

Active member
104
38
28
Location
Florida
So, I attempted a repair with JB Weld hi-temp steel paste. This is only to get me out of the garage and into a qualified shop for the engine swap. I am still installing the new OEM balancer, pulley, and new crank bolt.
 

Attachments

TOBASH

Father, Surgeon, Cantankerous Grouch
Steel Soldiers Supporter
3,172
2,799
113
Location
Brooklyn, NY
Bad idea!

You really need to either drill in a dowel using a guide with a hardened drillbit between the crank and the balancer, or you need to use a Dremmel to make a new groove... Either would be a more permanent solution.

In dragracing and such, we drilled and tapped and placed permanent dowels with red locktite to prevent rotation all the time.

That JB weld won't survive more than perhaps a minute, IMHO. Do it my way and you would last years.

IMHO, YMMV.
 

Edis06

Active member
104
38
28
Location
Florida
But drilling a dowel would require also carving a channel to accept the dowel in the balancer and I'm just not skilled enough for that. I do agree that your suggestion would work, however.

I also plan on loading it up with Loctite when I install the balancer, hopefully to make it more durable. I need to get the truck out of the garage by Friday (my lease expires with no renewal - what timing), so as long as I can back it into a spot where I can get it towed, I'll bee good.

Again, I just need to get a new engine installed. With what I have planned for this truck, any repair whatsoever will sure come back to haunt me later.
 

TOBASH

Father, Surgeon, Cantankerous Grouch
Steel Soldiers Supporter
3,172
2,799
113
Location
Brooklyn, NY
But drilling a dowel would require also carving a channel to accept the dowel in the balancer and I'm just not skilled enough for that. I do agree that your suggestion would work, however.

I also plan on loading it up with Loctite when I install the balancer, hopefully to make it more durable. I need to get the truck out of the garage by Friday (my lease expires with no renewal - what timing), so as long as I can back it into a spot where I can get it towed, I'll bee good.

Again, I just need to get a new engine installed. With what I have planned for this truck, any repair whatsoever will sure come back to haunt me later.
The new balancer ALREADY HAS THE AREA CUT, if you use a locking wedge and a Dremmel. You need to ensure you purchase a new wedge using this method. You need to use the Dremmel to cut a new groove ONLY on the crank, as the new balancer already has one!

If you use a drill and dowel method; drill at the interface of the crank and the balancer USING A GUIDE, as the steel of the crank is hardened and the steel of the balancer is not. Without a guide you will skive into the balancer. You make your own guide out of 1/2 inch or 3/4 inch steel. You drill 2 holes. One screws into the crank to hold the guide rigidly in place, while the other hole is used to drill at the interface of the crank and the balancer. This is a dead easy thing to do if you know what you're doing. Difficulty level is like 2/5. Use a drill press to make the guide so as to ensure holes are square to surface of guide, (so you will then drill true and straight into the interface with your hand drill). I would use 2 dowels, at 180 degrees, using a 1/16 or 3/32 drill. Then tap the holes and place the proper screws with locktite.

Imagine cutting a hole at the interface of both the crank and the balancer. Now imagine tapping the hole to hold a screw, and then tightening the screw into position to act as a block to slipping and rotation.

JB Weld is CRAP for this project.
 
Last edited:

Retiredwarhorses

Well-known member
Steel Soldiers Supporter
4,236
3,775
113
Location
Brentwood, Calif
The new balancer ALREADY HAS THE AREA CUT, if you use a locking wedge and a Dremmel. You need to ensure you purchase a new wedge using this method. You need to use the Dremmel to cut a new groove ONLY on the crank, as the new balancer already has one!

If you use a drill and dowel method; drill at the interface of the crank and the balancer USING A GUIDE, as the steel of the crank is hardened and the steel of the balancer is not. Without a guide you will skive into the balancer. You make your own guide out of 1/2 inch or 3/4 inch steel. You drill 2 holes. One screws into the crank to hold the guide rigidly in place, while the other hole is used to drill at the interface of the crank and the balancer. This is a dead easy thing to do if you know what you're doing. Difficulty level is like 2/5. Use a drill press to make the guide so as to ensure holes are square to surface of guide, (so you will then drill true and straight into the interface with your hand drill). I would use 2 dowels, at 180 degrees, using a 1/16 or 3/32 drill. Then tap the holes and place the proper screws with locktite.

Imagine cutting a hole at the interface of both the crank and the balancer. Now imagine tapping the hole to hold a screw, and then tightening the screw into position to act as a block to slipping and rotation.

JB Weld is CRAP for this project.
its called a woodruff key, I’ve seen these repair done before, the guy built the area Up around the key way with a mig welder, than ground it down and cleaned it up.
 

Edis06

Active member
104
38
28
Location
Florida
So, here's my plan: I'm picking up the new engine this week - a low mileage 6.5 with all the accessories already on it. I'm going to order all of the maintenance items on this "new" engine - new belt, hoses, balancer, glow plugs, PCV, various sensors, and maybe a water pump and fan clutch.

I will load up my current "ghetto fixed" crank with loctite and reassemble and while this is being lightly driven, I will restore the "new engine" to like new while out of the truck. Once it's done, I will do the swaparoo. Predator says it's no more than a 15 hour job, so it shouldn't be that painful. I'm used to rebuilding F1 transmissions in Maseratis and Ferraris in my spare time so I'm sure I can figure this out.

The jury's out on whether the ghetto fix will last for the few weeks I need or if the "new" engine has some catastrophic failure I don't know about yet. Time will tell I guess. This is one of those times I wish I had a Youtube channel lol.
 

Retiredwarhorses

Well-known member
Steel Soldiers Supporter
4,236
3,775
113
Location
Brentwood, Calif
So, here's my plan: I'm picking up the new engine this week - a low mileage 6.5 with all the accessories already on it. I'm going to order all of the maintenance items on this "new" engine - new belt, hoses, balancer, glow plugs, PCV, various sensors, and maybe a water pump and fan clutch.

I will load up my current "ghetto fixed" crank with loctite and reassemble and while this is being lightly driven, I will restore the "new engine" to like new while out of the truck. Once it's done, I will do the swaparoo. Predator says it's no more than a 15 hour job, so it shouldn't be that painful. I'm used to rebuilding F1 transmissions in Maseratis and Ferraris in my spare time so I'm sure I can figure this out.

The jury's out on whether the ghetto fix will last for the few weeks I need or if the "new" engine has some catastrophic failure I don't know about yet. Time will tell I guess. This is one of those times I wish I had a Youtube channel lol.
predator? Hmmm, ok...hopefully it all works out
 

TOBASH

Father, Surgeon, Cantankerous Grouch
Steel Soldiers Supporter
3,172
2,799
113
Location
Brooklyn, NY
1) I never liked the term "Ghetto Repair"... It is ignorant. The Ghetto is a place that bigots forced Jews to live, just outside of Sardinia in Italy. It is a term that has everything to do with European racism and nothing to do with shotty work. It is a term that should never be used.

2) The repairs I described are both high quality and would last for years. Why you would rather spend thousands of dollars and waste many hours of time replacing an engine that might be altogether fine?

3) Using a JB Weld or a Locktite technique on a crankshaft was never a great idea. Smooth surfaces under tremendous forces will not hold epoxy, and the heat the engine generates will degrade epoxy within minutes. Locktite holds threaded screws with microscopic imperfections and won't adhere well or function well on a polished crankshaft (even one with a failed scuffed woodruff key notch).

If you need to do a cheap and effective backwoods/trail/emergency repair for a quick but robust repair, tig or mig weld the crank to the balancer, welding in small sections and allowing to cool frequently, understanding that afterwards the parts are trash, (meaning they can’t be re-used).
 
Last edited:

Edis06

Active member
104
38
28
Location
Florida
1) I never liked the term "Ghetto Repair"... It is ignorant. The Ghetto is a place that bigots forced Jews to live, just outside of Sardinia in Italy. It is a term that has everything to do with European racism and nothing to do with shotty work. It is a term that should never be used.

2) The repairs I described are both high quality and would last for years. Why you would rather spend thousands of dollars and waste many hours of time replacing an engine that might be altogether fine?

3) Using a JB Weld or a Locktite technique on a crankshaft was never a great idea. Smooth surfaces under tremendous forces will not hold epoxy, and the heat the engine generates will degrade epoxy within minutes. Locktite holds threaded screws with microscopic imperfections and won't adhere well or function well on a polished crankshaft (even one with a failed scuffed woodruff key notch).

If you need to do a cheap and effective backwoods/trail/emergency repair for a quick but robust repair, tig or mig weld the crank to the balancer, welding in small sections and allowing to cool frequently, understanding that afterwards the parts are trash, (meaning they can’t be re-used).
Again, I agree your approach is the right one, should I want to keep the engine. I checked all day yesterday with machine shops and welders, even showing them your post to see if they can do the work. All denied. I even went to the neighboring towns and nobody will touch it without removing the engine. I can't take any more time off and the car has to be out of the garage in 2 days. So, if i can get it to move even 30 feet then mission accomplished.

As for the "ghetto" comment, I wouldn't say it has "everything" to do with European racism. In fact, I've never heard it used in that context. I was describing the repair disparagingly to sound in agreement with you and your comments on how to proceed in the best way, and the "ghettos" to which I'm referring are rarely inhabited by the types of people who make good choices. Sorry, didn't mean to offend.
 

M37M35

Well-known member
Steel Soldiers Supporter
572
648
93
Location
East Central Oklahoma
So, I attempted a repair with JB Weld hi-temp steel paste. This is only to get me out of the garage and into a qualified shop for the engine swap. I am still installing the new OEM balancer, pulley, and new crank bolt.
I had this exact issue with a 6.2 in a civilian truck several years ago.

Call me crazy, but I fixed it the same way. I used original formula two-part JB Weld to fill in around the worn keyway, then installed a new harmonic balancer with green LocTite high strength shaft retaining compound.
I put several thousand miles on it after that with no issues.
YMMV.
 

Edis06

Active member
104
38
28
Location
Florida
UPDATE:

Ok, I reassembled everything and WHAT A DIFFERENCE. SMOOTH AS SILK. FASTER, MUCH MORE RESPONSIVE. The truck runs like a new truck.

I did some research and the poster above was right, this was very common in the 6.2 GM civilian trucks. According to GM, the problem lies within the bolt and washer. There was an updated part number for a stronger bolt less prone to stripping and coming loose.

The reality is THERE IS NO WAY that little key and shallow channel will stop that rotation. Even with the dual key setup in the replacement crankshafts (mine only has one far forward - I checked). The strength comes from that bolt and the updated part comes with instructions on torque setting an additional 15 pounds or so to ensure longer life.

So if the key serves 75% as a timing guide and 25% antirotation, then updating the bolt is "key." So the 8.8 bolt I had replaced with a 10.9. Since the threaded channel in the crankshaft was so stripped (as was the original bolt), I was able to completely rethread the crankshaft with the new bolt. It took hours of back and forth motion with a socket and hammer, but it worked. It's buttery smooth now.

One issue I immediately saw was the main load-bearing component was the thick bushing-like washer that secures the balancer. There was not NEARLY enough surface area to ensure an adequate grip on the inner ring of the balancer. So I was able to find a custom washer that exactly fit the inner ring and used that underneath the thick washer for extra and even support.

Finally, I torqued it down as tight as I possibly could, added a small amount of loctite red hi-temp to the outside of the inner ring and voila!

Again, I can't say this will last forever, but the truck has never run better.

I'll keep you all posted on what happens going forward, while I work on the new engine. Thanks again for all of your help!
 

Edis06

Active member
104
38
28
Location
Florida
UPDATE:

Ok, it's been about 300-350 miles since the repair. Yes, I drive this truck a lot. Still smooth.

I paint marked the bolt in relation to the washer, the washer in relation to the pulley and the bolt in relation to the pulley, using a large "X" with all lines pointing to the four bolts on the pulley. This should indicate any rotation long before things get dangerous. Any rotation can quickly be seen at a glance without getting my hands dirty by looking at it through the front subframe.

I am fairly confident that, at least on this crank style, that woodruff key can only be expected to perform as a timing guide - there's just not enough strength there to stop any torque should the bolt allow it, even on a perfect, unrepaired unit. With that said, I believe a torque check (or even better, paint marking) of that bolt should be included in the regular inspection of these trucks, like the starter bolts, CV bolts, etc. That quick check once a week can save thousands when you drive this truck like I do.

I'll keep everyone posted on this issue. This way we can use my truck as a guinea pig demonstrating the reliability of this repair, should anyone else have this problem and not have an engine replacement option.
 

frank8003

In Memorial
In Memorial
6,426
4,973
113
Location
Ft. Lauderdale, Florida
Wood ruff key is to hold things in alignment during assembly.
Long and over-sized Keys are to hold Her together.
The Wood ruff will not hold against failure of harmonic balancer or internal engine damage. Woodriff is for assembly purposes.
You did good.

I have saved up all the keystock anyone could use in a lifetime, will be listing soon.
 
Top
AdBlock Detected

We get it, advertisements are annoying!

Sure, ad-blocking software does a great job at blocking ads, but it also blocks useful features of our website like our supporting vendors. Their ads help keep Steel Soldiers going. Please consider disabling your ad blockers for the site. Thanks!

I've Disabled AdBlock
No Thanks