• Steel Soldiers now has a few new forums, read more about it at: New Munitions Forums!

  • Microsoft MSN, Live, Hotmail, Outlook email users may not be receiving emails. We are working to resolve this issue. Please add support@steelsoldiers.com to your trusted contacts.

Dark Seas M1008 Project

DarkSeas

Well-known member
201
310
63
Location
Leland, N.C.
You bolt the lug down on the battery and you connect your cables with ring terminals. If you need to disconnect the battery you don't have to disconnect the lug from the battery all the time and the lug will remain in tact forever.
Interesting! I actually have lugs like this currently, but they are corroded to hell and the fastener bolt is rounded and stripped to the point where it doesn't stay tight. He also had the lugs directly attached to the cables, no ring terminal cables screwed on.

I like this, I will run it like the one you sent.
 

DarkSeas

Well-known member
201
310
63
Location
Leland, N.C.
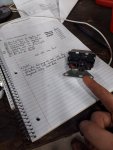
Delays, delays, delays. Got to love hurricanes and problems at work. I'm going back to the garage today to take some wiring measurements, I've got a list of what I need, just not how long I need. These are the wires I took out when I was taking the old harness out. I'm going to sort out connectors/terminals/lugs when I get to the garage along with wire lengths so I can go pick everything up tomorrow.

1665684881127.png

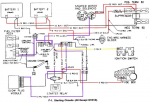
One thing I'm scratching my head about is the starter relay he has going... There is no glow plug module. Here's the original diagram:

1665684987663.png
With my basic understanding of circuits... it looks like the red wire supplies the 24V signal to the relay from the bus bar. The yellow wire/purple and white wire activates the relay switch when the ignition switch powers the yellow wire (turn the key), allowing the 24V signal to travel through the relay to the solid purple wire then to the starter, activating the starter motor. This sound about right?

Before I stripped out a lot of the wiring, turning the key cranked the motor. I know there's a doghead relay modification to prevent the starter from staying on. It may already have this modification done, I don't know. I put on my wiring list to pick up some feet of 12 gauge red, yellow, and purple wire. I feel like I'm going to really have to nail down this starter circuit.

I assume the best place to start is to try and find a yellow wire under the dash. Find where it meets the purple and white wire, if it even does. Find the starter relay. Make sure the relay has ground, power supply, and branches off to the starter with the solid purple wire. Will I find all this stuff under the dash? Under the dash is a nightmare (reference post #81 on this thread).
 

Keith_J

Well-known member
3,657
1,323
113
Location
Schertz TX
The Dog head mod is an alternative starter relay, the original has a plug/socket which is the same shape/ configuration as pictured in the diagram. The relay is a rectangular box stamped from sheet metal. The Dog head relay is cylindrical metal. The relay "converts" the 12 volt ignition switch signal to 24 volts.

The red wire is the source for the 24 volts. The standard GM color code convention is upheld.
 

DarkSeas

Well-known member
201
310
63
Location
Leland, N.C.
The Dog head mod is an alternative starter relay, the original has a plug/socket which is the same shape/ configuration as pictured in the diagram. The relay is a rectangular box stamped from sheet metal. The Dog head relay is cylindrical metal. The relay "converts" the 12 volt ignition switch signal to 24 volts.

The red wire is the source for the 24 volts. The standard GM color code convention is upheld.
Thanks Keith.

I thought the doghead mod would be crazy complicated, but I looked up the thread and understand a lot more about the ignition and starting circuits. Warthog did an awesome job walking through the circuits.

Going by the garage soon to check the status of the starter relay and take some measurements for the thicker cables I need to replace.
 

DarkSeas

Well-known member
201
310
63
Location
Leland, N.C.
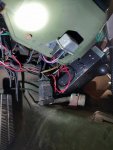
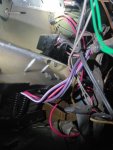
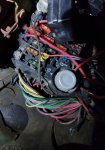
Okay so here's what I found looking for the starter relay. Is this stock? This is sitting on the front of the lower dash about 2ft from where your right knee would be.
20221013_185955.jpg
I also took a picture of what's behind the dash...
20221013_190031.jpg
 

Keith_J

Well-known member
3,657
1,323
113
Location
Schertz TX
Stock starter relay in a non stock position. Would make it easy to unplug if it failed. It is normally attached to the same bracket as the voltmeter and right alternator relays. You posted a picture of this bracket earlier.
 

DarkSeas

Well-known member
201
310
63
Location
Leland, N.C.
Thanks @Keith_J - I might keep it there temporarily while I doghead relay mod it, just to make troubleshooting easier. If it works, I'll move it back behind the dash.

This might be a really dumb question, but does anybody know offhand what the stud sizes for the bus bars are? And the engine wiring harness block studs? I am getting some wire together and didn't realize just how many sizes of connectors there were...
 

cucvrus

Well-known member
11,473
10,434
113
Location
Jonestown Pennsylvania
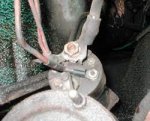
This is a similar lug end for the CUCV positive cable to starter connection. It allows for correct clocking and safe attachment of the cable. This way the cable only fits one way and is correct when installed. Your way will work also. I just go thru the trouble and change the cables when I see standard eye lugs at the starter end.downloadstarter.jpg See the ears that only go on the starter one way and prevent the cable from turning when tightening. GENERIC PICTURE. NOT A CUCV.
 

DarkSeas

Well-known member
201
310
63
Location
Leland, N.C.
See the ears that only go on the starter one way and prevent the cable from turning when tightening.
I'm assuming this is to prevent the 24V bus power from contacting the solenoid signal wire from the starter relay?

Honestly, the cable is completely out and it's gone. Was melted beyond belief. I'm replacing it with correct spec marine wiring, and adding the lugs myself. So it's the perfect time to do it right and get the lugs that will do the right job.
 

DarkSeas

Well-known member
201
310
63
Location
Leland, N.C.
Little update for y'all...
1) I picked up all my wiring from West Marine - had a store right in town, super nice guys there. Got some thick cables to make battery cables and run 24V to the starter. Been waiting on battery terminal lugs to come in before I started cutting cable.
2) I got a lawnmower solenoid from NAPA to do the doghead starter relay mod (anticipating Saturday). They gave me the wrong part at first, but I had the correct one the next day.
3) I ordered some military spec battery terminals from Amazon, and the package got 'lost' so the past month I've been waiting for the package/dealing with getting my money back - put a new order in yesterday, they should come Saturday, fingers crossed. If they come, I'll post some pictures and the location on Amazon I found them in case any of you are looking for the same kind of thing.

My closest friend Jr. started a new job in the past month that has him travelling out of state for 2-3 weeks at a time and only coming home for a few days at a time, he's been my mentor and biggest help with my project, so that's why things have kind of slowed down in the past month. I've still got Tom with me, so if I can get these things hooked up this weekend, I might be able to convince Tom to help me with putting the starter in, then we can see if she cranks.

Gotta be careful making sure his electric fuel pump isn't hooked to the 24V side before I power things back up, among other things. Also have to sort out pushing 12V to the glow plug button, since I plan on keeping the glow plugs on the button for the time being until I can get her to reliably crank over for me.

Once we bring her back to life, I've got to get new u-joints for the driveshafts, redo the leaf springs, fix the leaking seal on the transfer case, put fresh fluids in, and she should be good to go. Still a way to go, but the motor wiring is starting to come together, should be in the home stretch with that.
 

DarkSeas

Well-known member
201
310
63
Location
Leland, N.C.
Back at it today. Nobody ever seems to need me till I make plans to do something I wanna do...

Since I'm working on hooking things back up 24V I thought it may be prudent to check where the guy had the after market radio, fuel pump, and CB radio hooked up to. The CB looks like it goes to the rats mess of 12V stuff under the dash, the radio and fuel pump go into the fuse box.. so I may be good.

Will post a picture in a second of the fuse box locations , in case any of you could tell me if those are 24V or 12V feeds.

It also might be a good time to ask how to put a wire in a fuse box slot... the radio/fuel pump wires are about to snap off at the fuse box. Would like to just snip, strip, and fix that. Is there a specific type of wire ending to go into a fuse box?

A little more I did today, first time I ever worked on wiring I fixed the connector for the glow plug button, the end fell off so I put a new connector on.

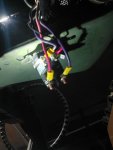
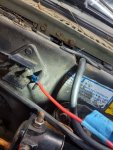
I also did the doghead relay modification. It looks janky because it is, but I triple checked and everything is connected to the solenoid correctly. I need to drill a new hole to really anchor it down, just thought y'all would be proud. Here's the old one cut out:

16707071920702618245713074066733.jpg

I plan on coming back tomorrow now that I have a bit of wiring confidence, and I'll be working on cutting and attaching connectors to battery wiring.
 

DarkSeas

Well-known member
201
310
63
Location
Leland, N.C.
So... fuse box question. Top left corner in the photo, that's where he has the 12V fuel pump power drawing from (brownish/black wire). Two slots below it (the red wire next to the 40 amp orange fuse) he has the radio/CB plugged in to draw 12V power. If I hook things up 24V will these fuse slots be 12V or 24V? Fuse box photo:
20221210_162158.jpg

Some of my janky wiring from today, I think it'll work though:

20221210_162357.jpg
20221210_162419.jpg

Looking at my doghead relay I think I got it all backwards... If so I'll fix it again tomorrow and I should've trusted my gut to begin with and not flipped everything. It's rough wiring upside down.

Edit: yeah, it's backwards. Luckily the connectors are on and it should be a relatively easy switch. Ugh.
 

cucvrus

Well-known member
11,473
10,434
113
Location
Jonestown Pennsylvania
I can no longer watch. Why are you cobbling this truck with unneeded modifacations? The mechanical fuel pump works and will not fail without notice. The dog head relay is only another relay that can fail just like the original relay you cut out. Besides now you have exposed positive terminals in the negative steel cab. Not sure these are upgrades. Besides I always heard everyone posting read the TM's. The TM's are now just used to start a fire. Hey, it is not my truck but clean uncut CUCV's are getting harder and harder to find. I have driven them 28 years and never needed any of these mods. Next comes the push button glow plugs and the lift kit.
Good Luck. Happy Holidays and be careful with all that wiring make sure it has relays and is properly fused.
 

DarkSeas

Well-known member
201
310
63
Location
Leland, N.C.
I can no longer watch. Why are you cobbling this truck with unneeded modifacations? The mechanical fuel pump works and will not fail without notice. The dog head relay is only another relay that can fail just like the original relay you cut out. Besides now you have exposed positive terminals in the negative steel cab.
I'm replacing the 12V starter he had put in with a 24V starter, figured the dog head relay mod might save me considering he already chopped and moved the original starter relay, I figured it might give me a decent shot at keeping the 24V starter alive for a time.

The fuel pump was electric when I bought it. He was explaining to me that he changed it out because it makes it a lot easier to bleed the air out of the fuel lines and filter by just turning the key and letting the fuel pump run. Wasn't my call.

To the exposed positive terminals in the negative cab, I guess it never really concerned me seeing the state of everything else under the hood and dash. All these things were already done to the truck and they worked. Figured leave them alone for the time being till the motor runs again.

And the glow plug button... well. For the meantime it's gonna have to stay. At least till I get the motor running. The glow plug harness in the truck right now is destroyed - it was when I bought the truck. I have a new one, but if I can manually push 12V to the GP to just warm the motor and get it to fire up, that will be good for me.

I dug really deep into this truck, injectors, glow plugs, motor wiring harness, new battery cables, new starter and starter relay. I'm getting a lot fixed, but there is a LOT more wrong than I initially thought. I was just going to change the filters and fluids, change the injectors and glow plugs, then run it for a while. Then the starter became an issue, then I saw all the dangerous motor wiring, then I found the mess of tape and wires underneath the dash.

There's a ton I know I need to tear out and fix, but I'm starting with the motor wiring and setting her back to 24V. Just making sure these dumb things are hooked to the 12V side of things so I don't start a fire and blow everything out when I start to put her back together. In fact, the truck right now is much more original than it started, and it's still heading that direction, just one step at a time.
 

DarkSeas

Well-known member
201
310
63
Location
Leland, N.C.
In short...
I know what I've got disappoints you guys in terms of being true to the original. I got the truck in this shape it was in: half the dash lights don't work, the glow plugs on a button, the engine wiring hacked to pieced to set it at 12V. LEDs, CB radio, power seats, an AM/FM radio - all that stuff was there when I bought it.

I'm working on putting it back, to be more reliable and closer to the original. But I've never wrenched on anything before, or wired anything. I'm doin this pretty much on my own right now, and I'm learning a lot, but it's really difficult fixing things when I don't have a guide. I'm making a lot of changes in the right direction, it'll be 24V with a 24V starter and running with clean, appropriate motor wiring that actually aligns with the diagram.

Getting the glow plugs back on a harness and their temperature check/shut off/wait light cycles being tied to the key will be coming eventually. The radio and CB will be coming out. All the dash wiring will be replaced back to original, hopefully I can diagnose and get everything working again on the dash.

Just be patient with me. I've got a strict financial and time budget, and I have to teach myself every step along the way. Get the motor running, then onto the next problem.
 

ssdvc

Well-known member
971
639
93
Location
CT
Do yourself a HUGE favor and insulate those terminals on that relay, ASAP. There is some decent current flowing to that relay and you don't want to inadvertently find out how much of a STING it can give you (please don't ask how I know !!).
 
Top
AdBlock Detected

We get it, advertisements are annoying!

Sure, ad-blocking software does a great job at blocking ads, but it also blocks useful features of our website like our supporting vendors. Their ads help keep Steel Soldiers going. Please consider disabling your ad blockers for the site. Thanks!

I've Disabled AdBlock
No Thanks