• Steel Soldiers now has a few new forums, read more about it at: New Munitions Forums!

  • Microsoft MSN, Live, Hotmail, Outlook email users may not be receiving emails. We are working to resolve this issue. Please add support@steelsoldiers.com to your trusted contacts.


FLU419 SEE HMMH HME Owners group

mberetta

Member
39
1
8
Location
Utah
Do I understand correctly that as far as the hydraulics go, the only prerequisite is that the implement lever be in the lowering position, before towing/winching?
 

Speedwoble

Well-known member
606
296
63
Location
New Holland, PA
Do I understand correctly that as far as the hydraulics go, the only prerequisite is that the implement lever be in the lowering position, before towing/winching?
Ideally it would be in float, but that valve doesn’t have a float setting. I think(and someone can correct me) that you will want the valve in the opposite of the position it would be in to actually put the backhoe in the operating position. That way the piston end of the cylinder is drawing fluid from the tank and the rod end is sending fluid either through the pump backwards as internal leakage or through the pressure relief.
If you held the valve in the same position as with the engine running, you are trying to pull fluid through the pump and at risk of collapsing a hose under negative pressure.
On my truck I “lower” it to working position , and “Raise” it from the working position back to the storage position. So on my truck we can assume I would have Soldier B or a wooden block hold the hydraulic in the “Raise” position while winching the backhoe off of the FOPS.

Make sure the PTO is disengaged and go really slow. It takes close to a minute to raise using the unimog hydraulics.
You could also try to knock the pin out between the cylinder and the backhoe so you are just raising the backhoe against gravity, but that could get exciting once the backhoe hits the midpoint and comes crashing down.
 

glcaines

Well-known member
Steel Soldiers Supporter
3,835
2,398
113
Location
Hiawassee, Georgia
Make sure the PTO is disengaged and go really slow. It takes close to a minute to raise using the unimog hydraulics.
You could also try to knock the pin out between the cylinder and the backhoe so you are just raising the backhoe against gravity, but that could get exciting once the backhoe hits the midpoint and comes crashing down.
Mine raises completely in about 10 seconds with the engine idling.
 

glcaines

Well-known member
Steel Soldiers Supporter
3,835
2,398
113
Location
Hiawassee, Georgia
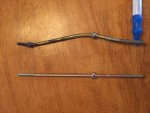
I finally got around to working on the throttle linkage. It was a mess. I bought a new rod from EI along with all new springs. Taking out the old bent rod was very difficult. I didn't want to take the ball joint apart, so I held the female section with vice grips, and backed the locking nut off about two turns. I then was able with great difficulty to break the rod free, using a second set of vice grips on the rod. I then had to unscrew the rod by turning it about 10 - 15 degrees each turn with the vice grips. It was extremely tight all the way out, but was not rusty. You can see from the photo how bent the old rod was by comparing it to the new rod. It was bent in four places.

Throttle Rod.JPG
Common practice for shutting down the engine is to move the hand lever forward to the stop, move it to the left and push it forward past the stop to shut the engine down. However, in TM 5-2420-224-20-2 under Accelerator Linkage Adjustment instructions, when the hand lever is pushed against the plastic stop, the engine should shut down. The instructions in the TM explain how to adjust the linkage to make this happen. When starting, one should move the hand lever back to the idle position, away from the plastic stop.
 
Last edited:

Pinsandpitons

Active member
156
41
28
Location
Central Washington

Pinsandpitons

Active member
156
41
28
Location
Central Washington
Ideally it would be in float, but that valve doesn’t have a float setting. I think(and someone can correct me) that you will want the valve in the opposite of the position it would be in to actually put the backhoe in the operating position. That way the piston end of the cylinder is drawing fluid from the tank and the rod end is sending fluid either through the pump backwards as internal leakage or through the pressure relief.
If you held the valve in the same position as with the engine running, you are trying to pull fluid through the pump and at risk of collapsing a hose under negative pressure.
On my truck I “lower” it to working position , and “Raise” it from the working position back to the storage position. So on my truck we can assume I would have Soldier B or a wooden block hold the hydraulic in the “Raise” position while winching the backhoe off of the FOPS.

Make sure the PTO is disengaged and go really slow. It takes close to a minute to raise using the unimog hydraulics.
You could also try to knock the pin out between the cylinder and the backhoe so you are just raising the backhoe against gravity, but that could get exciting once the backhoe hits the midpoint and comes crashing down.
Good thoughts. IDK about the valve position. Isn't the tank return above the oil level? That would suck air? Maybe? If the pto isn't engaged I think the pump should turn pretty easy. I vote normal "lower" lever position. Also you're gonna want the latches "open" so they can "close" and hold the hoe. I think soldier C should have a camera and beers (belonging to soldier A & B).
 

The FLU farm

Well-known member
Steel Soldiers Supporter
3,286
1,213
113
Location
The actual midwest, NM.
That's hilarious (and frightening). Do you think the planetary hubs were still in play or bypassed somehow? Not to mention the tires rated to 26 mph. All those poor gears, oh the humanity!
I would've gutted all the front axle stuff, and they probably did.
Tire speed ratings? That's for sissies. If you're still worried, use tight snow chains to keep the tread attached to the carcass.
 

tatra813

Member
523
25
18
Location
Washougal Wa
I’m looking to buy a SEE front end loader assembly and modifying it to add a quick tach hitch up front so I can run all my skid steer attachments on it too. I would also have to modify the loader arm attatchment to fit on my u500 unimog.

anyone have a loader assembly they are not using.
 

glcaines

Well-known member
Steel Soldiers Supporter
3,835
2,398
113
Location
Hiawassee, Georgia
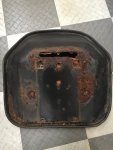
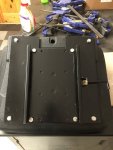
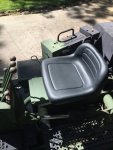
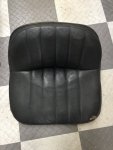
Well, I fnally got around to replacing the seat on my SEE. From the top, the old seat looked good. From the bottom, the seat was rusted out and virtually no insides left due to mice. I searched, but there was no Case exact replacement seat. None of the other seats I checked out had the same bolt pattern as the old seat. I located a seat that looked similar at Hills Machinery, a Case dealer in Greenville, SC. It is part number B1-03. I could have probably found it cheaper elsewhere, but the head of the Parts Dept spent a lot of time on the phone with me and in person trying to find me a seat. I had to make an adapter plate out of 1/4 inch steel plate. I drilled and tapped the four holes for the existing mount and drilled the other four holes for the seat. It works and looks great.
Old Seat.JPGOld Seat Bottom.JPGSeat Adapter Plate.JPGNew Seat.JPG
 

glcaines

Well-known member
Steel Soldiers Supporter
3,835
2,398
113
Location
Hiawassee, Georgia
Has anyone tried to replace the chainsaw bar on the Stanley chainsaw? My SEE came with a Stanley chainsaw model CS06120M that has an Oregon bar model 160ATSA195, with the additional markings of 30959 GA. Although my chainsaw looks brand new, the bar was laying in water and is very rusty. I looked online and contacted several Oregon dealers about a replacement bar. I finally contacted Oregon Customer Service. After 30 minutes on the phone with Oregon, they finally gave up. They couldn't find a model 160ATSA195 bar anywhere in their records. They have now forwarded my request to an old timer with the company to see what he knows. The '120M' in the saw model number designates the saw as a U.S. Military model of the Stanley CS06 saw. Apparently, the last three digits '195' in the bar model number designates the mounting on the saw and that is the problem. It looks like the military might have specified a unique mounting for the bar to eliminate the use of a civilian bar. If Oregon can't help, I'll purchase a civilian Oregon bar for the civilian Stanley CS06 saw and see if it fits, and if not I'll return it.
 
Top
AdBlock Detected

We get it, advertisements are annoying!

Sure, ad-blocking software does a great job at blocking ads, but it also blocks useful features of our website like our supporting vendors. Their ads help keep Steel Soldiers going. Please consider disabling your ad blockers for the site. Thanks!

I've Disabled AdBlock
No Thanks