• Steel Soldiers now has a few new forums, read more about it at: New Munitions Forums!

  • Microsoft MSN, Live, Hotmail, Outlook email users may not be receiving emails. We are working to resolve this issue. Please add support@steelsoldiers.com to your trusted contacts.

Front end/Rear end Swap

PeeWeeQ

Member
161
4
18
Location
Altoona, WI
Sooo, got the Control arm/steering rod issue solved--I cut off as much of the cotter pins as I could, put a combo wrench on the castle nut, got out my BFH, and pounded it until it spun loose. I did it on both ends and they came off no problem. Pounded the drag links out on each end, and, BINGO! Done-ski. :hammer: Then, I ordered new drag links and an adjusting sleeve...

Back to the drive-shaft/u-joint issue--I looked on the NAPA website and the rear drive-shaft u joints for a K5 Blazer appear to be exactly the same as what fits the rear drive-shaft u joints on a 1990 V2500 Suburban (what my front and rear end came out of). Does this seem right? I'm going to go to NAPA tomorrow and verify, but, near as I can tell, I don't need to 'bastardize' anything... [thumbzup] I hope...It says they both have the 1350 driveline series with a 1.188" & 1.888" bearing cap diameter. Found some K5 Blazer forum where they talk about a "447 conversion joint". Is this the one that was mentioned earlier in this thread?

Any thoughts?

20160211_172133.jpg20160211_172139.jpg20160211_173253.jpg20160211_173302.jpg20160211_175632.jpg20160212_145120.jpg20160212_183148.jpg
 
Last edited:

Ilikemtb999

Active member
694
44
28
Location
Denver, CO
I'd unbolt the rear straps, jack the rear of the truck up as high as you can and then just pull the shaft out and put the u joint in the new axle.


Or or use a caliper and measure the yoke and then your u joint.
 

PeeWeeQ

Member
161
4
18
Location
Altoona, WI
Pulled this from another thread where a gentleman 'grenaded' his stock rear end u joints and yoke. He was talking about "upgrading" from the stock 3R to a 1310 yoke. This was the response...

"1310 joint itself is actually weaker then the original. Only has 1 1/16" caps instead of the original 1 1/8" caps used in the 3R setup.


1310 has 1.06" caps and 2.34" wide between caps
3R has 1.125" caps and 2.55" wide between caps
1350 has 1.18" caps and 3.62" wide between caps

You can install a 1350 type yoke and then use a conversion joint #447 Precision that will fit the driveshaft with no mods."

Not that I wasn't getting good information from everyone, you guys have been great--but, I was having trouble piecing it all together. aua Considering all of this, can I conclude that the stock M1009 has a 3R driveline and that marrying the original driveshaft to my 'new' 14 bolt SF (1350 driveline) can be done with the #447 conversion joint? Sound about right? I'd go out there and just pull that driveshaft off of there right now as Ilikemtb999 suggested, but it is -14 degrees outside without the windchill in sunny Wisconsin this afternoon, so, I'm trying to figure this out from here...

Is this the one I'm looking for?

Screenshot_2016-02-13-13-09-02[1].jpg
 
Last edited:

PeeWeeQ

Member
161
4
18
Location
Altoona, WI
Another GM site says that the corporate 10 Bolt, with respect to CUCVs. had either 3R OR 1310 drivelines with no explanation of how to tell which is which...Gonna have to get cold and go measure, I guess...
 

Recovry4x4

LLM/Member 785
Super Moderator
Steel Soldiers Supporter
34,012
1,806
113
Location
GA Mountains
The driveshaft, once unbolted, should slide right out of the transfer for an easy trip into the house. From there you can measure the caps to see if it's a 3R or 1310. Oddly, when going through both the 20P and 34P, both pickups and blazers were listed with the same rear ujoint. I know this just isn't the case.
 

PeeWeeQ

Member
161
4
18
Location
Altoona, WI
No way...Doesn't the M1008 have 14 bolt FF? On that note, are the front and rear different in the M1009? I thought the yokes were the same, both being 10 bolt. Sigh...I'll figure it out...good learning experience..
 

Ilikemtb999

Active member
694
44
28
Location
Denver, CO
I have my old driveshaft out in the garage and it's currently 70 out. I can measure the width and cap size for you. I don't have my old axle though.


My 14b full float uses a 1350. Just unsure if it's the same for the sf


the 10 bolts use the same front and rear. So does the Dana 60 though I think the cross shaft is different slightly. Same caps and width. Scroll down on this link to u joint sizes. The biggest concern is the new axle yoke size. There's no disputing the 10 bolts use 1310 joints.

http://www.therangerstation.com/Magazine/summer2008/ujoints.htm
 
Last edited:

Westech

CPL
6,104
207
63
Location
cow farts, Wisconsin
Kenny is correct 100%. when I slapped in M1009 axles in my M1008 I took the yoke off the 14SF and installed it on the 10 bolt so I could use the stock drive shaft. Yes the splines and size of the pinon shaft is the same on the 10 and 14SF axles. The 14FF is different but also uses the same 1350 joint as the 14SF axle. the 10 bolts are the 1310 joints. so....


the ez thing to do is take the yoke off your 10 bolt and slap it on your 14SF and use the 1310 joint.... problem solved and you dont have to use a bastard joint that will cause vibrations.

PS you will have to mod/remove the yoke dust cover. I just cut the very out side lip off so it would fit.
 
Last edited:

Chaski

Active member
684
55
28
Location
Burney/CA
The pinion bearing preload on a 14 bolt is set with a crush sleeve. You shouldn't go swapping yokes without measuring the preload before and making sure you tighten up the pinion nut enough to give you the same preload or a few inch pounds more. It is not like a Dana axle where bearing preload is set with shims. If you zip the old yoke off with an impact and nail the new one down until it is good and tight you have most likely grossly altered your bearing preload and may destroy them.

I would just measure what you have and go from there, get a conversion joint if need be.
 
Last edited:

PeeWeeQ

Member
161
4
18
Location
Altoona, WI
20160213_105918[1].jpg20160213_202224[1].jpg20160213_202506[1].jpg20160213_202651[1].jpg
Sorry it's been a few days...Just started a new job. Couple that with girl's basketball games...

Anyway, got the new drag link ends and sleeve together (and on the truck now). Got the front end lowered, out, and new installed. I did it without any help since, well--I didn't have any available. I hoisted and supported the front end of the body with 6 ton jack stands. Then, I raised the entire leaf spring and shackles on the passenger side off of the front end, repeat on the other side. Then, I went to the I was able to get my body really close to each end, pick them up (obviously, one at a time) and lower them from the jack stands to small moving dollies. After that it was nothing to maneuver them into the garage and change places with the 'new' one.

Before I reinstalled the brake calipers, U-bolts, new shocks and a new steering damper, I hooked up the drive shaft while I still had maneuverability--piece of cake. On the driver's side, I had a little fun with the steering connections. The steering arm on the new front end was the correct shape, but, angled up instead of down where the drag link attached. I didn' like how it would have all gone together, so, I decided to take that one off and put the old one on. WOW. I don't know what those tapered collars were right under the 3 nuts holding the thing on, but, what a pain. Many BFG beatings and some use of a huge chisel for a wedge, and they came off. Reinstallation--CAKE. I wish I had taken pictures...

After that, the drag link assembly bolted right up like it was supposed to and everything else went back together well.

So, the next bit, is lowering the old rear end, raising the new one and hooking everything back up. On that note, another adventure--those U-bolts and plates that I had the gentleman I bought the front and rear end from throw in a box--they were for the front axles. I wish I had taken a closer look before I left. So, I went to the local salvage yard and the very helpful kid at the counter hooked me up with some plates--he found them in their scrap bin right before the recycler showed up--no charge. Unfortunately, the holes are 4+ inches apart--not 3 3/8 like they should be, AND, they were intended to be installed on the bottom of the housing with the u-bolt coming from the top. I'll include pics of these with my next post. SO, I ordered a u-bolt reversal kit, with plates from Off Road Designs (part #U8021), so, I can't really finish until they get here...

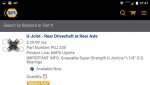
Speaking of parts, turns out that as everyone concluded, yes, the rear driveline is 1310, so, I decided to go with the NAPA part # PUJ 348 U-joint to connect to the new 1350 14-bolt.

So, barring any other unforeseen problems, working in between work and kid's activities, I should be done by the weekend....
 

PeeWeeQ

Member
161
4
18
Location
Altoona, WI
20160214_170323[1].jpg

More to come....If you look on the right, you can see the steering arm that was on this front end--that's the one I changed out...
 
Last edited:

Ilikemtb999

Active member
694
44
28
Location
Denver, CO
U bolt flip kit is a great addition. I used ruffstuff parts but the ORD kit does the same thing for more money. The stock design holds water and rusts away. Plus there aren't u bolts to catch on.

Did you reuse the front u bolts or buy new?

the rear should be easy to get out and new in place since the pumpkin is centered. I just used a furniture dolly (or you can just scoot it on the drums lol
 

PeeWeeQ

Member
161
4
18
Location
Altoona, WI


Finished up the front end and got the rear end dropped last night. Tonight (if it stops raining) I'm hoping to pull the drive shaft, change the u-joint, and get the 'new' rear end in place, ready to bolt up when the u-bolts and plates arrive.

On the front end, if you look at the pics, the shock boots are all scrunched up. Can anyone tell me why and what I can do to fix it?

Also, you can see the broken axle in the last pic that was the culprit for this entire project...
 
Last edited:
Top