• Steel Soldiers now has a few new forums, read more about it at: New Munitions Forums!

  • Microsoft MSN, Live, Hotmail, Outlook email users may not be receiving emails. We are working to resolve this issue. Please add support@steelsoldiers.com to your trusted contacts.

goldneagle's 1985 M1008 recovery and restoration thread...

Jeepsinker

Well-known member
5,341
329
83
Location
Dry Creek, Louisiana
It could be battle damage, but I kind of doubt it. Frag may do damage like that, but it would likely be a larger pattern. A couple of the pock marks look like they could be 5.56, and maybe one 7.62, but 7.62 would have punched through that, and so would 5.56 inside 100 yards. I can't really think of what else would cause that. It definitely is not just from rust. Notice that the edges of some of the marks are raised outwards, suggesting some kind of impact.
 

Drock

New member
1,020
10
0
Location
Eatonton GA
I'm going to call that battle damage. Those are impacts, not rust. If it were me I'd preserve it by hitting it with ah brass wire wheel to clean off the rust, paint it black, then (using an art brush) fill in the craters with silver paint. Ah great conversation piece and a reminder of what these trucks really are.
 

goldneagle

Well-known member
4,434
868
113
Location
Slidell, LA
I'm going to call that battle damage. Those are impacts, not rust. If it were me I'd preserve it by hitting it with ah brass wire wheel to clean off the rust, paint it black, then (using an art brush) fill in the craters with silver paint. Ah great conversation piece and a reminder of what these trucks really are.
Yep that is what I was thinking. Depending on which CAMO color goes in that area I will use a contrasting color to highlight the damage.

BTW the metal in that area is close to 3/8" thick. (maybe thicker) That would explain why it did not go all the way through.
 

goldneagle

Well-known member
4,434
868
113
Location
Slidell, LA
I have been busy with holiday sales and getting the Roboimpact drivers ready for sale. Today I decided to work on the HMMWV tire carrier project on my truck. I decided to use some heavy angle I had from stripping out the engine container. I cut 4 pieces of angle to length and sanded them ready to weld. I also cut 2 strips of heavy diamond plate that will be welded between the pieces of angle.

I welded the angles to make up two 90 degree corners. I then welded the diamond plate strips between the angles. (see pictures) I then used my angle grinder to clean the welds ready for paint.

I primed the assembly and fitted it to the bumper corner. (see pictures)

I then removed the mounting brackets from the HMMWV tire carrier and used them to mark the drill holes in the corner plate just fabricated.

I will drill out the holes tomorrow and hopefully get the the tire carrier mounted. (I still have to custom fabricate a bracket that will be used to lock the tire carrier to the bumper during driving.)
 

Attachments

goldneagle

Well-known member
4,434
868
113
Location
Slidell, LA
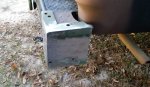
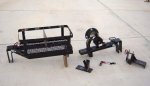
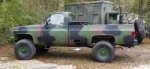
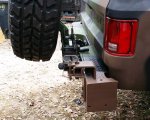
After drilling the two holes for the mounting bolts I was able to install the corner piece I fabricated yesterday. I cut a 1/4" thick plate 3-1/2" x 5-1/4" plate that I used to reinforce the inside of the bumper. I removed the 2 original bolts from the bumper corner. Then I marked the backing plate and drilled 2 holes in it to line up with the existing holes in the bumper. I then reinstalled the bolts throught the new plate and tightened them up. I then drill 2 holes through the plate using the existing holes I had drill thought the corner piece i had fabricated yesterday. I was then able to insert the bolts through the tire carrier bracket into the bumper and the backing plate I installed. I secured the mounting brackets for the tire carrier with one 5/8" x 4" long bolt and one 1/2" x 4" bolt.

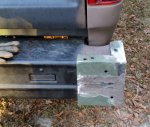
I then inserted the rest of the tire carrier into the corner bracket and secured it in place using the provided bolt. I noticed the left side of the bumper bracket was interfering with the tailgate when I tried to lower it. I cut 1/2" off the side of the mounting bracket to allow the tailgate to be lowered down.

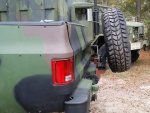
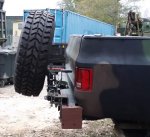
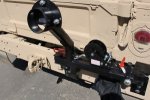
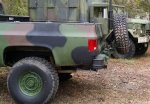
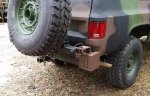
When I swung the tire carrier to the closed position it was hitting the right shackle mount. I had to custom cut the tire carrier to make it fit correctly.

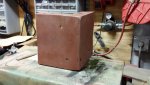
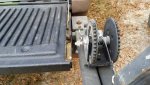
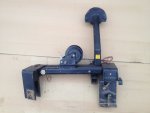
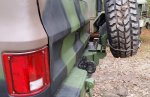
Once I had the tire carrier moving properly it was time to fabricate a bracket to secure the left side of the arm to the bumper. (That bracket was missing when I got the tire carrier) I used two pieced of heavy angle welded together in a L shape to make the mounting bracket. I used two 1/2" bolts to attach it to the bumper on the other side of the shackle mount. I then lined up the tire carrier tube over the bracket and drilled a 1/2" hole into the top of the bracket. I then inserted a pull pin to secure the tire carrier in "travel" mode.

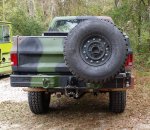
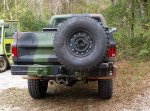
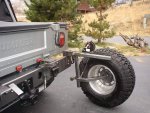
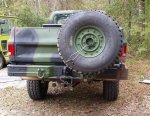
I mounted the tire to the carrier and secured into place. Looks good. [thumbzup]

I will paint it the next dry day we have.
 

Attachments

goldneagle

Well-known member
4,434
868
113
Location
Slidell, LA
Looks really cool!! What does the little crank winch do?
It lowers and raises the spare tire so you don't have to brake your back lifting the spare on to the carrier mount.

I will try to take a picture of it in the down position when i get a chance.
 

goldneagle

Well-known member
4,434
868
113
Location
Slidell, LA
Finally after a long delay I finally got my delivery of MRAP seats. I am planning to install them in my M1008 instead of the broken bench seat. The trick is going to be fabricating a sold base that will properly support the seat. I will see if the original seat base can be adapted to support the new seats. Here are the pictures of the seats I received.
 

Attachments

Last edited:

Drock

New member
1,020
10
0
Location
Eatonton GA
Those are cool. They look small enough to give you plenty of mounting position options. Where did you find them and what did they set you back?
 

ODTruck

New member
11
0
1
Location
Nashville, TN
Goldneagle what an awesome job on your truck! This is what I want my truck to look like when it grows up. Picked up my HMMV wheels and tires and trying to decide on lift options. Thinking about 4" lift and fender flares.
 

84 Blue Beast

New member
7
0
0
Location
Kentucky
GE - got my humvee rims and tires and those two inch spacers you mentioned to fit those tires on the front. It looks good but I have a concern with how much wheel stud actually fits through that spacer. When attaching the nuts to hold the spacer on the hub I can only get about 2/3 or 3/4 of that nut on that stud. Did you have that same issue? How did you handle that situation?
 

goldneagle

Well-known member
4,434
868
113
Location
Slidell, LA
GE - got my humvee rims and tires and those two inch spacers you mentioned to fit those tires on the front. It looks good but I have a concern with how much wheel stud actually fits through that spacer. When attaching the nuts to hold the spacer on the hub I can only get about 2/3 or 3/4 of that nut on that stud. Did you have that same issue? How did you handle that situation?
The spacers I got have their own studs built in. They have holes where the original studs go through and you attach them to the truck with lug nuts provided with the spacers. You thaen attach the rims to the spacers just like you would normally mount them. Picture attached. Came form well known auction site not allowed to be mentioned here. $70 a pair.
 

Attachments

84 Blue Beast

New member
7
0
0
Location
Kentucky
I got the same spacers but once I installed them on the front hub, I'm just curiuos how far did the nuts actually thread within the counter sunk hole on spacer? I guess what I'm saying, is it would appear that the original stud was just not long enough for the nut to thread completely on that stud. I was just curious if you had the same problem? I might have to take a picture. Thanks for your help.
 

goldneagle

Well-known member
4,434
868
113
Location
Slidell, LA
I had my mechanic install them after he did the lift kit so I never saw how much thread there was to grab. I think he would have told me if they were too short to use properly.
 

84 Blue Beast

New member
7
0
0
Location
Kentucky
Found out that there is special lug nuts that have a neck that fits into the spacer. This should allow for at least 5 full rotations of that lug nut to hold that spacer in place, according to my mechanic and wheel manufacture. I'll post in the next few days after I install them.
 
Top
AdBlock Detected

We get it, advertisements are annoying!

Sure, ad-blocking software does a great job at blocking ads, but it also blocks useful features of our website like our supporting vendors. Their ads help keep Steel Soldiers going. Please consider disabling your ad blockers for the site. Thanks!

I've Disabled AdBlock
No Thanks