• Steel Soldiers now has a few new forums, read more about it at: New Munitions Forums!

  • Microsoft MSN, Live, Hotmail, Outlook email users may not be receiving emails. We are working to resolve this issue. Please add support@steelsoldiers.com to your trusted contacts.


goldneagle's M923 recovery and modification thread

Danger Ranger

New member
2,253
23
0
Location
Roland, IA
Tonight I ordered a 3 foot long 5/8" grade 8 all-thread and 5 nuts for the 3rd bolt in back of the shackle base. The long bolt will go from the back hole in the top shackle base all the way down to the bottom shackle base. The existing bolt is 12" long and will not fit once I add the bottom shackle base. The all-thread will make 2 long bolts for my project -since 12" are the longest bolts available and are too short. I also need 4 longer bolts for the bottom shackle bases -since the existing bottom bumper bolts are too short. I have those in stock.
This has me a bit confused...Im not following, but thats probably me. Do you have any pics to explain this? Everything looks good. I am also caught on your top secret lock plan. Do the pins on these shackles extend through, or only go flush? If they extend through, then just drill a hole through it and put a masterlock on.
 

commandojeff

New member
241
1
0
Location
St. Louis, Missouri
This has me a bit confused...Im not following, but thats probably me. Do you have any pics to explain this? Everything looks good. I am also caught on your top secret lock plan. Do the pins on these shackles extend through, or only go flush? If they extend through, then just drill a hole through it and put a masterlock on.
What he is saying is that there are three bolts that hold on each shackle base. There is a long bolt in the back of the base that extends to the bottom of the bumper. Instead of a bolt, he is going to use a threaded rod with two nuts. One nut on the top and one on the bottom. This is exactly what I did as well. He will be cutting that 3 foot section to make two 1.5 foot sections.

Hope this helps at all. I'm not near my truck or I would take some pictures.
 

goldneagle

Well-known member
4,433
867
113
Location
Slidell, LA
This has me a bit confused...Im not following, but thats probably me. Do you have any pics to explain this? Everything looks good. I am also caught on your top secret lock plan. Do the pins on these shackles extend through, or only go flush? If they extend through, then just drill a hole through it and put a masterlock on.
OK on the 5 ton truck the 3rd bolt that holds the shackle vase in place goes all the way through the bottom frame as well and gets terminated with a nut. There is a steel tubing that acts as a spacer inside the frame to keep the bolt from crushing that section if you tighten it too much.

The 1" pin only comes out 3/8" past the shackle -so the lock would have to be real long and skinny. Skinny lock=weak lock...
 

goldneagle

Well-known member
4,433
867
113
Location
Slidell, LA
Once again - Looks great - you can work on my stuff anytime!
Is that an old 12v battery booster I see on cab floor?
Yeah - post pix of belt tensioner. I use a wood wedge to get correct tension, tighten 4 base bolts, remove wedge and use it to block wheel. Have to do it every 10-12 years or so:-D
Here are the pictures of the motor tensioner...
 

Attachments

goldneagle

Well-known member
4,433
867
113
Location
Slidell, LA
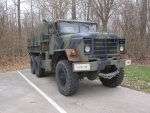
Here are the parts I picked up at Jeff's place Thursday:

New_Tow_Chain_1.jpgParts_Picked_up_1.jpg

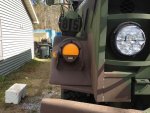
As i was setting up to install the shackle bases on the bottom of the bumper I got the package with the LED turn signals I ordered. I bought them for less than $30 each. They do not include the housings. Had to take the metal cover off from the back of the fender to expose the wires and connectors. Unhooked the electrical connections and removed the 2 large bolts that held the housing in place. Unscrewed the lens and removed the guts. Installed the new LED assembly on to the housing and fed the wires through the fender hole. You will need to remove the grommet temporarily in order to feed the wire connecters through. I installed the ground wire on to one of the 2 large bolts and secured the fixture back. I plugged all the wires back to the harness and closed the back cover.

I did the same thing on the other side and then tested the lights. I was concerned that the turn signals would not work with all LEDs in the system. Surprise! They all worked great! WOO HOOO! :tank:

Here are pictures of the new Turn Signals: (will paint them CARC Brown when I get a chance)

New_LED_Turnsignals_1.jpgShackles_1a.jpg

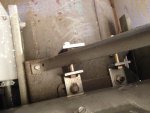
Once I got the LED Turn Signals done I started to take off the long bolt that held the top shackle in place. It was in very tight! I had to use the 3/4" ratchet drive to loosen it up. What a pain! The other two 5/8" bolts were also in tight. My aching back! There was also a 1/2" bolt to remove. I ended up using new bolts for the bottom shackle and temporary back bolt for the top shackle. I will install the all-thread when it arrives.

I started on the 2nd shackle mount. The long back bolt and front bolts would not budge! Since my back was already aching from the first set, I decided to use the angle grinder to cut the bolts off. I was planning to use new ones anyway! It was a lot easier to cut the bolts off than unbolt them. I hate the fine thread bolts! They take forever to undo and wear me out in the process.

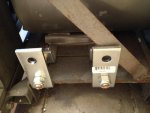
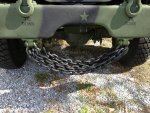
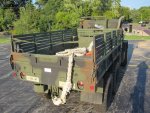
I installed the 2nd shackle on the bottom of the bumper and tightened the new bolts. I completed fabricating the locking system on the 2nd shackle and installed it. Looks good to me.. I also finished priming the tow chain and started to paint it flat black. I will install it tomorrow if all goes well. Pictures of the progress:

Shackles_1.jpg
 

goldneagle

Well-known member
4,433
867
113
Location
Slidell, LA
This morning I grabbed the tow chain from where I had left it to dry. Put the chain in a plastic bucket and used the hand-truck to carry it to the front of the M923. I laid a 4' by 4' piece of plywood over the stones in the driveway in front of the truck. I removed the driver side shackle and inserted the large ring from the chain into the shackle. Rehung the shackle. Took down the other shackle and inserted the chain through it. Rehung the shackle. Took down the left shackle and ran the chain through it again. Rehung the shackle. Back to the right side shackle and through it. Back to the left side shackle. A bit crowded but managed to squeeze it through and rehung the shackle with a little effort (heavy by this time). Chain went almost all the way to the right shackle before i hooked it on the link in the chain. Adjusted the chain a bit. Sprayed some more flat paint over it for touch-up. Project done!

Next I decided to tape off the turn signal lights so I could paint them the proper color for that location. Taped over the lenses carefully and put a rectangular tape over the blackout portion. Sprayed it with CARC brown paint. Can out perfect!

I also sanded the over-spray of the Vin as tag stenciled on the side of the hood. D a m n stencil bled during painting. Ended up touching up with paintbrush. Will respray the vin when i get a chance.
 

Attachments

commandojeff

New member
241
1
0
Location
St. Louis, Missouri
Looking good! I would put some safety wire on that chain if I were you. Not that I'm worried about mine coming unhooked. But if it ever did, the last thing I want to do is run over a part of the chain. It would not be a fun time that's for sure.
 

73m819

Rock = older than dirt , GA. MAFIA , Dirty
Steel Soldiers Supporter
In Memorial
12,196
314
0
Location
gainesville, ga.
in post 149, the first picture showing the chain captuued in the two lower shackles like it is, seems would make it VERY HARD it get to the chain if needed when the truck is stuck NOSE down. a MAJOR hassle. This is why chain is WRAPPED around the bumper, can be gotten off in almost ALL needed situations

Also with the chain hanging so LOW, It WILL collect every stick and get hungup on things when off roading.
 

commandojeff

New member
241
1
0
Location
St. Louis, Missouri
in post 149, the first picture showing the chain captuued in the two lower shackles like it is, seems would make it VERY HARD it get to the chain if needed when the truck is stuck NOSE down. a MAJOR hassle. This is why chain is WRAPPED around the bumper, can be gotten off in almost ALL needed situations

Also with the chain hanging so LOW, It WILL collect every stick and get hungup on things when off roading.
If you're stuck that bad, I wouldn't be trusting a chain anyway. Chains are way too dangerous when they break. I put mine there because I was tired of messing around with it when trying to get my hood open. Seems like the chain was always in the way when I was trying to latch the hood open. I don't do much off roading. But when I do, I plan on moving my chain.

I'd rather use my rope anyway. Much safer and probably easier than a chain. :-D
 

Attachments

goldneagle

Well-known member
4,433
867
113
Location
Slidell, LA
in post 149, the first picture showing the chain captuued in the two lower shackles like it is, seems would make it VERY HARD it get to the chain if needed when the truck is stuck NOSE down. a MAJOR hassle. This is why chain is WRAPPED around the bumper, can be gotten off in almost ALL needed situations

Also with the chain hanging so LOW, It WILL collect every stick and get hungup on things when off roading.
Actually the chain is not as low as it looks. It was taken down angle in picture #1 of that post. If you look at picture #2 it is still high. It makes a great bumper step! At least I know it will not buckle under my weight if I step on it! I am not planning to take this truck on any trails such as are at the GA rally. This truck will mainly see highway use.

The chain is more there for looks than recovery. Although I could use it to recover other vehicles. Wife likes it. She said it looks like a SMILE :-D maybe I can paint a few links white for teeth..(kidding) :tank:
 

goldneagle

Well-known member
4,433
867
113
Location
Slidell, LA
If you're stuck that bad, I wouldn't be trusting a chain anyway. Chains are way too dangerous when they break. I put mine there because I was tired of messing around with it when trying to get my hood open. Seems like the chain was always in the way when I was trying to latch the hood open. I don't do much off roading. But when I do, I plan on moving my chain.

I'd rather use my rope anyway. Much safer and probably easier than a chain. :-D
Now that's a rope! (Rope envy) :drool:
 

commandojeff

New member
241
1
0
Location
St. Louis, Missouri
Now that's a rope! (Rope envy) :drool:
It's a heavy rope! That sucker is a back breaker.

It's funny you say the smile thing with the chain. I got the same remarks with mine. "It's smiling!" hahaha. And you are correct. I use mine as a step constantly. Nice work. Those shackle nuts are tough! lots of heavy work even doing the things that seem like they will be simple before starting the project.
 

goldneagle

Well-known member
4,433
867
113
Location
Slidell, LA
It's a heavy rope! That sucker is a back breaker.

It's funny you say the smile thing with the chain. I got the same remarks with mine. "It's smiling!" hahaha. And you are correct. I use mine as a step constantly. Nice work. Those shackle nuts are tough! lots of heavy work even doing the things that seem like they will be simple before starting the project.
My back was killing me from the first 3 bolts! Only one of them was new and came out with normal effort. The ones on the driver's side would not even brake open with a 3/4" ratchet. Had to cut them off with the angle grinder.
 

commandojeff

New member
241
1
0
Location
St. Louis, Missouri
Mine were pretty tight too. But nothing a 3 foot breaker wouldn't handle. I was lucky because I was reading about them being super tight. Wish I would have had my 1 inch impact when I did it. I would have had em off in 5 minutes.
 

goldneagle

Well-known member
4,433
867
113
Location
Slidell, LA
Mine were pretty tight too. But nothing a 3 foot breaker wouldn't handle. I was lucky because I was reading about them being super tight. Wish I would have had my 1 inch impact when I did it. I would have had em off in 5 minutes.
I have a 1" impact drive but no sockets that fit the nuts 15/16".
 
Top
AdBlock Detected

We get it, advertisements are annoying!

Sure, ad-blocking software does a great job at blocking ads, but it also blocks useful features of our website like our supporting vendors. Their ads help keep Steel Soldiers going. Please consider disabling your ad blockers for the site. Thanks!

I've Disabled AdBlock
No Thanks