• Steel Soldiers now has a few new forums, read more about it at: New Munitions Forums!

  • Microsoft MSN, Live, Hotmail, Outlook email users may not be receiving emails. We are working to resolve this issue. Please add support@steelsoldiers.com to your trusted contacts.


HanksDeuce: 8" Lift, Bobbed, External Cage, A/C and more Project!

HanksDeuce

Well-known member
1,080
238
63
Location
Prairieville, LA
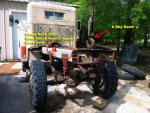
Although it was 30% chance of rain all day I headed out to the home of Timntrucks. Tim finished welding up the rear lift blocks, plates, and cross tubes for me. We test fit the M105A2 bed one last time. I marked the patient for surgery. With help from the wonderful XM381.com website I measured the frame cuts 4-5 times and let Tim cut twice.

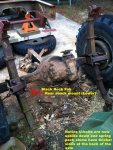
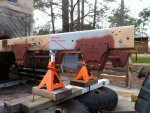
After all metal work was completed I primed the lift blocks, cross tubes and plates, and the end of the frame that was cut. We removed the rear most bump stops. I need to remove the other bump stops above the jack stands.

Next up is to mark and drill holes to install the rear bumperettes, pintle, and civilian receiver hitch. The deuce front springs should be here soon so we can complete the rear and jump on the front end! I went ahead and sprayed PB Blaster on the pitman arm shaft splines after backing the nut off. I'll try a gear puller next time. Stay tuned for more installments...

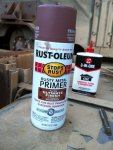
#1 The miracle materials
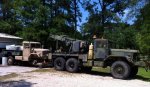
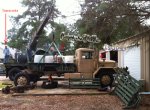
#2 What are friends for?
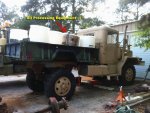
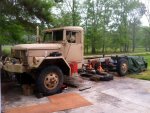
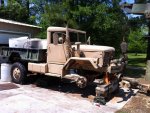
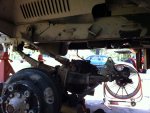
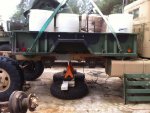
#3 One last trial fit before marking the patient for surgery.
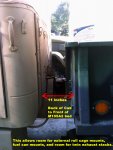
#4 Marking the M105A2 bed one last time before dissection.
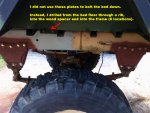
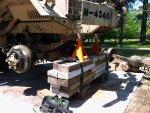
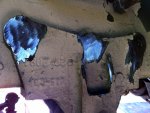
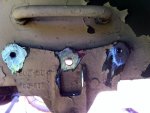
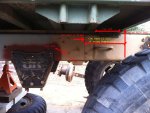
#5 Rear portion of lift kit completed. Frame cut & primed.
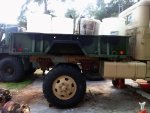
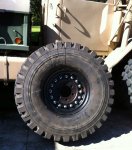
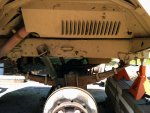
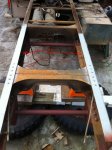
#6 Factory bump stops need to be cut. Holes for bumperettes & pintle to come!
 

Attachments

HanksDeuce

Well-known member
1,080
238
63
Location
Prairieville, LA
Blackrock supplied the rest of the parts needed to finish the rear axle install. I also had Blackrock make me some custom rear shock mounts. I will be working all weekend, so stay tuned for more pictures!
 

HanksDeuce

Well-known member
1,080
238
63
Location
Prairieville, LA
This weekend was spent finishing the rear axle install, mounting the M105A2 bed, and turning the deuce around to work on installing the Black Rock Fab lift kit on the front axle.

I will be bolting the M105A2 bed down through the bed floor, into a rib, through the wood spacer and into the top of the frame rail using a 1/2" grade 8 bolt in 6 locations.

Calculating shear strength:
Grade 8 bolts tensile strength = 150,000 psi
Tensile stress area of 1/2" bolt = 0.1419 sq. in.
Shear strength is typically 60% of tensile strength.

150,000 lb
------------- x 0.1419 sq. in. x 0.60 = 12,771 lb x 6 bolts = 76,626 lb
sq. in.

I feel comfortable that those 6 bolts will hold the bed in place instead of drilling angled holes to use the M105A2 bottom brackets. It didn't give me a warm & fuzzy feeling to drill that close to the corner of the frame rail for those bottom mounts.

Next up is the front axle removal and installation of the front lift blocks of the Black Rock Fab kit. The last parts to be shipped are for steering (longer Pitman arm and steering arm).

QUESTION: Anybody got an easy way of removing the existing Pitman arm? I don't want to heat it up for fear of cooking the steering box seal(s). I might try a gear puller, or Paul Bunyan and a few wedges. :)
 

Attachments

Recy Mech

Member
42
0
6
Location
Western Australia
07.jpg

G'day HanksDeuce, just a query regarding the space measurement. I'm sorta leaning towards doing the 'bob' job and this distance I was wondering would it be about the same if I wanted to mount the spare wheel there? I ask this as I still don't a 'toy' to play with :cry:

I'm thinking I wouldn't mind having this gap so I can mount the spare on one side and the other side for Jerry cans.

Just asking.
 
Last edited:
Hey Hank, I hate to come along punchin holes in your project, but I'd be remiss if I didn't point out that by bolting down your M105 bed to the frame of the truck, you're going to restrict the frame from articulating and could end up with traction problems in a rough situation. When the stock deuce bed was mounted, they bolted the rear of the bed down solid and used the long mounting bolts and springs in the front of the bed to allow the frame to flex and keep the weight of the truck distributed evenly among all the wheels on the ground. If you watch some of the video clips on youtube of some bobbers climbing, you'll be able to tell the ones that have the bed mounted solid to the frame as those are the ones that start to climb and then the left front and right rear wheels start spinning while the right front and left rear just jump and bounce under the diffs limited slip. Once again I don't wanna sit here and tell you how to build your truck, but unless you plan on staying on pavement at all times, you might wanna rethink bolting the bed down solid. Being a welder/fabricator myself, if you go off road enough and flex the frame around, you may start to notice the bed start breaking welds or some of the sheet metal start to tear in the high-stress points and that's no fun to deal with either. Everyone I've talked to or read posts from who've "been there, done that" all say bolt the rear down tight and use the original size long bolts and the springs in the front to allow that frame to flex when it's supposed to. To me it seems like an ounce of prevention vs. a pound of cure. Just my 2cents
 

Brain's 97 Diesel

New member
4
0
1
Location
Willow Grove, PA
Pitman arm removal tips: Keeping box & pitman arm use the proper puller and soak it for several days prior to. I've also tried some heat or vinegar (to remove rust) w/ some sucess. Keeping box but not arm heat it up & hit it w/ puller, or cut it w/ cutoff wheel if all else fails.
 

HanksDeuce

Well-known member
1,080
238
63
Location
Prairieville, LA
Recy Mech: I don't know what the proper clearance should be for the spare tire/rack assembly. I would think it would need to be more than 11".

Red beard: I appreciate your concern about the frame flexibility. But, between the frame stiffening by the cross bracing for the Black Rock Fab frame extensions and the upcoming external roll cage the frame twist will be almost non-existent. I will have the roll cage extend into the front of the bed to add rear triangulation. Therefore, no spring bolts are necessary. The deuce is mainly an urban assault vehicle anyways. I don't see myself acting a fool at a rally and needing to articulate into a 6 ft mud hole. :)
 

HanksDeuce

Well-known member
1,080
238
63
Location
Prairieville, LA
I put in a few hours of hard work yesterday by assembling 2 of the wheels & 53" tires. Thanks to PaTracy for creating this thread on how he put his together.

Everything was going perfectly fine until I dropped a deuce rim on my big toe. :sad: When I got home I got a safety pin red hot by the flame of a lighter and poked a hole in the middle of the toe nail. Immediate relief from the pain of the pressure that had built up under the nail.

When I work on the deuce again I will post up more pictures! 2 more wheels/tires to assemble and then on to the front suspension lift blocks. Last 2 things to do are the steering modifications and drive shaft extensions.
Don't forget a pic or two of that toe! that should be interesting! J/K, good argument for steel-toed boots though! lol can't wait to see how it's coming along.
:driver:
 

HanksDeuce

Well-known member
1,080
238
63
Location
Prairieville, LA
Well, Redbeard wanted to see it. This is before I popped a hole in the toenail. I will likely wear steel toes from now on while working on the deuce. I wear them all day at work. *shakes head*
 

Attachments

littlebob

New member
1,548
26
0
Location
Baton Rouge LA
This weekend was spent finishing the rear axle install, mounting the M105A2 bed, and turning the deuce around to work on installing the Black Rock Fab lift kit on the front axle.

I will be bolting the M105A2 bed down through the bed floor, into a rib, through the wood spacer and into the top of the frame rail using a 1/2" grade 8 bolt in 6 locations.

Calculating shear strength:
Grade 8 bolts tensile strength = 150,000 psi
Tensile stress area of 1/2" bolt = 0.1419 sq. in.
Shear strength is typically 60% of tensile strength.

150,000 lb
------------- x 0.1419 sq. in. x 0.60 = 12,771 lb x 6 bolts = 76,626 lb
sq. in.

I feel comfortable that those 6 bolts will hold the bed in place instead of drilling angled holes to use the M105A2 bottom brackets. It didn't give me a warm & fuzzy feeling to drill that close to the corner of the frame rail for those bottom mounts.

Next up is the front axle removal and installation of the front lift blocks of the Black Rock Fab kit. The last parts to be shipped are for steering (longer Pitman arm and steering arm).

QUESTION: Anybody got an easy way of removing the existing Pitman arm? I don't want to heat it up for fear of cooking the steering box seal(s). I might try a gear puller, or Paul Bunyan and a few wedges. :)
Looking Good! I tried to get my pitman arm off when I was changing cabs and gave up, after wasting the seal with heat. Let me know when you figure it out, I still need to get mine off to change the seal.
 

HanksDeuce

Well-known member
1,080
238
63
Location
Prairieville, LA
Well, the doctor removed the nail of my big toe. It took a while to get used to it so I put the deuce work on the back burner. I wear my steel toe boots now! Learned my **** lesson there.

Today we got the deuce up in the air to work on the front suspension. I removed the rear spring brackets and cleaned the frame up. I left the front spring brackets attached to the springs as well as the axle. This keeps me from wrestling to move the axle back into place. Our plan is to complete the rear blocks first, attach the springs again, then move on to the front spring brackets.

Pic comments:
1) Put together the HEMTT wheels and Michelin 16R20s a few weeks ago. I will paint the outside later. They are holding 55psi pretty well. No leaky.

2) Raised & braced the front of the deuce to get started on the front lift kit.

3) Many thanks to Timntrucks for the use of his wrecker (aka the "sky hook" for this long duration mission).

4) Close-up of my redneck ingenuity to brace the front of the deuce. It's about as sturdy as my 401K. I constantly check to make sure it's still there! :shock:

5) Factory deuce front suspension about to be modified with the Black Rock Fab 8" lift kit.

6) First order of business is to grind the spring bracket rivets flush.

7) Next I center punch each one (3 on the side, 2 underneath).

8. I use my handy dandy cryo bit to drill a hole part way through the rivet to give it some relief to crush inwards. Middle rivet was removed.

9) I then use a BFH and punch to knock the rivets out. I removed both front shocks and disconnected the draglink at the steering arm end. Next I rotated the axle down with 2 floor jacks.

Wish the back was this easy!
 

Attachments

HanksDeuce

Well-known member
1,080
238
63
Location
Prairieville, LA
The zinc plated nuts for the HEMTT wheels came from Stazworks with the wheels. I said I was going to paint the rims again once I mounted them on the deuce.
 
Top
AdBlock Detected

We get it, advertisements are annoying!

Sure, ad-blocking software does a great job at blocking ads, but it also blocks useful features of our website like our supporting vendors. Their ads help keep Steel Soldiers going. Please consider disabling your ad blockers for the site. Thanks!

I've Disabled AdBlock
No Thanks