Yes going to do freeze plugs ss, repaint few things, clean all threads, re surface head I've read a lot but i want to get everything figured out before hand its January in maine and I'm doing this job in tarp tent outside minimal heat. I'm to busy in summer for this job so it now or never.
-
Steel Soldiers now has a few new forums, read more about it at: New Munitions Forums!
Head gasket repair walk through - go to post #31!
- Thread starter cattlerepairman
- Start date

More options
Who Replied?- 333
- 262
- 63
- Location
- Denver, Colorado
I added a few things to post 40 since you read it. Also, there may be a misprint in the TM you're using; Fuel injector hold-down yokes should be torqued to 150 INCH lbs., not foot lbs.
tommys2patrick
Well-known member
- 731
- 374
- 63
- Location
- Livermore, Colorado
I am nearing completion of my head job. for some reason that just reminded me of a job I had in a poster/incense store in 1966. these are things that may not have been mentioned in some of the posts or I found confusing---I apologize in advance If I am preachy or otherwise obnoxious/ boring, you pick. Also, everyone has there own way of doing things, some to the exclusion of the way others want to do something. while i may be in the later group, in my defense its not my fault. please see explanation in last sentence.
1. look at your engine tag and determine which engine manual you should pull out of the tm library here. not all the same. the gasket kits, from reputable suppliers, should be generic enough to do any model. however with the correct tm it will then be easy to cross reference which gasket goes on which engine and in what order because that is important. the kits have 100% of the gaskets for the engine and most any component on it. each gasket has a number stamped into it if it is large enough. if its round or beansie, compare old to new till you find it in the set. think of this like the biggest heaviest set of puzzle pieces you ever got from your uncle that liked you the best but your mom was always afraid he was going to kill you.
2. the block has six large freeze plugs not five, not four. you can get to the rear one by removing the transmission tunnel cover in the cab. sadly you must remove the data tag on the engine block to get to the one underneath it. however careful work can get it off with minimal damage. if they are dorman freeze plugs it will have a part number stamped on it. dorman has been around forever and supplies forty seven trillion of them annually ( estimate). these are not in the gasket kit.
3. have the head surfaced, a good shop will magnaflux it and clean it properly, check the valves etc. carefully remove the valve train on both heads first. much easier to get the heads off without this in the way, you will need to adjust the valves no matter what you do so just accept that as good. I carefully removed any studs( nuts and washers) on the head as well, saved them. i believe at least two are for the valve cover gasket the rest are cap screws with the exception of the exhaust and intake studs.
4. the freeze plugs on the intake manifold will need replacing. off all the engine freeze plugs these collect water and crud on the exterior and rust out accordingly. plus you have dissimilar metals working against them. not like the others that rust out from the inside of the engine. check the two drain/close off valves for the cab heater. they can corrode inside under the rubber hose. any drain valve on the engine should be checked for that matter. crud builds up behind them as they don't get used everyday. then when you want to use them they are plugged or worse.
5. the head studs--this speaks to the age of the engine design, american engineering standards and some changes in american manufacturing standards/practices. America sets the high mark for what can be done and continues to be done. that being said, the head studs will be extremely difficult to replace for the average person. the type of threads in the studs are no longer being made in any significant quantity. they were obsoleted before world war II as I recall. I can't imagine why the military and various tractor companies continued to use this type of stud up into the mid 1980's. while you might be able to find some considering how popular antique tractors are becoming or you might even have the skill set and tooling to make some for yourself but it would be easier to just reuse the existing ones. nothing wrong with the studs or the design. they are perfectly designed and executed. for some reason this one stud out of all the studs sizes, thread types and tpi was changed as a standard to a different one. the new design is not interchangeable with the old. the old being the stud holes in the block. while on paper you can re-tap the block for new head studs it will be very easy to turn the project into a nightmare of epic proportions. If possible you might remove the head studs and and reseal the threads as a large number are drilled into oil and water passages inside the block. I have found a large number of studs coated with oil sludge from the passage below it.
6. other studs on the heads themselves--exhaust, intake, valve cover etc--I would remove them carefully and reseal the threads. like the head studs several penetrate the block far enough to encounter oil and water passages. when installing new or old such studs check the depth or height from the mating surface before removing as it can be quite important to reattaching the component that was removed. unlike a bolt if you bottom out a stud putting it in you likely have gone much too deep. I recommend new exhaust studs at the least as they go through some extreme thermo cycling. if you opt to reuse any studs, when cleaning, closely inspect them. there is a micro groove at the tip of the threads of the stud that aids in allowing a passage of air, water, oil, sealant etc that might be in the stud hole as it is inserted. relieves internal pressure which can be significant enough to alter the torque you want to attain. thorough clean is in order if reusing. the stud hole as well.
7. gaskets-gasket shellac is assumed to be used in how this engine was designed. while the new head gaskets do not use it and can be a detriment to there function all others still require it. these are paper gaskets(not o-rings or crush washers) for the most part, some with a rubber like component and you are essentially gluing everything together. surface prep is key, do not use gas or solvents, any cleaner that leaves the surface oil, gas, cleaning agent and water free will work.
I generally try to live by the words "don't fix what ain't broken". but you will be doing some major removal work and your engine will likely be absolutely covered in oil, rat droppings, crud, wasp nests etc. like most engines of the day the exterior of the block was called wet for a reason. oddly enough I believe the inside is called dry. it leaked all kinds of fluids. kind of like an old harley was said to mark its territory. so feel free to take on replacing the gaskets for any and all components in a vain attempt to seal the block permanently. that's my plan, however futile, because my dad would want it that way. even though he has long passed its too late for me to change now.
- 3,317
- 3,530
- 113
- Location
- NORTH (Canada)
Here is a post on the ARP head studs and part numbers if you wish to upgrade:
Head stud issues
While I was swapping out my heads I decided to upgrade my head studs to the ARP studs. I ordered the studs mentioned in the post below. I don't know how to cut and past here so I just wrote it down and re post here. Its all Rustystud 's info. Part numbers for head bolts and studs for...
www.steelsoldiers.com
- 3,317
- 3,530
- 113
- Location
- NORTH (Canada)
I did that and had a clean block for about three days. The new headgastkets on new heads and a straight deck ooze. The valve cover gaskets are mostly, but not totally, oil tight (even with re-seating and vaseline). I have a block with a few streaks, but at least not a dripping wet block![...] like most engines of the day the exterior of the block was called wet for a reason. oddly enough I believe the inside is called dry. it leaked all kinds of fluids. kind of like an old harley was said to mark its territory. so feel free to take on replacing the gaskets for any and all components in a vain attempt to seal the block permanently. that's my plan, however futile, because my dad would want it that way. even though he has long passed its too late for me to change now.
tommys2patrick
Well-known member
- 731
- 374
- 63
- Location
- Livermore, Colorado
I tried those numbers at the ARP website as well as numerous searches. no luck. I have called and sent emails to ARP as well still no luck. Has anyone got some direct experience with ARP head studs for the multifuel that they would be able to share? such as TPI, nut size, washer, torqueing specs, retorque, cost, fitment, special order instructions etc?? The old post that Rusty stud made with the ARP numbers has apparently changed in its parts number. instead of AQ 6.120-1B as written in the post the current number appears to be AR 6.120-1B. or at least that is the closest I have been able to find. however I have not confirmed the specs on the stud to be confident it will actually be an exact copy of the original head studs. Yes, i know the original has three different head studs and numbers. I sent Rusty a private message but not responded yet. Any help is much appreciated.
tommys2patrick
Well-known member
- 731
- 374
- 63
- Location
- Livermore, Colorado
follow up--searching for head studs by manufacturer and part number is challenging me to say the least. I may need to retract part of my statement. some of the part numbers for head studs are come up active but still no details on TPI so I can be sure they will fit the deck properly. more to follow as details come in. thanks for your understanding and current lack of curse encrusted comments.I tried those numbers at the ARP website as well as numerous searches. no luck. I have called and sent emails to ARP as well still no luck. Has anyone got some direct experience with ARP head studs for the multifuel that they would be able to share? such as TPI, nut size, washer, torqueing specs, retorque, cost, fitment, special order instructions etc?? The old post that Rusty stud made with the ARP numbers has apparently changed in its parts number. instead of AQ 6.120-1B as written in the post the current number appears to be AR 6.120-1B. or at least that is the closest I have been able to find. however I have not confirmed the specs on the stud to be confident it will actually be an exact copy of the original head studs. Yes, i know the original has three different head studs and numbers. I sent Rusty a private message but not responded yet. Any help is much appreciated.
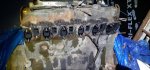
Hello all im no stranger to work so this head gasket change will not be problem, I'm just over calculated in what i do always. im a carpenter up hear in northern maine and ive done more then most to get where i am today at 32yrs. I do finish work and build camps out on islands up on northern lakes of maine, ive switched gears on the head gasket change i have spair engine so i tore that apart this evening, I'm going to prep them parts before Tearing apart engine in truck to make things faster.
Thanks everyone for the help.
I really enjoy being apart of this
Sight.
Thanks everyone for the help.
I really enjoy being apart of this
Sight.
Attachments
-
 143.9 KB Views: 22
 -
 168.4 KB Views: 23
 -
 98.2 KB Views: 22
 -
 220.2 KB Views: 21
Last edited:
tommys2patrick
Well-known member
- 731
- 374
- 63
- Location
- Livermore, Colorado
Was finally able to get a hold of tech at ARP. Got price quotes on individual studs per Rusty Studs part numbers. About $475 for all including washers and nuts. without tax and shipping. Downside is they said it will take 3 to 4 weeks to ship them. pretty much the best price I could find unless you wanted to buy from a variety of on line sellers onesy twosy fashion. I don't believe this is presently a very common head stud design. The base threads for them is 12 TPI (course). I believe a more current engine design calls for 13TPI (course) on base of stud. the 18TPI (fine) is still used on nut end. Kind of a quirk to 9/16" diameter studs. however the original design called for 7/8" 6 point nuts apparently for the extra clamping torque required from the standards back in the day. I think the 12 point nuts might be smaller clamping area but not certain. my two cents.
- 3,317
- 3,530
- 113
- Location
- NORTH (Canada)
Would you mind posting the updated part numbers and prices?
tommys2patrick
Well-known member
- 731
- 374
- 63
- Location
- Livermore, Colorado
my quote was for the black oxide but I think you can get them polished or stainless IIRCWould you mind posting the updated part numbers and prices?
longest stud-AQ 6.500-1LB 9/16" diam 12TPI base 18TPI top black oxide $13.69 ea
medium length stud AQ 6.120-1LB diam 9/16" 12TPI base 18TPI top black oxide $12.76 ea
short stud AQ 3.475-1LB diam 9/16" 12TPI base 18TPI top black oxide $7.30 ea
by the way the LB refers to broaching (sequential cutting basically) as opposed to rolled threads in the manufacturing process. likely due to the micro groove on the base threads, however the description does not mention this feature and I did not ask the tech. I doubt the original design called for sealing threads because of this feature. ergo the wet block philosophy. however on those studs penetrating the internal block passages they only vent internal fluids up the stud onto the exterior. in my mind it may also contribute to some nuts possibly unthreading slightly due to oil and/or water pressure trying to bypass the washer. or even premature gasket failure. when I took the heads off it seemed like some studs came of with considerably less force than others. kind of a hydro planning concept so to speak. so sealing those seems appropriate to me. unless you are really anal about wanting it exactly original including the leaking head studs.
washers-200-8719 9/16 " internal diam 1.0" external diam x 0.120 thick chamfered black oxide $0.96 ea
nuts-300-8305 9/16" 12 point 18TPI collar diam 0.965 head height 0.620 socket size 11/16" $9.36 ea
IIRC shipping wasn't too bad 20 or 30 bucks but you might want insurance considering what these will cost as a package.
as a note, I need to run down to the barn and recount the studs. I think I estimated 8 long, 6 medium and 8 short. I meant to recount them before I actually ordered. Suggest you may want to do the same as I used the above numbers to estimate the total cost just to get in the $$ neighborhood. For some reason I worry I underestimated the number. so check first please, I am.
tommys2patrick
Well-known member
- 731
- 374
- 63
- Location
- Livermore, Colorado
upon further checking the old neighborhood is bigger than I remembered!!!!!
well anywho, here is a more accurate total
14 long studs at $13.69 ea =$191.66
8 med studs at $12.76 ea = $102.08
6 short studs at $7.30 ea = $43.80
28 washers at $0.96 ea = $26.88
28 nuts at $9.36 ea = $262.08
total ( no tax or ship) = $626.50
Looks like I need more beer to fix my memory problems--sorry about that. feel free to check my math and or join me in a beer(s).
tommys2patrick
Well-known member
- 731
- 374
- 63
- Location
- Livermore, Colorado
It occurs to me that these might benefit from a group purchase. I have not explored the possibility with ARP or anyone else. But seeing as how pretty much everyone that owns a deuce long term will likely have to do this at some point whether its because of gasket failure, freeze plug failure( my case) or any of several other issues that may come up, sooooo! The long wait time for these to ship from ARP tells me that they are likely only doing runs as needed and not keeping much in inventory. fixtures and tooling up are usually a big cost for a manufacturer to do onesy twosey runs. especially if the big money is in race motor work. they might consider dropping the price if they could ramp up production quantities more. some of our usual vendors might want to get into this if we get the cost down enough. perhaps at the least they might be willing to make a deuce kit for us. so us individals ain't got to look all this up every time we need them. bud 30 and out.
- 114,343members
- 167,222threads
- 2,354,145posts
- 3,062online users