• Steel Soldiers now has a few new forums, read more about it at: New Munitions Forums!

  • Microsoft MSN, Live, Hotmail, Outlook email users may not be receiving emails. We are working to resolve this issue. Please add support@steelsoldiers.com to your trusted contacts.

Heater core replacement

Keith_J

Well-known member
3,657
1,325
113
Location
Schertz TX
Thanks Skinny! If I could source the core...I know I could do it myself. Yes, I am the king of 1/4" drive tools. But down here, the arctic heater core isn't necessary. Comfortable, yes.

I did note the multiple choices of heater cores, some are for vehicles with AC, others not. Didn't see any difference in thickness, just connections.
 

Skinny

Well-known member
2,130
491
83
Location
Portsmouth, NH
No problem.

The radiator shop may be able to source individual parts. I would rather spend $100 fixing the OEM one than $20 on a junk aluminum unit which doesn't fit. There is enough room under the dash to install and plumb a mojave unit if desired.
 

natemccabe

New member
108
0
0
Location
Fairbanks, AK
Thanks Skinny! If I could source the core...I know I could do it myself. Yes, I am the king of 1/4" drive tools. But down here, the arctic heater core isn't necessary. Comfortable, yes.

I did note the multiple choices of heater cores, some are for vehicles with AC, others not. Didn't see any difference in thickness, just connections.
If you dont want that arctic heater core i will gladly purchase it from you...
 

twlinks

New member
225
3
0
Location
Hutchinson, KS
My heater seems to work fairly well, blows hard and fairly hot air for the most part. I think the switch may be on the way out because the air will go from hot to cold at random intervals. I haven't gotten the chance to tear into it and see what could be the problem but while I'm down there should I get the core flushed as well? Just for good measure? Also open to any suggestions about the possible switch failure or other causes to my problem.

Thanks in advance,
cpallme
I don't think your switch has anything to do with it blowing hot/cold intermittently. Have you checked your fluid level in the radiator lately? I had the same thing last year on my work truck, found a small hose leak that had drained the radiator down...replaced the hose, filled the radiator back up and shazaaaam, worked like a charm again.
 

ssdvc

Well-known member
971
639
93
Location
CT
OK, I finally got a break and made the permanent repair to my heater core. When I purchased it, it was leaking, but ever so slightly (a whole nother story). This past week it finally gave up the ghost. Thank heavens for this site.

Anyway, I thought I would share a few things that I learned this weekend. First, the Autozone 94553 heater core fits good and does work very well. I did add a bit of weather stripping on each side of the unit, just to make sure it sealed well, but I really didn't have to do it. Again, I thought it was a good fit.

Second, removing the rear battery does make things a whole lot easier and makes getting to those three bolts a bit better.

Third, while your changing the heater core, you may as well go ahead and change all the hoses and hose clamps, including that little 4" POS bypass hose. A few of my hose clamps just came apart while I was removing them. Some advise. Take the old bypass hose and use that to measure for the new one. That is one tough little sucker to get on and off.

Forth, it doesn't take an hour, if your not an expert mechanic (which I am not). If you go at a good pace it will take a little bit more. If you change the hose, even more time. I took about 4-5 hours, but I wasn't in a rush.

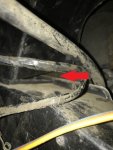
and lastly, after you put the heater/vent box back in, take a look under the dash (take a look under the dash while it is out too). I looked underneath mine and the following picture is what I saw.

View attachment 415157

This is a photo of the defroster ducting (top) and the heater/vent box on the bottom. I always wondered why my defroster sucked, and now I know why. The two pieces were misaligned and there was a decent gap between the two pieces. I took metal duct tape, wrapped it around the two sections and sealed it. I then took a roll of pipe insulation wrap and wrapped that around the same area to protect it and give it a little insulation. Man, what a difference. I now have huge air flow from both of the defroster ducts and the heat/air flow in general seems much better.

Again, while things are apart it pays to have a look around.

Cheers.
 

ssdvc

Well-known member
971
639
93
Location
CT
Sorry. The picture in my last post is upside down and I don't know how to fix it. **** MAC.
 

ARYankee

Well-known member
1,983
33
48
Location
Benton, AR
OK, I finally got a break and made the permanent repair to my heater core. When I purchased it, it was leaking, but ever so slightly (a whole nother story). This past week it finally gave up the ghost. Thank heavens for this site.

Anyway, I thought I would share a few things that I learned this weekend. First, the Autozone 94553 heater core fits good and does work very well. I did add a bit of weather stripping on each side of the unit, just to make sure it sealed well, but I really didn't have to do it. Again, I thought it was a good fit.

Second, removing the rear battery does make things a whole lot easier and makes getting to those three bolts a bit better.

Third, while your changing the heater core, you may as well go ahead and change all the hoses and hose clamps, including that little 4" POS bypass hose. A few of my hose clamps just came apart while I was removing them. Some advise. Take the old bypass hose and use that to measure for the new one. That is one tough little sucker to get on and off.

Forth, it doesn't take an hour, if your not an expert mechanic (which I am not). If you go at a good pace it will take a little bit more. If you change the hose, even more time. I took about 4-5 hours, but I wasn't in a rush.

and lastly, after you put the heater/vent box back in, take a look under the dash (take a look under the dash while it is out too). I looked underneath mine and the following picture is what I saw.

View attachment 415157

This is a photo of the defroster ducting (top) and the heater/vent box on the bottom. I always wondered why my defroster sucked, and now I know why. The two pieces were misaligned and there was a decent gap between the two pieces. I took metal duct tape, wrapped it around the two sections and sealed it. I then took a roll of pipe insulation wrap and wrapped that around the same area to protect it and give it a little insulation. Man, what a difference. I now have huge air flow from both of the defroster ducts and the heat/air flow in general seems much better.

Again, while things are apart it pays to have a look around.

Cheers.
Good job!!! Great tips as well. Now I didn't replace my 4" section which I am sure that I will be regretting at some point in the future. I did replace the other hoses. I also bought and installed weather stripping as well. I saw the same misaligned gap between the duct and defrost. I tried really hard to get it to align but didn't have much success. I plan on getting some aluminum duct tape to wrap around it.
 

ssdvc

Well-known member
971
639
93
Location
CT
Just an FYI, I did use the metal/foil duct tape, but I covered it with a "felt" type pipe wrap (found it being clearanced at Walmart, $1.00 for 25' of it). I didn't want the metal tape "interacting" with any wires or circuits under the dash.
 

pbrstreetgang

Member
114
0
16
Location
Kentucky
Everyone keeps mentioning getting their original rebuilt. Where can you get this done? I asked a few people where I live and they told me not to fool with it. The new replacements are quite simply a waste of money.
 

ssdvc

Well-known member
971
639
93
Location
CT
Everyone keeps mentioning getting their original rebuilt. Where can you get this done? I asked a few people where I live and they told me not to fool with it. The new replacements are quite simply a waste of money.
I'll respectfully disagree. Installed correctly, the aluminum one I used (The Spectra Premium 94553) is just as good and put out just as much heat as the original. Just make sure the air flow is going THROUGH the heater core and not around it and you should be fine. Also, some of the old heater cores may be beyond repair and you do take your chances with the rebuild.
 

cucvrus

Well-known member
11,475
10,451
113
Location
Jonestown Pennsylvania
Never removed the top bolt from the bell housing from the top side. All are accessible from the bottom side in clear view with a 9/16" swivel socket and a long 3/8" extension. Hate to tell you but you are doing it all wrong man. I change engines like some guys change oil. Fact is I pulled a few just to paint under the hood and detail paint the engine and engine compartment. No puncture wounds here. Look up under there. See that? Easy.
 

cucvrus

Well-known member
11,475
10,451
113
Location
Jonestown Pennsylvania
Maybe you could do a stand alone thread of a step by step with Pics pulling the motor out ... I for one would love to clean up the engine bay properly ...
Just a thought
For sure I would do it all wrong. I would get naysayers coming out of the wood work. I do have body removal down to a science now. I think I will do that on everyone I redo going forward. It opens up so many closed doors. Makes everything much easier. And if I did it in early spring. I could just keep rolling and get tons done and back together. I have this new project all tucked in and napping till spring. I will send out the transmission and redo the engine as temperatures and time permits. Hibernation is a fun thing. Happy Holidays. Time for bed. Good Night.
 

MarcusOReallyus

Well-known member
4,524
818
113
Location
Virginia
Never removed the top bolt from the bell housing from the top side. All are accessible from the bottom side in clear view with a 9/16" swivel socket and a long 3/8" extension.

Yeah, it's interesting what you can do with an extension or two.

https://www.harborfreight.com/3-pc-super-long-extension-set-62121.html

https://www.harborfreight.com/3-pc-long-impact-extensionadapter-60409.html

https://www.harborfreight.com/9-pc-wobble-socket-extension-set-61278.html

https://www.harborfreight.com/3-pie...impact-wobble-socket-extension-set-67065.html
 

Chevybrit

New member
177
2
0
Location
Northern Pasquotank NC
FOLLOW UP to post #45 from SSDVC with the dead picture link .. Mine was exactly as described but its nice to see a picture

heater duct.jpg

It almost looks as though there should have been some kind of rubber boot to make them fit .. there is no way that ever was connected properly, the angle is all wrong .. I'll do as he did getting some tape in behind it and around and maybe a bit of insulating.
 
Last edited:

UNIMOG-GUY

Active member
251
25
28
Location
Blacksburg, VA/Denver, CO
My heat isn’t working either. I’m going to check the coolant level, blend door and then replace the heater core.

Has anyone tried this part?
https://www.autozone.com/cooling-he...e=Chevrolet&model=K30 1 ton P/U 4WD&year=1986

It appears to be brass and copper and weighs 3lbs vs the Spectra Aluminum weighing 1.75 lbs. It looks to be the closest to an OEM as I could find after looking at Advance Auto, NAPA, O’Reily’s, PepBoys and AutoZone.
 
Last edited:
Top
AdBlock Detected

We get it, advertisements are annoying!

Sure, ad-blocking software does a great job at blocking ads, but it also blocks useful features of our website like our supporting vendors. Their ads help keep Steel Soldiers going. Please consider disabling your ad blockers for the site. Thanks!

I've Disabled AdBlock
No Thanks