• Steel Soldiers now has a few new forums, read more about it at: New Munitions Forums!

  • Microsoft MSN, Live, Hotmail, Outlook email users may not be receiving emails. We are working to resolve this issue. Please add support@steelsoldiers.com to your trusted contacts.

HMMWV Start Box Glow Plug ByPass Fix

jhighsmith

Member
27
35
18
Location
tampa, florida
Greetings Brothers and Sisters
I have owned many Humvees and noticed a re occurring problem, either the glow plugs fail to come on at all, OR worst case scenario, they stay on all of the time and burn up.
I have went thru this repeatedly and came up with a fix that I am happy with.
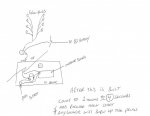
I took my latest variant smart start box ( which happened to be bad ) and opened it up, and then, using a multi meter on continuity, I isolated the glow plug output, which is a #8 green wire - this wire comes from the computer board, thru the cannon plug at the upper fire wall, on the other side of the cannon plug, male side, this wire separates into 8 circuits ; going to each glow plug.
Cut the green wire at the circuit board and place a yellow heavy gauge eyelet 3/8ths on the green wire.
Using another dead start box, remove the 24 volt solenoid that controls the engine on and off, it is the only one in there.
This donor solenoid can be bolted to the corner cover of the box I was putting back in the truck.
Place the green wire on the 3/8th lug, of the donor solenoid
Run another yellow eyelet wire to the main power input at the computer board - now you have an input 24 volt and an output to the glow plug set.
Using a low voltage marine grade horn button, mount this next to the test port or the inboard side facing you as mounted in the truck
1 side of the horn button will go to the main 24 volt input line, the output from this button will go to the trigger side of the donor solenoid
Test fit your pieces so that everything fits in the box when it is bolted back together before mounting the solenoid and horn button.
I added a 24 volt LED light in the humvee style next to the horn button, the positive lead goes to the glow plug lug on the solenoid output, the negative goes under the mounting bolt of the solenoid. - Remember LEDs are polarity sensitive
Now when you want to activate your glow plugs ;
1) Turn on your ignition switch
2) Depress glow plug button for (4) seconds ; counting 1 thousand 1, 1 thousand 2 etc.
3) Rotate ignition switch to engage starter
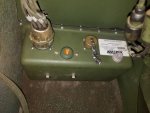
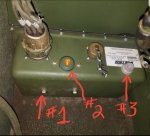
*Note the Picture : #1 is the solenoid mounting bolts
#2 is the warning light that the glow plugs are activated
#3 is the power button - I used a sealed marine grade horn button. Voltage / Amps does not matter, as it is only engaged for (4) seconds.

If anyone is interested in this any further, please PM me, and I can take my box apart and post photos of the exploded view. - I did not do this as I built it, as it was a quick fix to run the truck, however, I mentioned it to some friends and they liked the idea so I thought I would share.

Joe
 

Attachments

Last edited:

California Humvee

New member
11
0
1
Location
Beaumont california
Greetings Brothers and Sisters
I have owned many Humvees and noticed a re occurring problem, either the glow plugs fail to come on at all, OR worst case scenario, they stay on all of the time and burn up.
I have went thru this repeatedly and came up with a fix that I am happy with.
I took my latest variant smart start box ( which happened to be bad ) and opened it up, and then, using a multi meter on continuity, I isolated the glow plug output, which is a #8 green wire - this wire comes from the computer board, thru the cannon plug at the upper fire wall, on the other side of the cannon plug, male side, this wire separates into 8 circuits ; going to each glow plug.
Cut the green wire at the circuit board and place a yellow heavy gauge eyelet 3/8ths on the green wire.
Using another dead start box, remove the 24 volt solenoid that controls the engine on and off, it is the only one in there.
This donor solenoid can be bolted to the corner cover of the box I was putting back in the truck.
Place the green wire on the 3/8th lug, of the donor solenoid
Run another yellow eyelet wire to the main power input at the computer board - now you have an input 24 volt and an output to the glow plug set.
Using a low voltage marine grade horn button, mount this next to the test port or the inboard side facing you as mounted in the truck
1 side of the horn button will go to the main 24 volt input line, the output from this button will go to the trigger side of the donor solenoid
Test fit your pieces so that everything fits in the box when it is bolted back together before mounting the solenoid and horn button.
I added a 24 volt LED light in the humvee style next to the horn button, the positive lead goes to the glow plug lug on the solenoid output, the negative goes under the mounting bolt of the solenoid. - Remember LEDs are polarity sensitive
Now when you want to activate your glow plugs ;
1) Turn on your ignition switch
2) Depress glow plug button for (4) seconds ; counting 1 thousand 1, 1 thousand 2 etc.
3) Rotate ignition switch to engage starter
*Note the Picture : #1 is the solenoid mounting bolts
#2 is the warning light that the glow plugs are activated
#3 is the power button - I used a sealed marine grade horn button. Voltage / Amps does not matter, as it is only engaged for (4) seconds.

If anyone is interested in this any further, please PM me, and I can take my box apart and post photos of the exploded view. - I did not do this as I built it, as it was a quick fix to run the truck, however, I mentioned it to some friends and they liked the idea so I thought I would share.

Joe
hey brother would you be willing to set up my glow plug box like yours, Im not a mechanic but I know if i see it a can always copy what you did to it, and help out my other brothers here in cali, I m not the only one having the same problem here, let me kmow thanks
 

jhighsmith

Member
27
35
18
Location
tampa, florida
Ship me your starter box( make sure it's a good box other than a glow plug issue). You'd have to pay me for my time and parts, if you have another box and can pull the solenoid out and send it with the box this would save you some cash. When I get done I can get you a return shipping quote plus repairs and PayPal me and I'll get it returned to you in a few days. Sound pretty fair?
7411 19th ave E. Apt A
Tampa Fl 33619

This is one of my rental places and mail is safe to deliver here as the tenant is always home.
Let me know,
813-833-3536
Joe
 

Hum to the Vee

New member
11
18
3
Location
Cedar Rapids, Iowa USA
The attempt to locate my old box in my disaster of a garage was not successful. Figured it was best to just order a new one as I am not sure if the old one had issues or not. It wasn't original to the truck but I'm guessing it wasn't changed out recently by the amount of dust that was on it. You should have the new one shortly.
 

DocBreckon

New member
18
10
3
Location
Vegaa
HI. Correct me if I am wrong, but it sounds like you are sending 24 Volts to the Glow Plugs with the bypass? I have read that the Glow Plugs are 12 Volts and not 24 Volts. Just asking to clarify. Dave
 

jhighsmith

Member
27
35
18
Location
tampa, florida
You are correct. The start boxes cycle these glow plugs many times but no more than constant closed at 4 seconds. So when you memic this action externally you will cound to 4 as the momentary switch is closed. A 12 volts system can be closed 10 seconds or longer, however the current displayed by the 24 volt system will rupture the stock military glow plugs when energized longer than 4 seconds, even with the s th lock starter box set up
 

lahumvee

New member
3
0
1
Location
87544
Greetings Brothers and Sisters
I have owned many Humvees and noticed a re occurring problem, either the glow plugs fail to come on at all, OR worst case scenario, they stay on all of the time and burn up.
I have went thru this repeatedly and came up with a fix that I am happy with.
I took my latest variant smart start box ( which happened to be bad ) and opened it up, and then, using a multi meter on continuity, I isolated the glow plug output, which is a #8 green wire - this wire comes from the computer board, thru the cannon plug at the upper fire wall, on the other side of the cannon plug, male side, this wire separates into 8 circuits ; going to each glow plug.
Cut the green wire at the circuit board and place a yellow heavy gauge eyelet 3/8ths on the green wire.
Using another dead start box, remove the 24 volt solenoid that controls the engine on and off, it is the only one in there.
This donor solenoid can be bolted to the corner cover of the box I was putting back in the truck.
Place the green wire on the 3/8th lug, of the donor solenoid
Run another yellow eyelet wire to the main power input at the computer board - now you have an input 24 volt and an output to the glow plug set.
Using a low voltage marine grade horn button, mount this next to the test port or the inboard side facing you as mounted in the truck
1 side of the horn button will go to the main 24 volt input line, the output from this button will go to the trigger side of the donor solenoid
Test fit your pieces so that everything fits in the box when it is bolted back together before mounting the solenoid and horn button.
I added a 24 volt LED light in the humvee style next to the horn button, the positive lead goes to the glow plug lug on the solenoid output, the negative goes under the mounting bolt of the solenoid. - Remember LEDs are polarity sensitive
Now when you want to activate your glow plugs ;
1) Turn on your ignition switch
2) Depress glow plug button for (4) seconds ; counting 1 thousand 1, 1 thousand 2 etc.
3) Rotate ignition switch to engage starter
*Note the Picture : #1 is the solenoid mounting bolts
#2 is the warning light that the glow plugs are activated
#3 is the power button - I used a sealed marine grade horn button. Voltage / Amps does not matter, as it is only engaged for (4) seconds.

If anyone is interested in this any further, please PM me, and I can take my box apart and post photos of the exploded view. - I did not do this as I built it, as it was a quick fix to run the truck, however, I mentioned it to some friends and they liked the idea so I thought I would share.

Joe
Hi Joe, were you able to take any photos of the box open? Also, the low voltage marine grade horn button, was this 24v or simple 12v? Thanks!
 

lahumvee

New member
3
0
1
Location
87544
You still have not changed your location.
I sold my last truck several months ago, just put a solenoid in there on a dry run and test fit the lid. When everything closes that's where you want to mount it
What I meant....photos of the inside of the box. Thanks!
 

jhighsmith

Member
27
35
18
Location
tampa, florida
Good evening, I don't have any pix or boxes left anymore. I can tell you how to do it "it's pretty simple " instead of adding a remote solenoid directly to the glow plugs mounted on the fire wall and installing a momentarily switch on the dash to activate it like what's common on alot of the cucv trucks.
What I did was put those two items inside a non glow plug functioning start box. On the older hmmwv with the 60 amp generator, the main power runs through this box so you can tap into that power source to heat the glow plugs manually for 4 seconds to start the truck. You'll need a 24 volt solenoid preferably out of another junk starter box and any momentarily push button switch "doesn't matter what voltage it's rated at" .
"A"Take the start box out of the truck and working on a table "open up the cover and pull it off but leave it plugged up
"B" get a multimeter ,use the continuity setting and trace one of the 8 glow plug wires back to the cannon plug that plugs into the top of the box "the 8 individual wires will join into 1 big wire at the outside of the plug.
"C" using the continuity tester or physically tracing the pin in the plug at which this junction happens "mark it and count the location from the index stud on the plug-then transpose this to the mating female plug on the box (once you're sure you have the correct wire that comes off the IC board and through the cannon plug to the 8 glow plug wires (cut this wire just off the IC board and crimp a large eyelet onto that wire *this eyelet will go to one of the high voltage lugs on your donor solenoid.
"D" using the multimeter "set to 24 or 28 volts DC, find a constant hot wire on the cannon plug inside the truck that goes to the start box from the inside***you might need to turn the ignition on to get a hot wire. Once found-turn the ignition off then transpose or find that wire the same way as step "C" and splice or crimp a heavy 12ga wire to that constant wire inside the start box and place an eyelet on the end of your jumper splice ( this will feel the other high voltage input side of your donor solenoid and energize the glow plugs when activated.
"E" take your momentary switch and set it up with two jumper wires (one side will need a large eyelet to get power from the supply "high voltage" side of your donor solenoid) the other wire will need a small eyelet to go to the small lug (signal side) of your donor solenoid.
"F" Almost finished-now find a home for the two new additions to your starter box. (1)The solenoid is larger and doesn't really matter where it's mounted as long as it's out of the way and doesn't make contact with anything inside the box, especially the power lugs. (2) the push button needs to face you when the box is installed back in the truck, find a place and mount it through the box and secure it.
* put it all back together and test it's functionality-only energize the glow plugs for a count of 4 or four seconds "much longer will fry them"
(1) if it doesn't work the first time-you might have to take the starter box lid back off and put the trigger wire to the other small lug. Unless your able to bench test the solenoid and definitively know which small trigger lug is the one the closes the switch.
(2) make sure you have functional glow plugs (you can do a continuity test on each one still in the motor-one wire of your tester will touch the nut thingy on the glow plug and your other tester wire will go to the contact (ONLY) on the glow plug (make sure the test lead only touches this terminal and nothing else or you will get a false reading) if the tester beeps or shows continuity-the glowplug works to some degree, you can ohm them too, you'd have to look up the values for that.
THATS IT
 

Dcmock

New member
3
0
1
Location
Missouri
Good evening, I don't have any pix or boxes left anymore. I can tell you how to do it "it's pretty simple " instead of adding a remote solenoid directly to the glow plugs mounted on the fire wall and installing a momentarily switch on the dash to activate it like what's common on alot of the cucv trucks.
What I did was put those two items inside a non glow plug functioning start box. On the older hmmwv with the 60 amp generator, the main power runs through this box so you can tap into that power source to heat the glow plugs manually for 4 seconds to start the truck. You'll need a 24 volt solenoid preferably out of another junk starter box and any momentarily push button switch "doesn't matter what voltage it's rated at" .
"A"Take the start box out of the truck and working on a table "open up the cover and pull it off but leave it plugged up
"B" get a multimeter ,use the continuity setting and trace one of the 8 glow plug wires back to the cannon plug that plugs into the top of the box "the 8 individual wires will join into 1 big wire at the outside of the plug.
"C" using the continuity tester or physically tracing the pin in the plug at which this junction happens "mark it and count the location from the index stud on the plug-then transpose this to the mating female plug on the box (once you're sure you have the correct wire that comes off the IC board and through the cannon plug to the 8 glow plug wires (cut this wire just off the IC board and crimp a large eyelet onto that wire *this eyelet will go to one of the high voltage lugs on your donor solenoid.
"D" using the multimeter "set to 24 or 28 volts DC, find a constant hot wire on the cannon plug inside the truck that goes to the start box from the inside***you might need to turn the ignition on to get a hot wire. Once found-turn the ignition off then transpose or find that wire the same way as step "C" and splice or crimp a heavy 12ga wire to that constant wire inside the start box and place an eyelet on the end of your jumper splice ( this will feel the other high voltage input side of your donor solenoid and energize the glow plugs when activated.
"E" take your momentary switch and set it up with two jumper wires (one side will need a large eyelet to get power from the supply "high voltage" side of your donor solenoid) the other wire will need a small eyelet to go to the small lug (signal side) of your donor solenoid.
"F" Almost finished-now find a home for the two new additions to your starter box. (1)The solenoid is larger and doesn't really matter where it's mounted as long as it's out of the way and doesn't make contact with anything inside the box, especially the power lugs. (2) the push button needs to face you when the box is installed back in the truck, find a place and mount it through the box and secure it.
* put it all back together and test it's functionality-only energize the glow plugs for a count of 4 or four seconds "much longer will fry them"
(1) if it doesn't work the first time-you might have to take the starter box lid back off and put the trigger wire to the other small lug. Unless your able to bench test the solenoid and definitively know which small trigger lug is the one the closes the switch.
(2) make sure you have functional glow plugs (you can do a continuity test on each one still in the motor-one wire of your tester will touch the nut thingy on the glow plug and your other tester wire will go to the contact (ONLY) on the glow plug (make sure the test lead only touches this terminal and nothing else or you will get a false reading) if the tester beeps or shows continuity-the glowplug works to some degree, you can ohm them too, you'd have to look up the values for that.
THATS IT
That sounds simple my question is, the 24v power coming into the box, is this going to the circuit board and do I cut it so it doesn't go to the circuit board anymore or just splice into it
 
Top
AdBlock Detected

We get it, advertisements are annoying!

Sure, ad-blocking software does a great job at blocking ads, but it also blocks useful features of our website like our supporting vendors. Their ads help keep Steel Soldiers going. Please consider disabling your ad blockers for the site. Thanks!

I've Disabled AdBlock
No Thanks