• Steel Soldiers now has a few new forums, read more about it at: New Munitions Forums!

  • Microsoft MSN, Live, Hotmail, Outlook email users may not be receiving emails. We are working to resolve this issue. Please add support@steelsoldiers.com to your trusted contacts.

How do you change a tire

panzerjunky

New member
281
0
0
Location
san diego ca
Hello Gents
I have looked in my 10 manual and cant find info on how to remove the tire from the rim correctly. I remember doing it in the mud at Ft. Carson one winter and I kinda remember a pick ax being involved I am almost positive that was not correct .
Anyway would anyone know the tm No for this operation as I want to sand blast my rims for painting and would like to get the rubber off or would you guys just mask and blast away?
Thanks Jerry
 

M543A2

New member
Steel Soldiers Supporter
1,063
12
0
Location
Warsaw, Indiana
With the difficulty involved in changing tires by hand, I would first try blasting with the tire in place on a wheel. I do not think the blasting will affect the rubber much. Masking would be needed for painting.
Regards Marti
 

GoHot229

Member
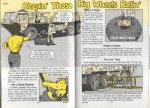
Oh no....... there are SO......many posts here on Steel Soldiers...... I usually awnser this question in great detail, along with several others here, so...to go through all that again.....big sigh.....................uhhoooowwwww. I suggest looking up ( split ring wheel) (split rims) (Slide hammer) there are at least 6-8 entire articles here. Please look.... another trick, go to face page of SS then scroll down to Deuce, where it has the prompt to (new post) punch on that , type in (change tires or split ring rim, or like terms in the subject area, then go down to the paragraph area and click there as though you were going to write.....by clicking on the paragraph area, you will see alternate posts of like subjects come up, choose from them......................gosh, theres so many . just choose.
 

GoHot229

Member
Deuce tire/rim break down authored by Gimpyrob this is about as good as it gets currently as far as easy to follow instructions ...... You'v been here on SS for some time by your join date, so theres no need to tell you how DANGEROUS these wheels can be !!!!! most of the danger is while re-inflating if done improperly.


We really should have a section for this or a sticky or I'd even go so far as to make a video,' if I had a camcorder' so the members could see it SAFLEY done and just what tools and how to do it in the field as well. I can't emphasize the dangers...while airing it up again, thats where 99.9% of the drama is.
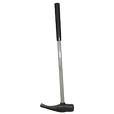
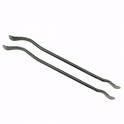
NO PICK or MATTOX... here are the tire tools and the thing you remember as a pick...actually a tire hammer. Only a very pro truck tire changer with alot of time under his belt could pull it off with a mattox, and even then could cut the side of the tire beyond serviceability. I could use it, but then I'v got hundereds and hundereds of split ring wheels under my belt, disassembled and assembled. and it would still be tricky.no pick! The GREEN matox/pick is I believe what you were thinking of...
 

Attachments

Last edited:

croftonaviation

New member
217
7
0
Location
crofton ky
I don't think you were wrong is using the pick, or at least not alone. a friend of mine who was an engineer in the army asked if the truck came with a "pick o matic".:-D apparently they have been used more than once to change a tire.
 

BugEyeBear

New member
549
3
0
Location
Eastern Georgia
Unless I was planning on mounting a new tire I'd just mask it (using a very sturdy mask material), blast it (avoiding the rubber), and repaint it.

Every time you dismount a tire you risk damaging the tire. Especially with an older tire that is less flexible. & Especially if you have never done this before. & Especially if you are using substitute tools.

Add to this the inherent dangers involved with remounting/reinflating a tire on split rims, & you'll understand why PERSONALLY I leave the tire mounted unless I'm ready for a new tire to be installed! & PERSONALLY I always pay an experienced split rim tire guy to mount my tires. I don't have a safety cage at home, I've seen the videos of what happens when a split rim fails, and I just don't think it is worth the risk!

EVERY TIME I've had tires mounted on split rims I've encountered some marring of the paint, so I always plan on painting my rims afterwards anyway.

NOW I'M SURE that some will argue that split rims aren't overly complicated and that you should go ahead and do it yourself with hand tools & w/o a safety cage.
It is your decision.
Just be sure to know what the proper procedure is, use the correct tools, understand the risks involved, and PLEASE be safe!
 

jimmcld

Member
469
5
18
Location
Denton, Texas
The media used to mask for sandblasting is rubber. Sandblasting will not hurt rubber, in fact, if the rubber is old and dingy looking, it will probably make it look better.
 

mckeeranger

Member
779
4
18
Location
Eastern Kentucky
I'm all for masking, blasting, and painting them. Seems to me like a lot of trouble to take the tires off, if you're not going to change them. I know you probably want to do a perfect paint job on them, but like BugeyeBear pointed out, you're likely to scratch them and have to do touch up anyway.

For anyone changing one of these wheel/tires, without a proper cage, I recommend putting them back on the rear of the truck ( if you have duals ) before putting air in them. If the ring blows off it may damage the other tire, but it's better than turning it loose inside your shop, or in your yard. Always use a clip-on air chuck that you can control from a distance, wear hearing and eye protection, and drive the truck for a few miles ( preferably on a bumpy road ) before putting on the valve cap, or moving the wheel/tire to another place on the truck.

Also remember to clean the ring and its groove well, before putting it back together, and use rubber lubricant on the tire bead.

The best thing to do before trying it is to take one to a good professional shop and watch them do it. You may learn a lot, or you may decide never to do it yourself.

These are, of course, just my opinion, your results and milage may vary.
 

NMC_EXP

New member
286
12
0
Location
Raton, New Mexico
I worked in a truck stop tire shop for five years. Dismounted and remounted a lot of 20" and 22" tube type, semi truck tires on flat based, lock ring type wheels.

The correct terminology is "multi piece rim" not "split rim". In the true split rim type the lock ring was a complete ring without a split but the main part of the wheel had a split which ran at an angle axially across the wheel. In my opinion, the true split rim type was much more dangerous to work on than the standard multi-piece wheel in use today.

APPLICATION:

Tube type, flat based rim with single lock ring. NOTE: This DOES NOT apply to (a) rims with more than one lock ring, (b) true "split rims", (c) tubeless tires on drop center rims.

DISASSEMBLY:

If the tire tread is directional, note the direction for proper reassembly.

1. Remove valve core to completely deflate the tube.

2. With the tire/rim assembly flat on the floor and lock ring side up, break the bead on the lock ring side all the way around the wheel. A slide hammer is good if you have one but expensive to buy. I preferred to use a short handled tire wedge hammer and a short handled sledge hammer to strike the flat face of the wedge hammer. Some folks could swing the wedge hammer and hit the lock ring/tire joint but I was not that accurate.

3. After 1st bead is broken you will need two pry bars with tips no wider than 1/2" to remove the lock ring. The lock ring should have a pry bar slot in it near the split in the lock ring. Carefully pry the lock ring away from the rim to disengage the lock ring flange from its groove in the rim. Once you get it started work your way all around the rim. NOTE: do not spring the lock ring out of shape in the process. Remove lock ring.

4. Flip tire/rim assembly so the fixed flange side is up. Repeat step #2 and break the bead all the way around.

5. Flip the tire/rim assembly over, lock ring side up. The wheel may fall free of the tire at this point so watch you feet.

6. If the wheel does not fall free then with the valve stem at 6:00 o'clock pick up the tire at 12:00 o'clock to a 45 degree angle. With your feet spread, bounce the tire against your knees. The rim should fall free and you DO NOT want you toes between it and the floor when it does.

7. Remove flap & tube and vacuum any debris out of the tire. Rust chips and other crud will eventually poke a hole in the tube.

8. Reinstall tube Install valve stem and put just enough air in the tube to take out the wrinkles. If the tube is wrinkled or twisted when fully inflated, the tube will fail. Reinstall flap onto tube.

REASSEMBLY:

1. Inspect the lock ring - it should lay fairly flat. If it appears to be sprung out of shape, better stop here. and find a new lock ring.

2. Use wire brush ro remove rust from lock ring flange and its mating groove in the rim.

3. Place rim flat on floor with lock ring side up.

4. Place tire/tube/flap assembly on floor with valve stem pointing up.

5. Lubricate tire beads and inner surface of the flap with soapy water. Murphy's Oil Soap (vegetable based) is preferred but any soap will do.

NOTE: Never use petroleum based products such as Vaseline, engine oil or fuel on tires and tubes. Petroleum based fluids will chemically degrade these types of rubber.

6. Pull tire assembly over the rim with valve stem lined up with its slot in the rim. Insert valve stem into slot and lower tire assembly on the rim.

7. Place lock ring on the wheel with the lock ring split 180 degrees opposite from the valve stem (thought to aid in balancing).

8. To install the lock ring I used pry bar and a sledge which had one rubber face and a steel face for weight. If you use a steel hammer do not damage the lock ring. Start the lock ring into its groove at the split but opposite the end which has the pry groove. Work your way all the way around to the split. If the rim and lock ring are in good shape the lock ring will snap into place. It is in effect a snap ring.

NOTE: If the lock ring does not appear to be seated into its groove all the way around, DO NOT attempt to inflate the tire.

INFLATION:

NOTE: An unshielded, multi piece rim failure during inflation will likely be fatal for the operator.

1. NOTE: NEVER install tire size A on rim size B. All of the components must match including tread width. e.g. putting a 9.00x20 tire on a 10.00x20 rim and vice versa is asking for trouble. Never put lock ring part #ABC on rim part# XYZ. Bad things will happen

2. Inflate the tire in a safety cage built for that purpose and use an air chuck which locks on the valve stem so your hand is not in the cage if things go wrong.

3. If a cage is not available AT MINIMUM install the uninflated tire/wheel on the truck, outboard position on a drive axle (NOT STEERING AXLE) fully bolted up then inflate it.

This way, if the lock ring blows off most of the lock ring shrapnel will be directed away from the operator and the rim and tire will not be blown in the opposite direction.

4. If the rim is fairly clean and properly lubricated, the tire beads should slide out to engage the lock ring and fixed rim flange smoothly as the tire is inflated.

5. Inflate to recommended pressure. DO NOT overinflate.

6. Always install a valve cap. A lot of slow leaks are caused by debris getting into the valve when pressure is added to a tire thru a dirty valve stem.

DISCLAIMER:

Multi piece truck rims are inherently dangerous and accidents can result in death or serious injury.

I do not recommend that anyone work on tires without actual training and you do so at your own risk.

These general guidelines are provided only to reduce the risk of accident and injury for those who work on tires without training.

Do not take chances, these things really can kill you.

(Hope these weasel words would make my lawyer happy).

Best regards,

Jim
 

BugEyeBear

New member
549
3
0
Location
Eastern Georgia
...The correct terminology is "multi piece rim" not "split rim". In the true split rim type the lock ring was a complete ring without a split but the main part of the wheel had a split which ran at an angle axially across the wheel. In my opinion, the true split rim type was much more dangerous to work on than the standard multi-piece wheel in use today....

Jim
Yes, you are correct!
True "Split Rims" are different & are MUCH MORE DANGEROUS!
Many tire shops won't even touch these anymore, so probably best to use the correct terminology if you are calling around to find a tire shop to mount a tire on your "multi piece rim"!! Otherwise you might get a lot of "We don't do those" responses.
THANKS for the correction!!

...(Hope these weasel words would make my lawyer happy).

Jim
Made me laugh! rofl
Your Lawyer would be PROUD!!
 

82ABNMP

Active member
556
53
28
Location
Winston Salem NC
tires

If you are not using a heavy/corse media for blasting then blast away. Blasting old tires will make then look new and will not hurt them( I just did this). Just back away from the tire/rim near the edge. It's not worth it to take the rims off to blast them. Clintion from C&C equipment does this all the time. How do you think he gets his tires to look that way...blasting! :-D
 

NMC_EXP

New member
286
12
0
Location
Raton, New Mexico
I think NMC_EXP was a spec. writer in another life.
Heh....its worse.

I was a tire monkey in an earlier life.

I was an engineer until recently, and I did write some specs.

But deep down inside, I'm just a simple country boy try'in to do my best in a complex technological environment

Regards

Jim
 

NMC_EXP

New member
286
12
0
Location
Raton, New Mexico
Yes, you are correct!
True "Split Rims" are different & are MUCH MORE DANGEROUS!
Many tire shops won't even touch these anymore, so probably best to use the correct terminology if you are calling around to find a tire shop to mount a tire on your "multi piece rim"!! Otherwise you might get a lot of "We don't do those" responses.
THANKS for the correction!!
Split rims scared the bejeepers outta me even back when I still thought I was immortal.

I never had a lock ring blow off. However I did refuse to re-inflate a few after I fixed them because the lock ring or rim was in bad shape. I'd put them back on the truck, give the driver the air hose, and back off a hundred yards.

Funny thing was the only time I got hurt was a tubeless tire (single piece rim - no lock ring). I never was scared of these but I should have been. None of us put them in the cage to air them up. Tubeless semi tires were rare back then so we learned the hard way.

Guy came in with a brand new low boy trailer. Had tubeless tires and one was not only flat, one bead was all the way off the rim.

I assumed (the word that kills) that he had run it flat for so long that it partially dismounted itself....bad decision.

I popped it back on the rim and partially inflated with it laying on the floor. Checked for leaks - no leaks. This was a 12 ply bias tire so max inflation pressure was 85 or 90 PSI. I was using a chuck that did not lock so I was squatting next to the tire holding the chuck on the stem.

I kept adding more pressure so I could find the leak (another bad call). Last time I checked it had 65 PSI. Soon after that I felt the tire suddenly getting "taller". I dropped the chuck an leaned back just as the bottom bead slipped off the rim. All I remembered was a really loud noise.

Spectators said it picked me up and blew me backwards about six feet. I crashed into the Coates car tire machine and was out cold.

The tire and rim went straight up, hit the ceiling and bounced around the shop a couple of times. By the grace of God it did not hit me on the way up. It would have splattered me on the ceiling like a fly hit by a swatter.

Besides bruises, a week of ringing ears, the only thing that required treatment was one eye - the drit and crud blown off the floor scratched my cornea. Had to wear an eye patch for a while.

They took me to the hospital to get checked. The driver grabbed his tire/rim and beat feet with that spot "singled out" - Budd wheel). I suspect either the rim or tire was defective but I'll never know.

I used the cage for tubeless semi tires from then on.

Regards and glad to still be here,

Jim
 

BugEyeBear

New member
549
3
0
Location
Eastern Georgia
"WOW!" Sounds like that was a close call!!
You were lucky!!


I think most of us have a close call story or two that we could share.
I'm sometimes simply AMAZED that I somehow survived my youth!
SOMEONE must have been watching out for me, cuz I did a lot of things that should have had me pushing up daisies LONG AGO!
 

NMC_EXP

New member
286
12
0
Location
Raton, New Mexico
I'm sometimes simply AMAZED that I somehow survived my youth!
SOMEONE must have been watching out for me, cuz I did a lot of things that should have had me pushing up daisies LONG AGO!


You and me both.

I finally convinced myself that if you give the Lord enought shots at you, sooner or later he's going to take one.

Regards

Jim
 
Top
AdBlock Detected

We get it, advertisements are annoying!

Sure, ad-blocking software does a great job at blocking ads, but it also blocks useful features of our website like our supporting vendors. Their ads help keep Steel Soldiers going. Please consider disabling your ad blockers for the site. Thanks!

I've Disabled AdBlock
No Thanks