• Steel Soldiers now has a few new forums, read more about it at: New Munitions Forums!

  • Microsoft MSN, Live, Hotmail, Outlook email users may not be receiving emails. We are working to resolve this issue. Please add support@steelsoldiers.com to your trusted contacts.


Installed civi Air conditioning in the m1009

camarossguy2

Member
65
77
18
Location
NE FL
My 'corona' project has been to install A/c in the m1009.
I have seen quite a few posts here of people asking about a/c, a few post of members installing an aftermarket kits...I may have missed it, but i never saw a factory civi a/c installed on a m1009.
Anyway, it was actually quite a bit more work then I imagined, seemed like every step it was fitting back at me lol, I dont know how good the aftermarket kits are, but as long as they are adequate, I'd suggest using one of them lol.

I acquired the plastics from craigslist, bought all the parts that touch Freon new. I originally was going to convert to a serpentine belt from a 6.5, but simply had a hell of a time finding any parts. After talking to a local friend who just converted his 6.2 to a serp setup, I opted to stay V-belt. Plus he gave me a great deal on the brackets for the pass alt and drivers compressor.

First off my m1009 was already converted to 12v, but for some reason the PO removed the pass alt and bracket, and left only the drivers.

First step was to remove the alt brackets and install the civi alt bracket on the pass side. My m1009 alt was to big, so i just used the civi one. I then installed the compressor on the drivers side.
Had to back out the original pass alt bolt that had been sheard off in the head. got lucky!


Next I took apart the dash, removed all the stock heater box parts. Over simplified, I made a template, cut the firewall hole, patched the old heater hole. Cut a hole for the center vent. in the dash frame


Next condenser goes in


One of the harder parts was dealing with the m1009 specific parts that interfere with a/c. I obviously knew about the blackout switches, I debated making a custom vent, but ultimately just moved the switches and stickers below the vent.


The surprise was the Evap box pretty much was in the way of everything. not to mention, the bottom bolts alone took several hours grrrr

My spin on fuel filter had to be moved over ~1.5". its new place it was way to close to the valve cover, so i had to ditch the huge 9" long volvo filter i had for a shorter 5" wix.
Next I had to move the main power bus closer to the fender. Now most of the cables didnt reach, so amazon to the rescue for a bunch of 0/1 gauge cables.
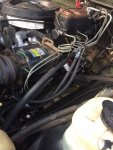
The evap box also is in conflict with the battery, which has to be moved more forward. With my turbo, I had to get quite creative with routing my a/c lines and bends.
My side project was to figure out the wiring. I took this as the opportunity to open up all the loops and clean everything up. I feel like I actually understand the changes made. Im a lot happier now that ive solder the connections and removed the unneeded wires

Having had a few square bodies before, I knew the A/c system are inherently rather fair at best, that plus the close proximity to the turbo and down pipe, I Wrapped the evap box in a ~3/8 thick foam insulation with a radiant foil. In addition, I spent a lot of time sealing every pipe and duct inside the car with foam so there are no leaks.

The result is quite impressive, vent temps in the high 30s while driving in 91 degree sunny florida today. The air velocity was great to, kids said they could easily feel the air in the back seat.


HeisenBob

Active member
103
31
28
Location
Norman, OK
Nice. I’d like to do this one day. Looks like a lot of work. Do mine sharing what your all on cost of parts and total time?
 

camarossguy2

Member
65
77
18
Location
NE FL
Nice. I’d like to do this one day. Looks like a lot of work. Do mine sharing what your all on cost of parts and total time?
I probably put in at least 4 maybe 5 , 8 hours days. I though 2 was going to be plenty. In my defense, I spent a lot of time looking through wiring diagrams, tracing the vacuum lines, figuring out where the outside air actuator goes lol. Then at the end, my blower would only work on high, took a while to figure that it.
The m1009 obviously has a lot of differences then the civi ones, pluss i didn't know what year AC parts I had. Turns out there was a lot of minor changes in connectors and colors, mine turned out to be a '80. Once I figured that out, it was so much easier. Just googling "k5 ac wiring diagram" or similar shows the same 3 diagrams that are much different then mine.

Anyway, the goal of my truck is a "restomod"... its my interpretation of how i think the m1009 should have come from the factory,(i.e. turbo, 1 ton, 4spd, a/c etc) so price was not the main driving factor in why i chose the civi over a vintageAir or nostalgic. I wanted it to be the equivalent to original.
Off the top of my head, I got the boxes, vents and dash for $80
from amazon/rockauto
Short line acdelco 15-33072 $38
condenser $81
acdelco blower 15-80213 $44
heater core $12
suction lines $40
insulation $25
acdelco 336403 blower resistor $14
0/1 cables $40
wix 33412 Filter $44
3 new belts 18
Accumulator, orfice $17
evap core $48
Clutch switch $13
seals $10
used alt, alt brakets, compreser brakets and almost new hr6 compressor $250
pag46 oil $8
R134a $17
From LMC truck
Dash molding $57
inner glove box (ya, different glove box fo ac trucks :rolleyes:) $28

I may be forgetting something, buts thats $884. If i factor my hourly rate of $99, times 34 hrs, brings the total to $4250 lol
 

chevymike

Well-known member
578
449
63
Location
San Diego, CA
Nice work but man it looked like a lot of work to get all of that stuff to fit.

I found this system which is specifically to add A/C to CUCV's It does NOT mess with your factory heater but installs as a stand alone system up in the dash, above the heater assembly. Looks like a lot less work and might be helpful for others. I think this is the system I am going with in my M1010


Sharecropper

Well-known member
Steel Soldiers Supporter
1,814
942
113
Location
Paris KY
Nice work but man it looked like a lot of work to get all of that stuff to fit.

I found this system which is specifically to add A/C to CUCV's It does NOT mess with your factory heater but installs as a stand alone system up in the dash, above the heater assembly. Looks like a lot less work and might be helpful for others. I think this is the system I am going with in my M1010

You might want to read my post regarding that Nostalgic A/C. https://www.steelsoldiers.com/threads/kinda-got-carried-away-m1028-rebuild.54469/post-2224882

Hope this helps.
 

chevymike

Well-known member
578
449
63
Location
San Diego, CA

Sharecropper

Well-known member
Steel Soldiers Supporter
1,814
942
113
Location
Paris KY
Mike the important thing to remember is to align the pulleys so your belt will run straight, smooth, and cool. I believe most guys don't even think about this and then wonder why their belts squeal and then break after a short time. When I assembled the front of my P400, I aligned every single pulley, including the alternators and power steering pulley. I torqued the water pump and crankshaft pulleys and then used a straight edge to check alignment. Both alternators required a spacer behind their pulleys, and then I had to use my pulley-puller to bring the power steering pulley out approximately 1/8" to align with the other pulleys. The after-market crankshaft pulley for the A/C from CPI was an adventure in itself. The Sanden compressor could only bolt on one way, and with the CPI crank pulley bolted on as designed by CPI the belt missed the Sanden pulley by a whole 1/2". See photos below. So then I had to go to my machine shop and have a special spacer made to go between the CPI pulley and the crank to get the belt aligned to the Sanden.

After I completed all this, I wondered if a 4-groove HMMWV crank pulley would have worked without having to deal with the CPI crank pulley.

Hope this helps.

IMG_3269 - Copy.jpg DSC_0682 (2).JPG
 
Last edited:

swinters

Member
56
9
8
Location
Olympia, WA
Thanks for posting about your install. Nice looking install job and I'll bet it's worth the effort every time you use it. I've been wondering which way to go to add a/c to my CUCV. I have the Banks sidewinder on mine too so have been trying to find out what I need to do to mount the compressor on the left (drivers) side. Two of my parts trucks have 6.2's with a/c on them but the one I'd prefer to use the parts from is an early red block 6.2 so I need to do some measurements and comparisons to see whether it'll fit. I'm hoping to leave both alternators on the truck if at all possible.

I looked at the Nostalgic kit and like the idea of using that or one like it so sent them an email a couple of weeks ago asking whether they had an option to install the compressor on the left side. I haven't heard back. After reading Sharecroppers post on the mount supplier issues my guess would be that they're trying to get info from the mount supplier but that's only a guess. Considering the Covid impacts on businesses I wanted to give them some extra time so I figured I'd send them a note this coming week and see what's up.
 

Mad Texan

Well-known member
Steel Soldiers Supporter
657
1,150
93
Location
Chester County, PA
Sharecropper said:

You might want to read my post regarding that Nostalgic A/C. https://www.steelsoldiers.com/threads/kinda-got-carried-away-m1028-rebuild.54469/post-2224882

Hope this helps.

Yeah I recall when you posted it. Both have pros and cons. Split system prevents one system from taking the whole system down. I am not worried about mounting the compressor since the 1010 had a compressor for the rear box. Dual alts already on pass. side.
I've wondered if they could option out the kit to work with our compressor eliminating any pulley issues. I've wanted to call them and discuss what they could do.

It's on the list... somewhere... down there... page 37 or so... :rolleyes:
 

Sharecropper

Well-known member
Steel Soldiers Supporter
1,814
942
113
Location
Paris KY
Sharecropper said:

You might want to read my post regarding that Nostalgic A/C. https://www.steelsoldiers.com/threads/kinda-got-carried-away-m1028-rebuild.54469/post-2224882

Hope this helps.


I've wondered if they could option out the kit to work with our compressor eliminating any pulley issues. I've wanted to call them and discuss what they could do.

It's on the list... somewhere... down there... page 37 or so... :rolleyes:
The crank pulley seems to be the weak design in the CPI kit. It is a strong casting, however when bolted to the crank through the OEM pulley as designed it will not align properly with the compressor pulley. I had to get my machine shop to produce a special 3/4"-thick spacer in order to make the CPI pulley align with the Sanden pulley.
 

Mad Texan

Well-known member
Steel Soldiers Supporter
657
1,150
93
Location
Chester County, PA
The crank pulley seems to be the weak design in the CPI kit. It is a strong casting, however when bolted to the crank through the OEM pulley as designed it will not align properly with the compressor pulley. I had to get my machine shop to produce a special 3/4"-thick spacer in order to make the CPI pulley align with the Sanden pulley.
I read what you went though to get everything lined up on yours. Mike, myself and a few others with M1010's have a uniquely different situation in that we have a compressor already hanging off the drivers side of the motor that lines up the crank pulley already. We wouldn't need to use the CPI pulley as we already have a grove on our balancer pulley for A/C.

Maybe... this is the answer with their system. It would require some research.


Attachments

Skinny

Well-known member
2,130
486
83
Location
Portsmouth, NH
I am in the middle of taking my stock M1031 setup and swapping it out for my old M1010 drive.

I am going 12v so Leece Neville 555JHO on the passenger side, bolts in. I was going to reuse the factory Fridgidair compressor as they are rugged and pump a lot at idle...but...they suffer from crank seal leaks bad.

You can get a Sanden style compressor that bolts into the A6 mounts.

I used the bucket seats I had laying around to free up some cab space. I'm going with a back wall mount unit. Has cool and heat capability.

So all new parts, no messing with the factory dash parts, and doesn't protrude into the engine bay.


Sent from my Moto G (5) Plus using Tapatalk
 

cb88

New member
15
1
3
Location
Charlotte
I'm thinking of putting on the Nostalgic system... I don't care too too much about it being integrated with the heat. And I'm already deviating a bit by planning on putting a radio where the center dash vent would be... I might relocated the vent to where the radio would have been stock.

Also contemplating turbo options... and a chilled water to air intercooler might be fun/interesting in addition to overkill... but it would be one way to get max air into the engine without exceeding 10psi as well as reducing excessive EGTs potentially. I'm wondering if I'd have space to squeeze an intercooler in between a sidewinder and the banks manifold chamber. Should be possible looks like a barrel type intercooler can be had that is 11.5in end to end... eyeballing it that ought to fit. doing it that way would allow completly omitting the air to water heat exchanger typically on intercoolers. The interchiller would prevent boost loss also as you can get chillers that only loose about 0.1-1psi depending on the model.

There is a guy on youtube Adventure 3000 with a 6.5 turbo + 24V + AC installed with the nostalgic system... seems like a decent setup. Considering all the work he has done on his truck I'm sure he's knocking around this forum somewhere.
 
Last edited:

M1009Kev

New member
13
19
3
Location
North Carolina
One of the harder parts was dealing with the m1009 specific parts that interfere with a/c. I obviously knew about the blackout switches, I debated making a custom vent, but ultimately just moved the switches and stickers below the vent.
Great work! Did you reuse the original sticker or had one made? I have the daunting task of trying to find an exact replica sticker.
 
Top
AdBlock Detected

We get it, advertisements are annoying!

Sure, ad-blocking software does a great job at blocking ads, but it also blocks useful features of our website like our supporting vendors. Their ads help keep Steel Soldiers going. Please consider disabling your ad blockers for the site. Thanks!

I've Disabled AdBlock
No Thanks