jedawson1
Member
- 420
- 24
- 18
- Location
- Murfreesboro, TN
Hello All, here is my story:
I purchased this April of 1951 M37 from a gentleman in VA with the help of fellow SS MadDawg. Its a solid truck, but the previous owner had an unfortunately medical issue that forced him to leave the truck parked outside for 3 years under tree's. With that said, there is no major rust, but it is showing signs of rust creeping in at the fender joints and the undercarriage. I was waiting to build a larger shop before taking on a preservation project, but god had different plans; My neighbor of 10 years has a 17 year old son named Kyle who still doesn't have his drivers license or a truck, now this is not his fault, his father is a provider but hasn't in the last 10 years shown encouragement or interest in his sons life. Just the other day I asked Kyle to help me take the trash off since I have recently had minor surgery (jersey finger) and cant use my right hand for a few weeks. While driving with Kyle I asked him "how will you know when you become a man" (book "Raising A Modern Day Knight") he spouted the typical answers like "I have nuts, and when I got pubic hair" etc... I asked him to think about what separates him from his friends, after some time to think we agreed that his actions separated him I said "great now we are making progress". I then pointed out that there are childish actions and manly actions, to which I had to clarified MMA fighting does not constitute manliness, but toughness and skill. After some silence to let the question sink in, I then proposed the 4 principals of manhood from "Raising A Modern Day Knight"; 1)reject passivity 2)accept responsibility 3)lead courageously 4)expect gods greater reward. Kyle listened while I dialoged examples of these principles so as not to leave them open to misinterpretation.
Anyway, I mentioned needing to disassemble my M37 and asked him if he wanted a summer job helping me. He said yes and we ended up working all day Saturday and Sunday bagging up bolts, labeling parts, and taking pictures to remind us just how everything fits together. I paid him $10 an hour and after handing him his first $100 bill I asked "how much do you need to buy your first truck?" Kyle said $3000, I said "how many of these do you need to buy your first truck" and it started sinking in...to which I explained "now you only need 29 more 10 hour days". I paid him again yesterday another $100 bill, and told him to ask his parents at supper if they would match him $1 for $1 or $.50 on the dollar (probably wont happen). But my wife received a text message saying "Kyle asked me to open him a savings account, tell Jason thank You."
Man it felt good to know my talk is sinking in, time will tell if he's ready to "reject passivity" but he's off to a good start. God is good!
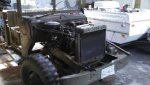
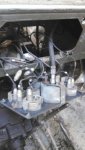
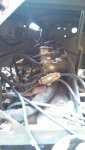
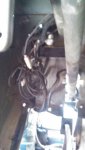
Now to the truck, the goal is preservation; (1)to prevent minor rust spots from becoming cancer by dis-assembly, stripping, and painting (2) get a good protective coating on the chassis like POR (3) go through all the mechanical systems including entire drive-train and breaks to get them up to near 100% so I can enjoy driving it knowing its properly serviced.
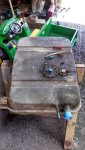
Here are some pictures of the truck when I brought it home, and showing progress disassembling the bed to which Kyle had to drill out all of the floor bolts because the corrosion was too strong for the Phillips head bolts to withstand without stripping. The bolts seem like a medium steel as they were pretty slow to drill even with good bits, but not as hard as grade 8 that I've drilled through on bulldozers.


I purchased this April of 1951 M37 from a gentleman in VA with the help of fellow SS MadDawg. Its a solid truck, but the previous owner had an unfortunately medical issue that forced him to leave the truck parked outside for 3 years under tree's. With that said, there is no major rust, but it is showing signs of rust creeping in at the fender joints and the undercarriage. I was waiting to build a larger shop before taking on a preservation project, but god had different plans; My neighbor of 10 years has a 17 year old son named Kyle who still doesn't have his drivers license or a truck, now this is not his fault, his father is a provider but hasn't in the last 10 years shown encouragement or interest in his sons life. Just the other day I asked Kyle to help me take the trash off since I have recently had minor surgery (jersey finger) and cant use my right hand for a few weeks. While driving with Kyle I asked him "how will you know when you become a man" (book "Raising A Modern Day Knight") he spouted the typical answers like "I have nuts, and when I got pubic hair" etc... I asked him to think about what separates him from his friends, after some time to think we agreed that his actions separated him I said "great now we are making progress". I then pointed out that there are childish actions and manly actions, to which I had to clarified MMA fighting does not constitute manliness, but toughness and skill. After some silence to let the question sink in, I then proposed the 4 principals of manhood from "Raising A Modern Day Knight"; 1)reject passivity 2)accept responsibility 3)lead courageously 4)expect gods greater reward. Kyle listened while I dialoged examples of these principles so as not to leave them open to misinterpretation.
Anyway, I mentioned needing to disassemble my M37 and asked him if he wanted a summer job helping me. He said yes and we ended up working all day Saturday and Sunday bagging up bolts, labeling parts, and taking pictures to remind us just how everything fits together. I paid him $10 an hour and after handing him his first $100 bill I asked "how much do you need to buy your first truck?" Kyle said $3000, I said "how many of these do you need to buy your first truck" and it started sinking in...to which I explained "now you only need 29 more 10 hour days". I paid him again yesterday another $100 bill, and told him to ask his parents at supper if they would match him $1 for $1 or $.50 on the dollar (probably wont happen). But my wife received a text message saying "Kyle asked me to open him a savings account, tell Jason thank You."
Man it felt good to know my talk is sinking in, time will tell if he's ready to "reject passivity" but he's off to a good start. God is good!
Now to the truck, the goal is preservation; (1)to prevent minor rust spots from becoming cancer by dis-assembly, stripping, and painting (2) get a good protective coating on the chassis like POR (3) go through all the mechanical systems including entire drive-train and breaks to get them up to near 100% so I can enjoy driving it knowing its properly serviced.
Here are some pictures of the truck when I brought it home, and showing progress disassembling the bed to which Kyle had to drill out all of the floor bolts because the corrosion was too strong for the Phillips head bolts to withstand without stripping. The bolts seem like a medium steel as they were pretty slow to drill even with good bits, but not as hard as grade 8 that I've drilled through on bulldozers.