• Steel Soldiers now has a few new forums, read more about it at: New Munitions Forums!

  • Microsoft MSN, Live, Hotmail, Outlook email users may not be receiving emails. We are working to resolve this issue. Please add support@steelsoldiers.com to your trusted contacts.


Keith's M1078A1 Project Overland

Keith Knight

Well-known member
Steel Soldiers Supporter
708
1,478
93
Location
Wauchula, FL
Gone are the cable steps that I never could find on my way down.
I wanted a step that came out away from the truck that you could see as you’re coming down but I didn’t want it in the way while tipping the cab or while negotiating rough terrain. So I can easily swing these up out of the way and kick them back down when needed.
1685447112965.jpeg
1685447048113.jpeg1685447149314.jpegA magnet that holds in the folded position
 

Attachments

TomTime

Well-known member
Steel Soldiers Supporter
691
1,666
93
Location
MD.
Gone are the cable steps that I never could find on my way down.
I wanted a step that came out away from the truck that you could see as you’re coming down but I didn’t want it in the way while tipping the cab or while negotiating rough terrain. So I can easily swing these up out of the way and kick them back down when needed.
View attachment 898438
View attachment 898436View attachment 898439A magnet that holds in the folded position
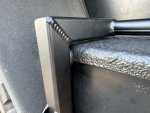
How do you raise them once in the truck?😁
 

ramdough

Well-known member
1,554
1,727
113
Location
Austin, Texas
Gone are the cable steps that I never could find on my way down.
I wanted a step that came out away from the truck that you could see as you’re coming down but I didn’t want it in the way while tipping the cab or while negotiating rough terrain. So I can easily swing these up out of the way and kick them back down when needed.
View attachment 898438
View attachment 898436View attachment 898439A magnet that holds in the folded position
Kieth,

I think you need more practice fabricating parts. Luckily, I have a list of things that need built and I am happy to help you out!

Beautiful work as usual. Some day my welds will hopefully be that clean.


Sent from my iPhone using Tapatalk
 

chucky

Well-known member
Steel Soldiers Supporter
6,536
18,745
113
Location
TN .
Im guessing since ive not received any packages from Wachula that you must have forgot ! If you could give a physical address i can send some of my associates by for the grill and steps and they can install your BETTER grill i sent you while they're there and could you give me the tool list and sises for the steps its hard for them to see in the dark and no need for them to bring extra tools ! GREAT JOB FOR SURE !
 

Keith Knight

Well-known member
Steel Soldiers Supporter
708
1,478
93
Location
Wauchula, FL
I like it. Was working on a way to power a set with an air motor:)

I think my wife would be more comfortable getting in or out with a more solid and visible step..
I actually built an electric deployable version first that would work when the door was opened. But I felt it had too many parts and hung down more than I wanted it to. So I went with a simpler design that will never fail.
 

Mavcaster

Well-known member
200
418
63
Location
Maryland
View attachment 887030
Finale resting place for the tank. The gas cap is getting painted, that’s why it’s not on there.
Hey Keith, just curious to hear your take on why you decided to go with this bracket style of mounting for the gas tank vs the conventional strap mounting for the diesel tank. Would you consider this method to be effective on the larger diesel tank as well (or even a smaller size 58 gal tank)? I'm in the process of adding a second 58 gal tank and just curious if this method is doable since I like it much more than the straps. Thanks!
 

Keith Knight

Well-known member
Steel Soldiers Supporter
708
1,478
93
Location
Wauchula, FL
My smaller gasoline tank you’re referring to is not as deep or in other words it’s about 9” away from the frame, because of the spring hanger and other things. Also the short distance between the two L brackets that are attached to the frame are relatively close to each other which meant that I could mount it in this manner because there would not be enough twist in the frame in that short distance to cause any damage to the fuel tank. My 175 gal large diesel tank is mounted the conventional way because of its length and because it rested up against the L brackets in the back at the frame. This method allows some minimal movement during frame flex without stressing the fuel tank. My fresh water tank is mounted between the frame rails which would potentially see the most flex between the four mounts so in that situation I mounted it on flexible thread bushings from McMaster Carr using 1/2 hardware.
My point being each mount is different based on frame twisting. The last thing you want is to have a tank ridged mounted to something that can flex putting stress on the tank causing it to crack over time. I’ve seen it to many times. Also the design of the tank makes a huge difference in how it handles stress. Also I’m referring to aluminum tanks not steel steel tanks which can take stress better that aluminum tanks. Hope this helps.
 

Mavcaster

Well-known member
200
418
63
Location
Maryland
Yes that makes a lot of sense, thanks for that explanation. I can definitely see your reasoning in the longer fuel tank you made. In your opinion do you think the L bracket method could be applied to the stock steel 58 gal tank in the stock location?
 
Top
AdBlock Detected

We get it, advertisements are annoying!

Sure, ad-blocking software does a great job at blocking ads, but it also blocks useful features of our website like our supporting vendors. Their ads help keep Steel Soldiers going. Please consider disabling your ad blockers for the site. Thanks!

I've Disabled AdBlock
No Thanks