• Steel Soldiers now has a few new forums, read more about it at: New Munitions Forums!

  • Microsoft MSN, Live, Hotmail, Outlook email users may not be receiving emails. We are working to resolve this issue. Please add support@steelsoldiers.com to your trusted contacts.


M1008 Build

Keith_J

Well-known member
3,657
1,313
113
Location
Schertz TX
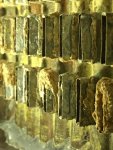
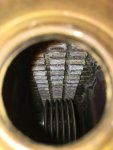
I use citric acid to passivate stainless steel, it won't dissolve chromium unlike nitric acid.

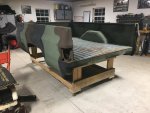
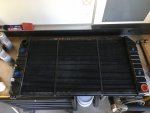
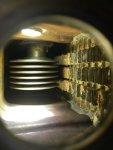
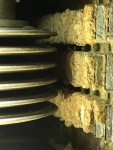
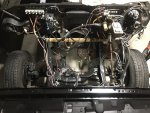
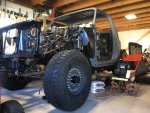
After using Blue Devil, I've had heater core and radiator leaks, all in the solder joints. Typical age issue. Oddly enough, the radiator fixed itself as no more leaks but it will get a proper fix soon. Still trying to get motivated to swap head gaskets. This includes using the heads as jigs for twin turbo manifolds. Lots of work..
 

DIVE DIVE

Well-known member
Steel Soldiers Supporter
217
772
93
Location
Chesapeake, VA
I was able to get the radiator support finished up and mocked up this weekend and also got all the wing supports for the bumpers and pintle painted as well. I had to make a repair to the voltmeter since the needle broke off. Got it epoxy repaired and retested SAT.
 

Attachments

Mullaney

Well-known member
Steel Soldiers Supporter
Supporting Vendor
7,251
18,805
113
Location
Charlotte NC
My wife found this sweet pic yesterday…regret getting rid of this M1009 big time!View attachment 871203
.
That is DEFINITELY a nice looking truck.
Funny how it works...
We have a (Insert Truck Name Here) and we almost drove the wheels off it.
Then, for whatever reason - or maybe even "life happens" and it goes away.
Always looking in the reard view mirror wishing you hadn't sold it...

A lot like firearms. Over the years, I have sold three.
Can't tell you how many times I hadn't done that...
Yeah, I got another one - but it just wasn't the same
.
 
Last edited:

DIVE DIVE

Well-known member
Steel Soldiers Supporter
217
772
93
Location
Chesapeake, VA
Started working on the inner fenders today. I have two sets. One set is the original set that was previously painted, and the other set is an original set off a different square body that are in great shape-just need a paint prep and some fresh paint. Unfortunately the original set that have been painted already were painted poorly and have some areas of bad rust so I’ll be using the civvy set. The civvy versions are missing a few holes in them and the extra battery bracket supports, so I’ll have to drill some holes and drill out the spot welds on the old ones then transfer the brackets over to the new ones, prep them and then paint them.
I learned that the civvy fenders have little dimples in them where the holes are supposed to be for various options and vehicle types. So all I had to do is place the civvy fenders over the m1008 fenders, mark the missing holes where the dimples were and then drill them out. It removes the guesswork from transferring the holes from one set to another.
 

Attachments

DIVE DIVE

Well-known member
Steel Soldiers Supporter
217
772
93
Location
Chesapeake, VA
Got the reinforcements off of the old passenger fender and riveted to the newer one. I was going to weld them on, then decided not to because it would just end up burning all the paint off and rusting underneath like the original did. So I painted the under side of the brackets and then started pop riveting them back on with steel rivets. One more to go before I do final paint prep and paint them. I’m going to use the rubberized underbody paint for the bottom side of the fenders then a semi gloss black for the engine bay side to match the radiator support and somewhat match the satin of the Chassis Saver paint. Too hot to get much else done today.
 

Attachments

DIVE DIVE

Well-known member
Steel Soldiers Supporter
217
772
93
Location
Chesapeake, VA
Finally getting around to painting the inner fenders. Lots of prep work plus it has been absolutely miserable here, and I don’t have AC in the shop (yet!). Using this undercoating stuff on the bottom side, and let me tell you, I don’t know what this stuff is made of but it has some serious vehicles in it. There are a bunch of terrible chemicals listed on the back. Needless to say it works great, dries extremely quickly, and is very durable. I still need to do another coat but it is too hot and will be for the foreseeable future.
 

Attachments

Mullaney

Well-known member
Steel Soldiers Supporter
Supporting Vendor
7,251
18,805
113
Location
Charlotte NC
Finally getting around to painting the inner fenders. Lots of prep work plus it has been absolutely miserable here, and I don’t have AC in the shop (yet!). Using this undercoating stuff on the bottom side, and let me tell you, I don’t know what this stuff is made of but it has some serious vehicles in it. There are a bunch of terrible chemicals listed on the back. Needless to say it works great, dries extremely quickly, and is very durable. I still need to do another coat but it is too hot and will be for the foreseeable future.
.
That stuff is really good and surprisingly durable. I sprayed the battery cover on my M1089. It is fiberglass and there were "hairy fibers" all over it. Every time I touched it, I got glass in my hands. Sprayed with that and the problem is gone!

It dries like a bullet!
.
 

DIVE DIVE

Well-known member
Steel Soldiers Supporter
217
772
93
Location
Chesapeake, VA
Well, haven’t been able to get too much done with work and the ridiculous weather here the last few weeks. I’m working on the radiator now. Flushed the oil cooler and trans coolers with a few cans of brake cleaner and compressed air/vacuum. There is a significant amount of solder bloom on the coolant tubes, however. Not sure what the best way to get it off is though. I tried traditional radiator flush-just letting it set and then flushing with a hose but it didn’t budge the bloom. The lack of flow and heat from a running engine probably didn’t help either. It chips off pretty easily but I can’t reach 90% of the tubes with mechanical cleaning. Any recommendations @Keith_J ? I always value your opinion.
 

Attachments

Keith_J

Well-known member
3,657
1,313
113
Location
Schertz TX
Blue Devil radiator flush is trisodium citrate, it only works when hot and flowing. Using just citric acid will cause significant metal loss.

It takes time, I left the Blue Devil flush in the system for a week of driving. And still had sediment after 2 flushes so I installed a coolant filter. Coolant recovery tank now stays clean.

Make sure the head gaskets are good.
 

DIVE DIVE

Well-known member
Steel Soldiers Supporter
217
772
93
Location
Chesapeake, VA
Head gaskets are brand new! Lol don’t have a motor yet. I’m going to continue with mechanical cleaning at this point in an effort to get the majority of it off at least. It’s just a pain working though the small holes to reach the tubesheet. I’ve cleaned more heat exchangers than I care to admit.
 

Attachments

Mullaney

Well-known member
Steel Soldiers Supporter
Supporting Vendor
7,251
18,805
113
Location
Charlotte NC
Rodding a Radiator
You take your clogged but undamaged radiator to a competent rad shop. The top and bottom tanks are desoldered from your old radiator. A thin rod is run through each core to dislodge any debris. Everything is thoroughly cleaned in muriatic acid.
.
Folks who do that work are getting harder and harder to find.
Radiator soldering requires skill rather than pressing a button on a controller.
In our town of over a million, there is one place in town that would tackle that job.
Owner of that place is 71 and when he is gone, I don't know that anybody else will take his place...
 

DIVE DIVE

Well-known member
Steel Soldiers Supporter
217
772
93
Location
Chesapeake, VA
.
Folks who do that work are getting harder and harder to find.
Radiator soldering requires skill rather than pressing a button on a controller.
In our town of over a million, there is one place in town that would tackle that job.
Owner of that place is 71 and when he is gone, I don't know that anybody else will take his place...
I hear you. I’m not sure that I need that level of cleaning quite yet. Frankly, I’m not sure that even 40 years ago it would make sense to completely de-solder a heat exchanger of this size just to clean it! Either way I made a lot of progress with mechanical cleaning and improvisation at this point and it’s looking pretty good! I’ll let the heat transfer capability tell me what to do, whenever I can get around to getting a motor and getting her fired up for the first time. Plenty of work to do between now and then, though! Mocked up the 37” tires today for fun…needed some inspiration.
 

Attachments

Keith_J

Well-known member
3,657
1,313
113
Location
Schertz TX
I've been repairing radiators as needed, it isn't easy to perfect the skills. First is desoldering tank to tubesheet and these are huge tanks. Too much heat damages the core, I've yet to find a source for new cores. An ash vacuum works well but not OSHA approved, lead dust caution here. Blasting molten solder with compressed air is messy and OSHA violation.

Leaking tubes are typically bypass soldered at both ends by professionals, I only solder the leak itself if the damage is from the outside. Trim fins off and clean to bright brass. Only the smallest holes can be sealed with solder, small patches from cartridge brass works well.

I only rod tubes which don't show flow from a garden hose. Solder bloom is easily removed with a wire brush when hot and fluxed with ammonium chloride. Replace solder with 85-15 Pb-Sn. This has a higher melting point than 60-40 Sn-Pb uses for tubesheet to tank joint. Make sure the entire surface is coated in solder.

I had the most trouble when soldering the tanks to the tubesheet until I submerged the core in water to within an inch of the tubesheet. This prevents desoldering of the tube to tubesheet joints.

Careful with air testing, I use a cut motorcycle inner tube to connect the inlet to outlet. It limits pressure and provides a good attachment with a clip Chuck. Remove the valve core for higher flow. Soapy water is all that is needed.

Clean the now leak free radiator in hot water as all traces of flux must be removed. Paint when dry.
 

DIVE DIVE

Well-known member
Steel Soldiers Supporter
217
772
93
Location
Chesapeake, VA
I've been repairing radiators as needed, it isn't easy to perfect the skills. First is desoldering tank to tubesheet and these are huge tanks. Too much heat damages the core, I've yet to find a source for new cores. An ash vacuum works well but not OSHA approved, lead dust caution here. Blasting molten solder with compressed air is messy and OSHA violation.

Leaking tubes are typically bypass soldered at both ends by professionals, I only solder the leak itself if the damage is from the outside. Trim fins off and clean to bright brass. Only the smallest holes can be sealed with solder, small patches from cartridge brass works well.

I only rod tubes which don't show flow from a garden hose. Solder bloom is easily removed with a wire brush when hot and fluxed with ammonium chloride. Replace solder with 85-15 Pb-Sn. This has a higher melting point than 60-40 Sn-Pb uses for tubesheet to tank joint. Make sure the entire surface is coated in solder.

I had the most trouble when soldering the tanks to the tubesheet until I submerged the core in water to within an inch of the tubesheet. This prevents desoldering of the tube to tubesheet joints.

Careful with air testing, I use a cut motorcycle inner tube to connect the inlet to outlet. It limits pressure and provides a good attachment with a clip Chuck. Remove the valve core for higher flow. Soapy water is all that is needed.

Clean the now leak free radiator in hot water as all traces of flux must be removed. Paint when dry.
@Keith_J this is what I appreciate from you, outstanding input, thank you.
 

adf5565

Well-known member
Steel Soldiers Supporter
316
579
93
Location
Tioga, PA
I hear you. I’m not sure that I need that level of cleaning quite yet. Frankly, I’m not sure that even 40 years ago it would make sense to completely de-solder a heat exchanger of this size just to clean it! Either way I made a lot of progress with mechanical cleaning and improvisation at this point and it’s looking pretty good! I’ll let the heat transfer capability tell me what to do, whenever I can get around to getting a motor and getting her fired up for the first time. Plenty of work to do between now and then, though! Mocked up the 37” tires today for fun…needed some inspiration.
Looks a lot better for sure. How did you go about the mechanic cleaning? Small brush or something else?
 
Top
AdBlock Detected

We get it, advertisements are annoying!

Sure, ad-blocking software does a great job at blocking ads, but it also blocks useful features of our website like our supporting vendors. Their ads help keep Steel Soldiers going. Please consider disabling your ad blockers for the site. Thanks!

I've Disabled AdBlock
No Thanks