Alucard-HD
New member
- 71
- 0
- 0
- Location
- PA
Does anyone have a wiring Diagram for a M1008 or know of some where i can one. Me and a friend are converting this truck over to he push button setup.
Steel Soldiers now has a few new forums, read more about it at: New Munitions Forums!


No, but i am now.Did you try "Search" for "Glow plug wiring diagram" ? Wayne
Ok i couldnt find it, why is everyone saying the GP is only 12V when i put 12v plugs in my truck and they fried. here is were i bought my new plugs and they are 24v SSDiesel Supply :: GM 6.5 TD Specialists
Also is that huge resistor thing required when runing the push button?
Great thank you very much...They fried because your BIG resistor has been disconnected. They are getting the full 24v. I would bet your "new" plugs are fired also.
The wiring diagrams are located in the Appendix F of the -20 and and Appendix E of the -34 manuals.
The plugs you bought are not true 24v plugs. They are used in 24v systems. They are the same as the Welman 070 12v plugs.
If the plugs are connected to the 24v terminal block, yes you will need the big resistor. If you hook them up to the 12v terminal block, no you do not need the resistor.
My advice to you is to download the the -20 or -34 manual, copy and print the wiring diagrams, and physically check to see how your truck is wired.
I just did a search on " glow plug wiring diagram" and found many links, this being one of them. It explains the function of the resistor. http://www.steelsoldiers.com/cucv/28290-m1008-resistor.html And in post #31 on page 4 has the Glowplug wiring diagram.
Thanks for the info, i bought the truck and the resistor wasnt on. How would i go about putting one on? Also will i need that or the card i fried to run the push button. heres a pic of the fried card.This is a frequent question, so just to restate it, the stock glow plugs in the CUCV's are designed to run on a 12V system. The reason we are able to use the 12v plugs is due to the big resister on the firewall being part of the circuit. If you want to use 24V plugs just bypass the resistor. If you want to use the 12V plugs without the resistor you need to move the wire that feeds the resistor over to a 12V source instead of the 24V one that it is attached to.
If you bought 24V plugs to use I would try to use them before buying new ones by altering the wiring to bypass the resistor. Test them first with an ohm meter, should shouw a very low resistance reading. Stock plugs would probably show .5 - 1.5 ohms, I would think that the 24V plugs would be similiar or slightly lower.
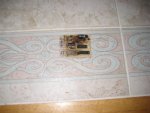
I'm really confused. You previously told us that the resistor was disconnected. Now you say it wasn't on the truck. You want to add a manual switch but have no idea how because you don't know if you need to replace the card. (that burned card is not part of the glow plug system)Thanks for the info, i bought the truck and the resistor wasnt on. How would i go about putting one on? Also will i need that or the card i fried to run the push button. heres a pic of the fried card.
Not there, not connected whats the difference? all and all it isnt doing the job.I'm really confused. You previously told us that the resistor was disconnected. Now you say it wasn't on the truck. You want to add a manual switch but have no idea how because you don't know if you need to replace the card. (that burned card is not part of the glow plug system)
Spend a couple of days reading the manuals, checking your wiring and learn how to troubleshoot the glowplug system.
I am no expert on the CUCVs but I have spent weeks if not months reading the Tech Manuals and past posts and I have learn how these things work.
Later
And how do you know that the resistor wouldn't do its job if it where connected?Not there, not connected whats the difference? all and all it isnt doing the job.
For the record and so i know what was that card that was burnt?
And how do you know that the resistor wouldn't do its job if it where connected?
Lets look at the burnt card. Let say that I am new to the CUCV and I was trying to find out want something was that was connect to some wires.
I asked a question in another thread http://www.steelsoldiers.com/cucv/49040-m1008-glow-plug-issues.html and told them it wasn't in the BIG box but was in a smaller box and a user told me that it might be part of the diagnostic system.....and to read the CUCV Forum WiKi page, download the Tech Manuals and read the wiring diagrams......hmmmm
So I go to the CUCV Forum CUCV - Steel Soldiers::Military Vehicles Supersite ,
open the CUCV FAQ Wiki Cucv - Steel Soldiers::Military Vehicles Supersite
and download the -34 manual http://old.steelsoldiers.com/index.php?module=pagesetter&type=file&func=get&tid=1&fid=file&pid=10
I then look at the wiring diagram for the Diagnostic System.
What am I looking for???? I know the card is by the diagnostic port and is in a blackbox that has 7 wires coming out of it. I wonder what the wire colors are?
Lets see, brown, black, black, purple, blank, dark green, tan and light green.
Now the user told me it might be the Resistor Board or the Tach Buffer Module.
The Resistor Board has 13 wires in it so that can't be it.
How about the Tach Buffer Module? I see the wire colors: brown, black, black purple, dk green, tan and lt green. Wow I think I found the part. The guy must have known what he was talking about!!!
-------------------------------------------------------
Your burnt card is the Tach Buffer Module and is used with the STE/ICE Diagnostic system. It is not part of the glowplug system. You do have an issue as to why it fried and you need to see where the short is but that is another issue.
Members of this board are more than happy to help with issues, but when the poster asks the question multiple times in different posts and then doesn't accept/listen to the info provided, that causes problems.
I will agree that some posts/answers are garbage, but when you have someone that takes the time to try and make the asnwer as clear or detailed as possible. you need to listen, and learn until you can become an expert.
Good luck with changing out your Glowplug system to a manual switch
We get it, advertisements are annoying!
Sure, ad-blocking software does a great job at blocking ads, but it also blocks useful features of our website like our supporting vendors. Their ads help keep Steel Soldiers going. Please consider disabling your ad blockers for the site. Thanks!