• Steel Soldiers now has a few new forums, read more about it at: New Munitions Forums!

  • Microsoft MSN, Live, Hotmail, Outlook email users may not be receiving emails. We are working to resolve this issue. Please add support@steelsoldiers.com to your trusted contacts.

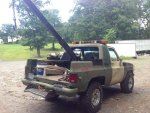
M1009 converted to small pickup (The Mule M1009) very handy little vehicle

cucvrus

Well-known member
11,473
10,434
113
Location
Jonestown Pennsylvania
I am trying to learn to post the pictures. I have help from a young Mexican boy and he is well versed in the use of the internet. He said this is not a very user friendly site to post pictures easily. I will work on it. Someone wants to move the pictures to my previous pictures fine. If not throw them out. I am just practicing at this point.
 

Attachments

Last edited by a moderator:

MarcusOReallyus

Well-known member
4,524
816
113
Location
Virginia
No harm done. I am trying to learn to post the pictures. I have help from a young Mexican boy and he is well versed in the use of the internet. He said this is not a very user friendly site to post pictures easily. I will work on it. Someone wants to move the pictures to my previous pictures fine. If not throw them out. I am just practicing at this point.
:beer:

You've got it, boss!
 

Recovry4x4

LLM/Member 785
Super Moderator
Steel Soldiers Supporter
34,012
1,808
113
Location
GA Mountains
It looks like the front wall from a pickup bed. Clever idea. Who needs an $1800 enclosure.
 

cucvrus

Well-known member
11,473
10,434
113
Location
Jonestown Pennsylvania
M1009 short bed conversion

I will explain the details tomorrow on my short bed canvas top conversion. I typed it twice here at home and was unable to post. Picture posting at home no problem. I don't know why?
 

Attachments

Skinny

Well-known member
2,130
488
83
Location
Portsmouth, NH
Pretty rust free truck for PA!

I dig the turn signals integrated into the grille like the quad headlamps have, then putting some type of aux light in its place. Hmmm.....
 

cucvrus

Well-known member
11,473
10,434
113
Location
Jonestown Pennsylvania
First a little history on the (Mule) M1009. I bought it in 2006 at a scrap sale. It was without tires, wheels, alternators , starter and the inside was shoveled full of garage floor sweepings and it appeared to be 500 lbs of broken safety glass. There were 4 of the M1009 Blazers in this condition in 1 lot. I bought them as scrap residue. They were neatly stacked on top of each other 2 piles 2 high. Oh the joy of it. When I went to look at them I was excited because 2 of the 4 had new rear gates on them. They also had new fenders on one and a new hood. I bid accordingly. When I paid and went to pick them up different story. They put the fork of the loader against the back gate and pushed it down over the new hood and fenders. In one move all the new sheet metal was wasted. The other new gate suffered the same fate but was salvageable. They did all of this moving prior to my arriving and were kind enough to set them near the gate so I could put wheels and tires on them to towbar them home. I did 4 round trips that day to get them out of there. The towbar was well used. 3 of the 4 ran when I got them home and they all were full of fuel. To my surprise all 4 had an FM97. Great. I went to work. I fixed the first one. That is pictured in the post as the one with the HID KC daylighters. That I drove for the past 8 years and put 60,000 miles on it. It is currently at 120,00 and will be up for sale soon. Perfect vehicle in excellent condition. More on that later. The second one is the Mule. That I had a lot of changing to do. Should I continue with this story? Survey says?
 

cucvrus

Well-known member
11,473
10,434
113
Location
Jonestown Pennsylvania
As always I did a complete cleaning of each vehicle and inventory of all parts and condition and estimate the cost of replacement parts. I wanted a real change to make the Mule. I wanted to do it with what ever I had in my stock pile of parts. I also decided early on that I would not repair any of the body dents and would just make everything 100% funtional. No add on accesseries or anything just bare bones all go no show. I even opted to repair the inner front fender aprons verses replacing them. Hey watch the pennies and the dollars take care of themselves. I started by attaching a starter and 2 new batteries. Changed the oil and filter and filled the radiator with antifreeze. Turn the switch it cranked but no start. Well 1 of the 4 had no hood and it had rained down the intake. Engine scrap in that one. Logbook was in that glovebox and showed that the injection pump was replaced in 24 July 2005. Less then a year ago and had less then 100 miles on it. I removed it put it on my project Mule. Purged the air and fired it up. The dust and mouse nests fell from the exhaust. Next I stretched a belt over the water pump and lower pulley and left it idle while I worked on other things. I like to wake these engine calmly not rev and beat the crap out of them. The mule had been sitting since 1996 and not been run. It only had 12 miles on it since the oil was changed 10 years previous. I shut it off and drained all the fluids went to work rewiring both of the alternators and doing other odds and ends repairs to the wiring and under the hood. I pressure washed everything with steam and simple green to get rid of the mouse smell and stripped the inside completely out. I mean completely. Heater box, instument cluster, all the firewall insulation all the seats, doors , rear gate , hood , brush guard , bumpers , roof , front inner fenders and batterie boxes and all the axles and driveline parts. The driveshafts were both junk. I then went to work at everything 1 piece at a time. I completly went over the engine and what was rusty I painte or undercoated with 3M undercoating. This was scrap undercoating that I kept from the undercoating totes that we use at work. The bottom of the barrel. Freebie stuff. I undercoated the underside of the hood and inner fenders and fender aprons and fixed the common inner fender holes with 1/4" black plastic mudflap material cut and screwed in to place. Never hurt a thing looks good and does the job it was intended to do. Freebie stuff. Anywhere that I found a rust hole of perforation I cut out and used sheet metal from a donor CUCV at the same spot on the body and made a patch. I used the 3/16" HD steel rivets and riveted it over the cut out and prepped hole. Freebie parts from junk fenders and hoods. I used a left replacement rocker panel and glue it over the old rocker panel after I cut all the rust out and prepped the surface with rust inhibitor. $20. for both at a swap meet. I bought about 10 sets 20 years ago. I sanded all the doors on the inside at the bottom and primed and re seam sealed them. $50. zinc primer and seam sealer. I got back to the rear gate. Well as you know the rear gate of an M1009 get real expensive fast. Tracks, seals , regulator , crank , and all other parts $500. gos real fast. The light bulb shone brightly at this time. Into the barn I went and out with a M1008 tailgate and hardware. the perfect fit and funtion. They should have all had this set up and a top gate with the glass in it. Better yet spit barn doors like an astro van 2 uppers and 2 lowers. I went to the suburban and checked out the rear barn doors no good. Back to the truck tailgate. Perfect. From the parts pile $0. complete gate. More later. I need to work now.
 

cucvrus

Well-known member
11,473
10,434
113
Location
Jonestown Pennsylvania
I had a seat out of a 1996 GMC top Kick chassis that was the seat for my project. It was a new takeout and was cut down in the middle for the stick shift it worked perfect. I made seat mounts to fit the floor out of 1/4" X 3" flat bar and elevator bolts for studs. That way I never had to drill any holes. I utilized the stock M1009 seat mounting holes that were in the floor. The seat fit perfect and was a grey vinyl so it matched OK. And the price Freebie. More later.
 
Last edited:

cucvrus

Well-known member
11,473
10,434
113
Location
Jonestown Pennsylvania
OK I had everything all figured out and the time came for reassembling the entire vehicle. I removed and replaced the rear wheel cylinders, master cylinder, front brake calipers front brake hoses rear brake hose, axle seals all 3 E-brake cables and new brakes front and rear. I put all new greasable u-joints at everypoint. Replaced the tie rod ends, steering stabilizer, sway bar bushings and spring and shackle bushings and drag links. Power flushed the entire brake system and reassembled. They were not all bad but I was building a dependable daily driver. I pulled the tranfer case and resealed the case and replaced the seal and gasket. Serviced the transmission and power flushed the entire cooling system and replaced the heater core as a precaution. I think my Autozone bill was less then $300. for everything and the parts were Lifetime Warranty. As I stated I was looking for an all go no show vehicle with just function and reliability. The OEM exhaust was intact except the tail pipes but they were still there so I passed on them. They lasted a while. The left side 3 years and I needed and used a used muffler and tailpipe. $0. from salvage I replaced both tailpipes at that time. Just last Friday I went to replace the right muffler with a used one and to my surprise I could not find a used muffler how sad. I went to the muffler shop and they put it up on the lift. This thing was built sometime in 1983 so we were looking at a 31 year old muffler and header pipe. I hate the sound of leaking exhaust. Well the PB blast on the 3 studs and a 3/8" ratchet and off with the exhaust. I still retain the OEM saddle clamps that are holding the exhaust on. During my rebuild I did cut all the 5/16" bolts and replaced them with grade 8 5/16 and never seize. Any way $225. later new exhaust. That is aluminized pipe and muffler on the right side only. Not bad for 31 year old vehicle. Ok back to the build. I wanted to share how frugal I am with this machine. I will replace the left side when it needs it. It is not leaking and has no function but to divert the exhaust to exit the vehicle. I went to the idea of how to close the cab area of the M1009. I had M1028 and M1008 cabs and was going to cut one to close off my M1009.The interior sheet metal work was what stopped me. I did not want the amount of work that it was going to take to make it look descent. And besides I wanted the open air model. Well the front bed wall was the best idea and I had it in stock and it was a new takeoff from a conversion that was done in the early 80's. I cut the top tube and fit it percisly in place right against the bed floor of the M1009 and anchored it to the riser flange with M6 lag bolts. Perfect. I used aluminum 1/8" x 1" x 1" aluminum formed angle to contour the sides to the inside of the side walls and riveted the angle to the inner bed wall of the M1009. 3/16" stell rivets # 11 drilled holes. Rememeber I did not want to change anything that could not be removed and return the M1009 to OEM. With the bed wall in place I took the sawzall out and hacked the fiberglass roof in half. Cut like hot butter. I measured about 10.5" and cut it straight across. I fit it in place and sanded it and cut pices out of the rear roof area to fill the voids that were small cresents from the side rear glass. I glued them in and sanded and painted the entire little roof 383 CARC green. $0. scrap roof scrap paint. I drove it that way for 1 year and then the idea hit me to make a back. I had cut down the bows from the M1008 and the tarp but I was not happy with that it was a mess to keep tight and the front never sealed properly. Scrap all that. Big loss. i destroyed 2 sets of cargo cover bows and a cargo cover. then I saw a HMMWV at the Gap that had a tarp on the back. I looked and thought that is it. I went on Ebay and found a guy selling them dirt cheap used. $50. I purchased one and set cutting a sewing and cutting and sewing. Alot of Budweisers and more figuring and cutting and sewing. Well in the end it is velcrow all the way around the top and the bottoms have parachute adjustable buckles and good old footmans loops. On the side and 3 footmans loop on the rear. I had to buy OEM AM general loops for the rear so the hooks fit them. They were cheap. $15. for all 3 delivered. Well that is about all on the top. Next we will talk paint on this low budget build. Do you want to hear more?
 
Top
AdBlock Detected

We get it, advertisements are annoying!

Sure, ad-blocking software does a great job at blocking ads, but it also blocks useful features of our website like our supporting vendors. Their ads help keep Steel Soldiers going. Please consider disabling your ad blockers for the site. Thanks!

I've Disabled AdBlock
No Thanks