• Steel Soldiers now has a few new forums, read more about it at: New Munitions Forums!

  • Microsoft MSN, Live, Hotmail, Outlook email users may not be receiving emails. We are working to resolve this issue. Please add support@steelsoldiers.com to your trusted contacts.


M101 A3 Build Utility, Camping, etc.

garwhal21

New member
10
0
1
Location
Salt Lake City Utah
HarleyHouse and Marcus, thank you both for the quick update. The plates on the trailer that support the bows may be strong enough. I have been trying to figure out if I can weld some receiver tubes in a 90 degree fashion (lateral view) and then fab some 2-3 square beams that can slide in and out. I have not had much luck finding many people who weld with aluminum in my area. The trailer is in such pristine condition, I am nervous for the "guy" who can do it. Harley, I like your tent deck. I was also the person that bought the m105 trailer about 3 months ago and had a bad painting experience with a company. I had installed a vertical hitch mount in lieu of the pintle hitch. But after towing this m1101, I love the pintle.
 

harleyhouse

Well-known member
1,256
29
48
Location
Oakmont, Pennsylvania
The 1101 has the nut inserts in the wall and with the right bracket bent up, It would be simple to make a rack.
I would not go wider than the trailer. Or just use the brackets you have and weld to those. Look for boat repair shops
or large sign making shops. They fab aluminum.

Post what you come up with so when I find a 1101 or 1102 I can steal the idea!
 

Attachments

themelon

New member
14
0
0
Location
Frisco, Texas
I wonder why you like that particular build...

I am going a similar route on my M101A2 to what you and TexasFJ did, matching wheels and tires to my truck. 2004.5 2500HD with LT285/75-17 Goodyear Wrangler Duratrac. Funny thing is each wheel and tire set is about the same price as what I paid for the trailer. It will be nice to have a universal spare though.

About the "dump bed" non-feature, has anyone fabricated proper tongue piviots to remove the fragile angled connection so it is at least sturdy enough to take higher angle unloaded movement? I'm thinking about doing that for the sole purpose of being able to stand it on it's butt, with a proper cart of course, so I can roll it in and out of a more compact storage location. I could completly disconnect it but I'd rather have it all in one package.
 

justinh

New member
30
0
0
Location
chino hills, ca
It sounds like my axle is still about a week out. Making a "to-do" list in the meantime, still hope to get it all knocked out in one day (or a few evenings) once the axle comes in.

Some things I was on the fence about doing (non-necessities) may get done since I've got the help right now of a great friend who has many more tools at his disposal than I do currently. So, I'll probably pick up a receiver tube for the rear of the trailer this week and I'm still undecided on whether I want to recess lights into the rear crossmember or just stick with the ones I mounted underneath.

I will probably end up doing something custom with the wheel wells too since I have the A3 tub with the wider flares but am towing it with a narrower vehicle. With my new axle and smaller tires/wheels they are overkill and just asking to get run into stuff. I've got a plan to narrow them up and reinforce the edges but we'll see where they end up once the new axle is under it.
 

garwhal21

New member
10
0
1
Location
Salt Lake City Utah
So I have spent the last three days searching all forums for information on wiring and I am not finding what I am trying to do. I am trying to convert the wiring to just 12v. I have an adapter and that works but I want to take the original wiring into the seven pin. All I am looking for is a color chart of the wires and which goes where. Everything is painted at the junction box and I can't tell any of the numbers. Somewhere someone has a color chart. I have a picture of the endImageUploadedByTapatalk 21370609497.431866.jpg
 

ALL4GLH

Member
41
0
6
Location
Watertown / Ft. Drum, NY
Found this on another website, it was a good start:

Pin A - Convoy light (one of the blackout lights)
Pin B - Left Turn (wire is Red with a White Stripe) Tag# 22 461
Pin C - Convoy light
Pin D - Ground (wire is Black with a Red stripe) No tag number - ground lug
Pin E - Tail (running) Lights (Wire is Red) Tag# 21 489

Pin F - Spare
Pin G - Not Used
Pin H - Convoy Light
Pin I -
Pin J - Right Turn (wire is Black with White stripe) Tag# 22 460
Pin K - Aux Feed (I put 12v to this) Tag# 37
Pin L - Not Used
Pin M -
Pin N -

Another method, although a little backwoods, will work. I used a spare 4 wire harness with bullet connectors crimped and then pulled apart the connectors at the junction of the trailer and just went one by one to see what had what function. Then I used a multi-meter to see what connector went to what color wire. Took me about 20 minutes to get it done. I did that before I found the above references. If I used above it would have taken me less time.
 
Last edited:

MarcusOReallyus

Well-known member
4,524
811
113
Location
Virginia
Another method, although a little backwoods, will work. I used a spare 4 wire harness with bullet connectors crimped and then pulled apart the connectors at the junction of the trailer and just went one by one to see what had what function. Then I used a multi-meter to see what connector went to what color wire. Took me about 20 minutes to get it done. I did that before I found the above references. If I used above it would have taken me less time.

Nah. You'd have still metered it out to make sure. :D
 

justinh

New member
30
0
0
Location
chino hills, ca
Well my axle finally came in, there was no way the nearly 85" width was going to be functional for me, especially when 5" of either side is just fender flares waiting to get bashed up even more. I'll be towing this thing with a 3rd gen 4runner and even with my really wide flares (on the 4runner) I'm not quite as wide as the trailer bed (very close).

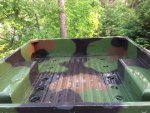
I haven't seen this really documented on here in other build threads (but I didn't specifically look for it either) they essentially moved the entire wheel tub out nearly 5" on the A3 to better match the track width and allow the space for the Humvee tires. This meant that my inner wheel well tub is 5" wider than my frame. Easy enough to solve with a grinder and a welder. We cut out the entire wheel well tub, trimmed the floor back to the frame width and rewelded the entire wheel well tub like an A2 would have had it. My trailer is a bit of a "hybrid" now I guess. I would have probably been better off starting with an A2 but the A3 is what was available local to me at the time.

I flat ran out of time on this project, and the welder ran out of gas at about 9pm tonight. But, everything is in and for better or worse this thing is headed cross-country tomorrow.

I really can't thank my friend Mark enough for his welding work and shop space. We ended up fully welding the new "tongue" to the original tongue, we reused the safety chain mount by welding them to the bottom plate and he did some finish work on my front receiver tube, etc. Then we added a short receiver tube to the rear (for a slide in table that is yet to be built and bike rack), swapped the axle and moved the fenders in about 10 hours worth of work spread over two days.

It isn't finished, when I get back from this trip we are going to do some finish welding on the fenders but everything is functional.
 

MarcusOReallyus

Well-known member
4,524
811
113
Location
Virginia
We cut out the entire wheel well tub, trimmed the floor back to the frame width and rewelded the entire wheel well tub like an A2 would have had it.
The one major change I would like to make on my A2 is that wheel well spacing. It's just short of 48" between the wheel wells, which means I can't lay 4x8 sheets in there. Bummer.
 

justinh

New member
30
0
0
Location
chino hills, ca
The one major change I would like to make on my A2 is that wheel well spacing. It's just short of 48" between the wheel wells, which means I can't lay 4x8 sheets in there. Bummer.
That is definitely a drawback, but I don't haul plywood very often and never in any quantity. In the grand scheme of things it was a tradeoff I was willing to make as I wanted the trailer much narrower. It would have been nice to trim the fenders off and build a new lip but then fender wasn't really wide enough then.
 
Top
AdBlock Detected

We get it, advertisements are annoying!

Sure, ad-blocking software does a great job at blocking ads, but it also blocks useful features of our website like our supporting vendors. Their ads help keep Steel Soldiers going. Please consider disabling your ad blockers for the site. Thanks!

I've Disabled AdBlock
No Thanks