• Steel Soldiers now has a few new forums, read more about it at: New Munitions Forums!

  • Microsoft MSN, Live, Hotmail, Outlook email users may not be receiving emails. We are working to resolve this issue. Please add support@steelsoldiers.com to your trusted contacts.


M1088 camper conversion

ckouba

Well-known member
Steel Soldiers Supporter
562
1,527
93
Location
Oregon
Making progress on a few fronts. Assembled the two tilting pedestals, recording this fascinating video for you. Do yourself a favor, watch it at 2x speed:


Also now trying out tire balance beads, but don't want to see them potentially sucked up the CTIS line. So I installed sintered brass filters at the wheels. They seem to allow pretty good flow but will also prevent beads from "migrating" out of the tire. Given the way the liners isolate the main volume of the tire (where the beads are) from the CTIS line, it seems like this may have been overkill, but there still is the potential for the beads to make their way there- and it'd only take one.

It is a LOT of work- remove the wheel/tire, break it down, remove the brass line, drill it out (7/16" hole for the 1/4" NPT thread), tap the new hole, thread it, re-install, reassemble the wheel/tire, reinstall wheel/tire on truck, but I imagine chasing beads out of the CTIS would be a little more annoying.


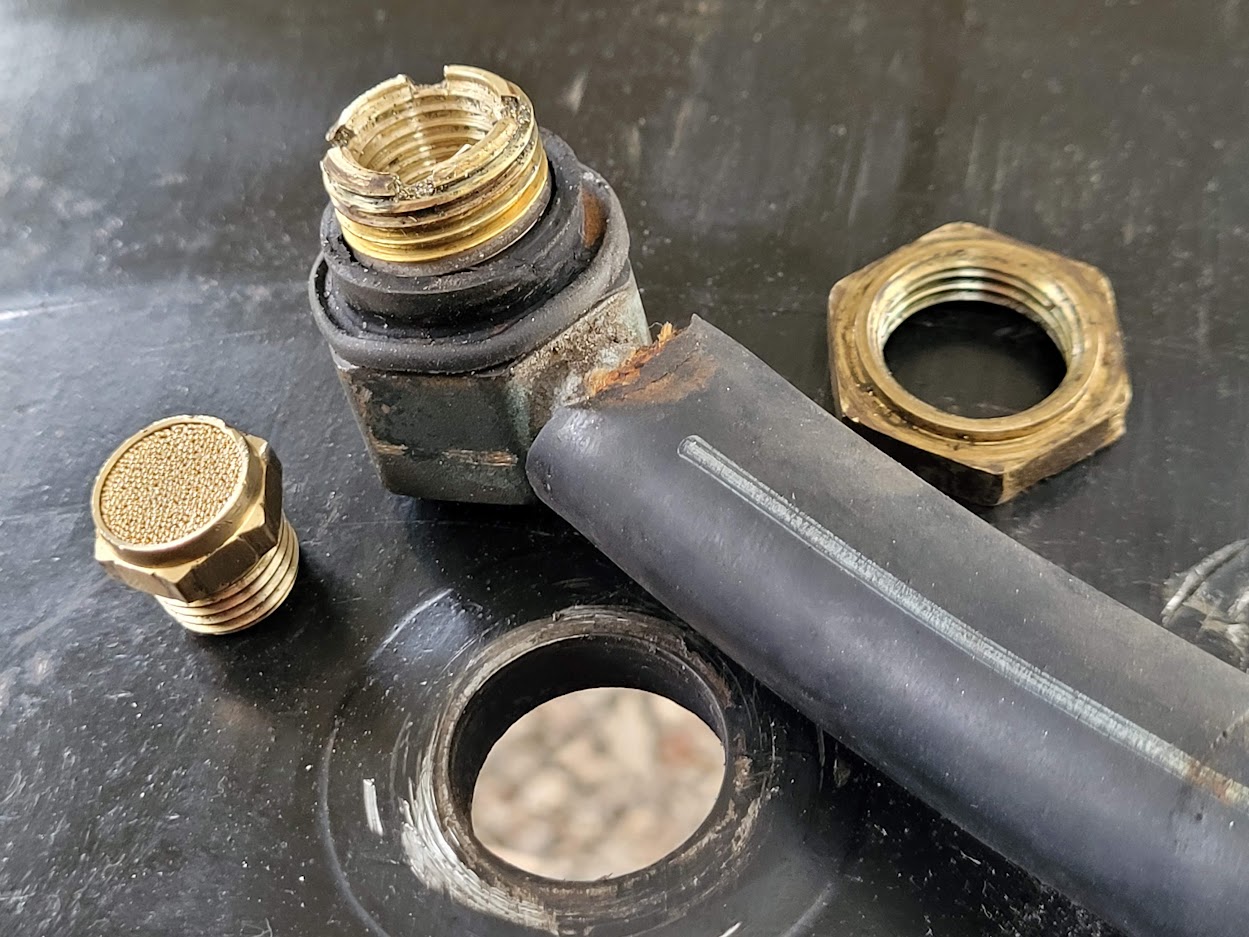
Due to the taper of NPT threads, it took a bit of effort to get the filter threaded but it all worked out. I also turned off some of the threads from the filter to reduce its overall length so it's as low profile as possible to get under the bead. It wasn't too bad to get the wheel back in the tire but it may require some additional effort next time the wheel and tire are split apart.

In addition, I have assembled the solar and shore power components onto a fixture and have it prepped for install. At this point I need to wire them up so I can get them into their assigned places. Once that's done, I'll need to get the panels attached to the roof and shore power wired, at which point I will be sufficiently functional.

That's still a few weeks out though. Unfortunately our trip in May got scrubbed, but that does get me more time to tend to other things.

I am checking out a local truck this week with the Eco hubs installed on it. If it's as good as it sounds, there's a set of these in the future for this rig as well. Would be very excited to see how they'd work out with the 3.07 axles.
 

ckouba

Well-known member
Steel Soldiers Supporter
562
1,527
93
Location
Oregon
I know it's won't be apples to apples but I went for a ride in a 1079 equipped the new Eco hubs (spider gear delete kit). I think this is a game changer. I am willing to roll the dice and see how they do when pushing my 3.07's instead of the stock 3.9's. It may be a bridge too far, but for the fuel savings and spinning the driveline at HALF(!!!!!) speed, I will go back to 3.9's if need be. The spider delete just makes sense for my mission profile.
 

ckouba

Well-known member
Steel Soldiers Supporter
562
1,527
93
Location
Oregon
I had forgotten how much fun it is to break down and reassemble the tires.

Not really....

The past two weeks was a great trip down memory lane. I went 5 for 5 pretty uneventfully with only one or two do-overs. Number 6 took me 3 days and about 6 tries to get it remounted without issues. At first I couldn't tell where it was leaking, then got a liner hung up on the o-ring holder, then it still wouldn't seal, so I swapped out the inner wheel, and then swapped in a fresh o-ring. The only good news to come out of this is that I confirmed I can still get the wheel out even with the extra height of the sintered filter.

But the other piece of good news is that the work appears to be all worth it. It feels like the balance beads are doing their trick. The only vibrations which seem to resonate now feel like they are tread-based, not from some sort of imbalance. I was hoping it would be this good of a change and it just may be. I need some more miles under me to convince me it's real, but it's definitely encouraging.

Now that I've written this, I remembered I still need to do the spare. So that's still waiting for me as well.
 

ckouba

Well-known member
Steel Soldiers Supporter
562
1,527
93
Location
Oregon
It's been a productive couple of days. I now have 4 panels on the roof, including two which tilt- extended:


Retracted:


Video of retraction (recommend watching at 2x if you watch it at all):

Was run off the visible power supply, so everything still needs to be wired in, but this was a massive step forward with the weather finally shaping up long enough to let me do it.

I also have several hundred $'s worth of copper wire on my table which I am building cabling for the electrical system. The shore power inlet has been installed and now need to get the components on my table into the cabin and all wired up. I know it will take a while but feels like I can see the end of the tunnel.

In other news, my hubs are on their way. I have the CTIS seals, just need a supply of spacers and I am ready for when those show up. Will be interesting to see how they do with 3.07 gears.
 

ramdough

Well-known member
1,554
1,727
113
Location
Austin, Texas
Hubs showed up today:


Thanks Mike, that was FAST!!!

I will be refreshing all the CTIS seals as part of the swap and am now just waiting on sourcing a complete set (still need the spacers). Definitely looking forward to getting these in though!
Hey, write up and document what you did. I may need to do my seals some day soon too.


Sent from my iPhone using Tapatalk
 

Recce01

Active member
128
50
28
Location
San Diego, Ca
Hubs showed up today:


Thanks Mike, that was FAST!!!

I will be refreshing all the CTIS seals as part of the swap and am now just waiting on sourcing a complete set (still need the spacers). Definitely looking forward to getting these in though!
I really look forward to your report on these. I have been wanting to get a set for ours!
 

phuriousgeorge

New member
7
9
3
Location
Arkansas
Just have to say this build has truly been inspiring. I picked up an M1085A1 earlier in the year and other than going over the stock aspects of it, have yet to start any modifications. Original plans were to leave the bed on and build a removable box for long-term stays to have the truck available, but I'm second-guessing myself now.
 

coachgeo

Well-known member
4,929
3,314
113
Location
North of Cincy OH
Just have to say this build has truly been inspiring. I picked up an M1085A1 earlier in the year and other than going over the stock aspects of it, have yet to start any modifications. Original plans were to leave the bed on and build a removable box for long-term stays to have the truck available, but I'm second-guessing myself now.
hooking up a trailer; box or flat bed, pulled behind the 1085 is significanly easier than removing habitat box from 1085 so you can use the bed.
 

ramdough

Well-known member
1,554
1,727
113
Location
Austin, Texas
hooking up a trailer; box or flat bed, pulled behind the 1085 is significanly easier than removing habitat box from 1085 so you can use the bed.
Also, unless you have a forklift handy, having you bed at 5’ in the air is pretty useless for normal hauling. I would make a box how you want it, then put a drop hitch for a normal trailer.

Just my opinion.


Sent from my iPhone using Tapatalk
 

ckouba

Well-known member
Steel Soldiers Supporter
562
1,527
93
Location
Oregon
A simple check valve replacement cured a nagging air leak. A new valve KN23010 (thanks to the spreadsheet!) behind the front bumper keeps my wet tank pressure rock steady at 123 psi and stopped the way-too-frequent cycling of the compressor/dryer.

On the subject of gearing, I just used it to run errands and get some fuel... truck just feels normal. If you never had the reduction hubs, you'd never really miss them in regular driving- or at least I don't.
 

ckouba

Well-known member
Steel Soldiers Supporter
562
1,527
93
Location
Oregon
Massive forward progress this week- all the things which were on the dining room table are now in the truck!

  • The partial box I built for all the solar components has been transferred into a corner of the habitat.
  • All the components have been reinstalled into the box.
  • Wires have been cut to size and lugged, and those wires have been installed between the components.
  • Batteries have been wired into the system (haven't turned them on yet though).
  • Inverter/charger has been wired into the system (also hasn't been turned on yet).
  • Shore power outlet installed and wired.
  • Tilting function for solar panels wired into habitat.
  • Solar panels are wired in to the habitat, proper voltage confirmed at switch upstream from MPPT controller.

I have a handful of other small tasks to complete prior to flipping the switch, but the heavy lifting has been done and I should be able to go active with the onboard electrical system shortly. This will make it a viable (albeit, primitive) camping rig and ready for a real trip. I learned a military term for it- "Initial Operational Capability".

Since I know threads are useless without pics...

During:


The "after" shot:


My T-fuses arrived will go in today, and all I have left (I think) is to secure the slack and connect the 110 output from the inverter to the 110 side of the panel.

On the one step forward, two steps back though... Something has changed with my air system (coincidently?) since swapping out the front bumper check valve. My cab no longer air rides and my fan clutch no longer disengages. I am truly hoping it's something simple I have overlooked but I really didn't mess with it. The only monkey business was that I had the cab raised and lowered a few times over the course of the last week. Always stumbling across opportunities to familiarize myself with truck systems!
 

ckouba

Well-known member
Steel Soldiers Supporter
562
1,527
93
Location
Oregon
I didn't have a lot of time due to work constraints but I did fire up a battery, confirm the MPPT controller and 24V->12V DC-DC converter are online, and that the panel was 12V energized.... and SUCCESS!! I had illumination in the habitat via its own on board power supply.

I still need to feed the solar harvest into the system (it is wired, just need to energize) so I can confirm I can charge independently, then I'll work in the shore power charger and inverter.

It felt great to have power on board though! Really feels like I'm making progress now.
 
Last edited:

ramdough

Well-known member
1,554
1,727
113
Location
Austin, Texas
I didn't have a lot of time due to work constraints but I did fire up a battery, confirm the MPPT controller and 24V->12V DC-DC converter are online, and the panel was 12V energized.... and SUCCESS!! I had illumination in the habitat via its own on board power supply.

I still need to feed the solar harvest into the system (it is wired, just need to energize) so I can confirm I can charge independently, then I'll work in the shore power charger and inverter.

It felt great to have power on board though! Really feels like I'm making progress now.
Congrats…… major progress here!


Sent from my iPhone using Tapatalk
 

ckouba

Well-known member
Steel Soldiers Supporter
562
1,527
93
Location
Oregon
Officially powered up!


This was ~3p on a mixed sky afternoon, ~70° or so, during a break in the clouds. Very exciting... truck is now a viable (primitive) camping option- bedroom, bathroom, refrigeration, illumination. Everything else is icing on the cake.
 

ckouba

Well-known member
Steel Soldiers Supporter
562
1,527
93
Location
Oregon
With all the progress I've made in the last few days (including large window installs), I thought it was time to get some pics- so it was glamor shots day:


And on the inside...


With the larger windows installed in the galley and dinette area, I no longer feel like I am building a cave. The ventilation with them open is fantastic as well. In addition, the fridge is now wired in and functional. It's starting to feel like a real camper!
 
Top
AdBlock Detected

We get it, advertisements are annoying!

Sure, ad-blocking software does a great job at blocking ads, but it also blocks useful features of our website like our supporting vendors. Their ads help keep Steel Soldiers going. Please consider disabling your ad blockers for the site. Thanks!

I've Disabled AdBlock
No Thanks